Hold the round end
of the Test Strip with
the gray electrode
side up, and insert
the Test Strip into
the Meter until it
stops.
The Meter will run a
quick self-test and
then prompt you to
apply blood by
showing you a
picture of a blood
drop being “sipped”
into the Test Strip.
1. Insert Test Strip
Press Ascensia™
M
ICROLET
®
Device firmly against
puncture site and
press button to
release. Form a
small drop of blood.
2. Obtain Blood Drop
Bring tip of
the Test Strip
to lightly
touch the drop
of blood. Hold
until the
Meter beeps.
The test result
will be
displayed after
a 15 second
countdown.
3. Test Blood Glucose
To turn your
Meter off,
simply remove
the used Test
Strip. Your test
result will
automatically
be stored in
memory.
Dispose of the
used Test Strip
and lancet
properly.
4. Turn Meter Off
Your Ascensia
®
C
ONTOUR
™
Meter
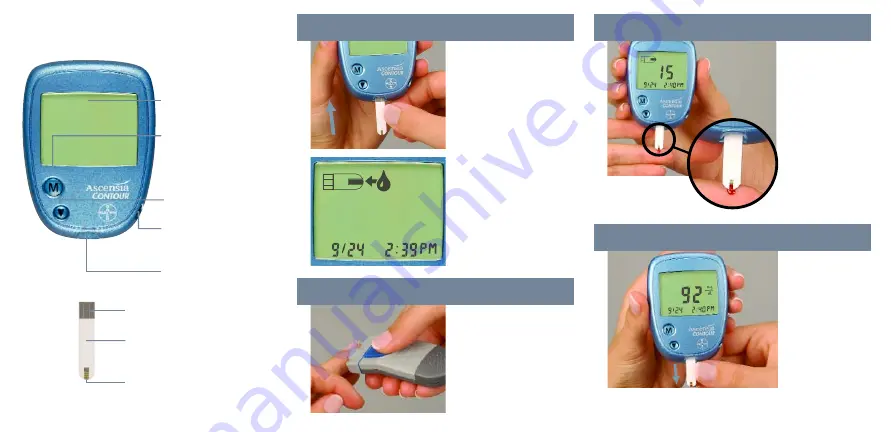
Screen: This is where your
blood glucose result will
display.
Gray Electrode End: Insert this
end of Test Strip into Meter.
Sample End or Tip of Test Strip: Lightly
touch this end of Test Strip to blood
drop.
Memory (
M
) Button: Use to
view results stored in the
memory, your 14-day
average and change Set-up
features.
Scroll (
▼
) Button: Use to
scroll through your blood
glucose results in the memory
and change Set-up features.
Data Port: Allows Meter to
communicate with a personal
computer via a cable.
Test Strip Slot: This is
where you insert the
Test Strip.
Ascensia
®
M
ICROFILL
™ Test Strips: Use
for blood glucose or control solution
testing. Supplied in a handy bottle with
an easy-to-open flip-top lid. No coding
is required.


