


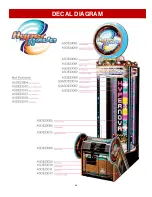


41
BILL ACCEPTOR DIAGNOSTICS
HOW TO UPDATE SOFTWARE
Install new hard drive by gently pushing straight onto motherboard until it “clicks”.
Turn the game back on by flipping the power switch on the power strip.
Locate hard drive on motherboard.
Press tab on far side of hard drive
and gentle remove from motherboard.
Unplug power supply jumper connector
and remove old hard drive from unit.
New Software Installation:
The hard drive contains all the information about the game: Credits per play, ticket pattern, etc.
Be sure to check this information after finishing installing new software.
Turn off game by flipping the power switch on the power strip.
AAMB10E-SHD
Determine if Bill Acceptor has power:
Turn game ON—The bill acceptor should make noise as stacker cycles and
green lights on outside bezel should flash.
If NO power:
Use meter to measure 12 VDC voltage at cable going into Bill
Acceptor from front I/O Aux Board
If power is OK:
Clean Bill Acceptor path to make sure there is nothing jamming
unit.
Check dipswitch settings on side of acceptor.
Make sure switch # 8 is OFF for Always Enable
ERROR CODES
Count the number of flashes on front bezel of Bill
Acceptor and follow on Bill Acceptor chart for
repair instructions.
Note: There are many different models and brands of Bill Acceptors that are used on
redemption games. Your Bill Acceptor may differ from the unit shown. Standard DBA is
MEI # AE2454-U5E Part # A5AC9101
Only use 12 Volt DC Bill Acceptor
The software is programmed onto a SD Card
There is separate software for the game main board and the Marquee Sign main board.
To remove:
Push gently into board and let it pop back out - remove
from board.
To install:
Push gently into board until it clicks.
SD Card part number is AASD0008A - please specify game name
when ordering.
AAMBRPI-HYP
Rasp Pi Board
Micro
SD card
location


