background image

12

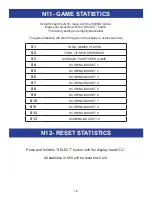
N11- GAME STATISTICS

Scroll through the N15- menu with the “MENU” button.

Make your selection with the “SELECT” button. 

The factory settings are highlighted below. 

The game statistics will scroll through on the display in numerical order. 

S1

TOTAL GAMES PLAYED

S2

TOTAL TICKETS DISPENSED

S3

AVERAGE TICKETS PER GAME

S4

SCORING BUCKET 1

S5

SCORING BUCKET 2

S6

SCORING BUCKET 3

S7

SCORING BUCKET 4

S8

SCORING BUCKET 5

S9

SCORING BUCKET 6

S10

SCORING BUCKET 7

S11

SCORING BUCKET 8

S12

SCORING BUCKET 9

S13

SCORING BUCKET 10

N12- RESET STATISTICS

Press and hold the “SELECT” button until the display reads “CL”. 

All statistics in N15 will be reset back to 0.

Summary of Contents for SWISH

Page 1: ...1 ...

Page 2: ...R code to the right with your Smartphone to jump straight to this game s parts page PARTS P 920 822 3951 X 1101 F 920 822 1496 E parts baytekgames com MON FRI 8 AM 5 PM C S T SERVICE P 920 822 3951 X 1102 F 920 822 1496 E service baytekgames com SALES P 920 822 3951 F 920 822 8936 E sales baytekgames com All games are proudly manufactured at our factory in Pulaski Wisconsin USA Scanhere GAME INSPE...

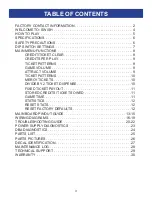
Page 3: ...ATTRACT VOLUME 9 TICKET PATTERNS 10 MERCY TICKETS 10 DIVIDE BY 2 TICKET DISPENSE 10 FIXED TICKET PAYOUT 11 STORED CREDITS TICKETS OWED 11 GAME TIME 11 STATISTICS 12 RESET STATS 12 RESET FACTORY DEFAULTS 12 MAIN BOARD PINOUT GUIDE 13 15 WIRING DIAGRAMS 16 19 TROUBLESHOOTING GUIDE 20 22 POWER SUPPLY DIAGNOSTICS 23 DBA DIAGNOSTICS 24 PARTS LIST 25 PARTS PICTURES 26 DECAL IDENTIFICATION 27 MAINTENANCE...

Page 4: ...this manual and be sure to contact our factory if you have any questions or would like some more information Thank you for your purchase Your business is important to us and we hope you enjoy this game as much as we do Your Friends at Bay Tek Games GAME INSPECTION Inspect the game for any damaged loose or missing parts If damage is found please contact your freight carrier first Then contact Bay T...

Page 5: ...TO PLAY Coin up and hit the start button to release the basketballs Shoot as many hoops as you can in the time allotted Hurry In the last 10 seconds baskets are worth 3 points Grab your tickets and play again ...

Page 6: ...et or shut off the power strip located inside the cabinet Use of flammable subtances can cause sever burns or serious injury Always use NON FLAMMABLE solvents for cleaning DO NOT use gasoline kero sene or thinners Lifting heavy objects can cause back neck or other injuries Be sure adequate lift ing and moving devices are available when unloading unpacking and moving this game Be sure the electrica...

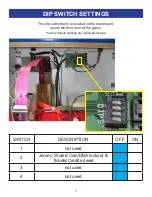
Page 7: ...witch bank is located on the mainboard inside the front door of the game factory default settings are highlighted below SWITCH DESCRIPTION OFF ON 1 not used 2 Jersey Stored Coin DBA lockout Tickets Credits owed 3 not used 4 not used ...

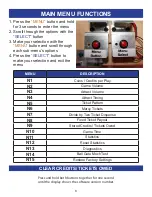
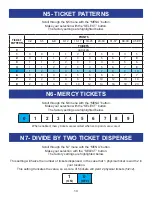
Page 8: ...exit the menu MENU DESCRIPTION N1 Coins Credits per Play N2 Game Volume N3 Attract Volume N4 Attract Timing N5 Ticket Pattern N6 Mercy Tickets N7 Divide by Two Ticket Dispense N8 Fixed Ticket Payout N9 Stored Credits Tickets Owed N10 Game Time N11 Statistics N12 Reset Statistics N13 Diagnostics N14 Ball Gate Mech Test N15 Restore Factory Settings CLEAR CREDITS TICKETS OWED Press and hold both butt...

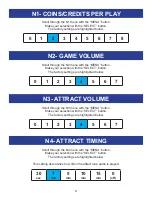
Page 9: ...h the SELECT button The factory settings are highlighted below 0 1 2 3 4 5 6 7 Scroll through the N3 menu with the MENU button Make your selection with the SELECT button The factory settings are highlighted below 0 1 2 3 4 5 6 7 N4 ATTRACT TIMING 30 sec 1 min 5 min 10 min 15 min 0 off Scroll through the N4 menu with the MENU button Make your selection with the SELECT button The factory settings ar...

Page 10: ... 18 20 N6 MERCY TICKETS Scroll through the N6 menu with the MENU button Make your selection with the SELECT button The factory settings are highlighted below 0 1 2 3 4 5 6 7 8 9 When enabled mercy tickets are awarded when zero points are scored N7 DIVIDE BY TWO TICKET DISPENSE 1 ON 0 OFF Scroll through the N7 menu with the MENU button Make your selection with the SELECT button The factory settings...

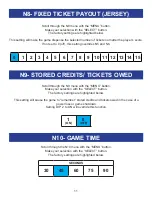
Page 11: ...8 9 10 11 12 13 14 15 N9 STORED CREDITS TICKETS OWED N10 GAME TIME Scroll through the N9 menu with the MENU button Make your selection with the SELECT button The factory settings are highlighted below This setting will cause the game to remember stored credits and tickets owed in the case of a power loss or game shutdown Setting DIP 2 to ON will override this function 1 ON 0 OFF Scroll through the...

Page 12: ...erical order S1 TOTAL GAMES PLAYED S2 TOTAL TICKETS DISPENSED S3 AVERAGE TICKETS PER GAME S4 SCORING BUCKET 1 S5 SCORING BUCKET 2 S6 SCORING BUCKET 3 S7 SCORING BUCKET 4 S8 SCORING BUCKET 5 S9 SCORING BUCKET 6 S10 SCORING BUCKET 7 S11 SCORING BUCKET 8 S12 SCORING BUCKET 9 S13 SCORING BUCKET 10 N12 RESET STATISTICS Press and hold the SELECT button until the display reads CL All statistics in N15 wi...

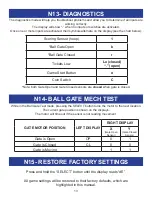
Page 13: ...ir symbols alternate on the display see the chart below Scoring Sensor hoop 1 Ball Gate Open b Ball Gate Closed r Tickets Low Lo closed open Game Start Button o Coin Switch C Note both Gate Open and Gate Closed sensors are closed when gate is closed N14 BALL GATE MECH TEST While in the Ball Gate Test mode pressing the SELECT button turns the motor to the next location The current gate position is ...

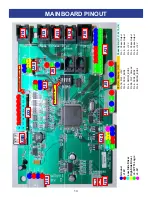
Page 14: ... 7 Ground Pin 4 Chase Output 3 3V TTL Logic Pin 6 SCS2_BUS2 Pin 5 Chase Output 3 3V Pin 8 SMISO_BUS2 Pin 6 12V R R L L USB J19 J24 J9 J5 J21 J14 J13 J11 J12 J10 J6 J25 J8 J22 J18 Flyback Diodes on Q1 Q2 PX37 PB18 PB16 PB17 PB7 PX29 PA06 1 8 9 16 1 3 4 6 1 2 3 4 1 10 11 20 1 5 6 10 PA05 PX10 PX11 Bootloader Jumper PB19 PX39 PX00 PX01 PB20 PX02 PB21 PB22 PB23 PB24 PB25 PB26 Q12 Q10 Q11 Q1 Q2 Q3 Q4 Q...

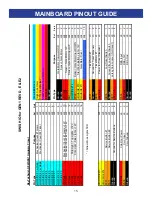
Page 15: ...J22 15 HIGHSIDE 10 Start Push Button Light 12V J24 8 12 Volts J22 16 HIGHSIDE 11 Gate Motor Driver J24 9 3 3V J24 10 Attract Mode Lights TBD PX37 Ticket Notch 1 J5 1 Ground Ground for Ticket Dispensor J5 2 PB18 Ticket Motor 1 J5 3 HIGHSIDE 13 J25 1 12 Volts Power for Ticket Dispensor J5 4 HIGHSIDE 14 J25 2 PX10 Service Button 1 J25 3 PB16 Low Ticket Switch J9 1 PX11 Service Button 2 J25 4 Ground G...

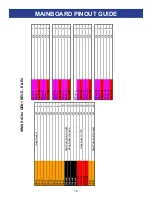
Page 16: ...Push Button Light J21 11 Driver 8 J11 5 Ground Hoop Sensor Ground J21 12 12 Volts J11 6 Ground J21 13 Ground J21 14 Driver 9 J13 1 12 Volts J21 15 Driver 10 J13 2 12 Volts Hoop Sensor 12V J21 16 12 Volts J13 3 12 Volts J21 17 Driver 11 J13 4 12 Volts J21 18 Driver 12 J13 5 PB25 J21 19 12 Volts J13 6 PB26 Start Push Button Input J21 20 Driver 13 J14 1 Driver 14 J14 2 12 Volts J14 3 Driver 15 J14 4 ...

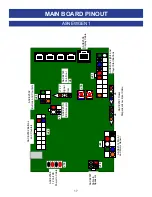
Page 17: ...nters J22 J25 AACE2502 Buttons and Counters J8 AACE2510 Bill Acceptor J21 AACE2002 Lights and Player Start Buttons J24 AACE2512 Motor and Motor Sensor J5 J9 AACE2501 Ticket Dispenser Low ticket Cable J6 AACE2503 Coin Door 12 V Signal Com J19 AACE2507 Cable to Speakers J16 AACE2506 Display Cable ...

Page 18: ...u Button Ticket and Game Counters AACO1000 Ticket Counter Game Counter AACE2502 AASE0020 Hoop Sensor AACE2500 Game Start Pushbutton and Light AACE2514 LED Cabinet Lighting A5PB8000 AACE2512 AAMO1001 Ball Gate Motor AACB2501 Ball Gate Sensor To J25 on Main Board To J22 on Main Board To J21 on Main Board To J24 on Main Board ...

Page 19: ...er Low Ticket Switch Wired Normally Open AASW200 1 4 Spacer A5SENY020 To J5 on Main Board To J9 on Main Board AACE2501 Coin Switches AASW9903 Wired Normal Open To J6 COIN on Main Board AACE2503 Coin Door Harness AACBL4A DOOR IN Time Display AABD4208 IN Score Display AABD4208 AACE2505 AACE2506 AACE2506 To J8 on Main Board AACE2510 Bill Acceptor Cable ...

Page 20: ...trip AACE2504 Line Filter A5FI9010 To J18 POWER IN Connector on Main Board Speaker A5SP1050 To J19 on Main Board AACE2507 To Speaker Power Supply Power Cable AACE2509 Power Supply 12 Volt Cable AACE2508 Power Supply A5PS1001 Green LED power indicator and voltage adjustment pot ...

Page 21: ...supply diagnostics to isolate bad component A bad motor or 12 volt short would cause this See Power Supply Diagnostic below Dollar Bill Acceptor not functioning Ensure Bill Acceptor is set to Always Enable Check for power to Bill Acceptor Dirt or debris in acceptor slot Pinched broken or disconnected wiring Bill acceptor problem Acceptor should cycle stacker at game power up If not check cable con...

Page 22: ...and check wires for continuity AACE2500 back to main board Cabinet Lighting not functioning properly Led s in top of cabinet plug into J21 of main board Inspect cable and sockets Replace cable if needed AACE2500 AACE2514 Tickets do not dispense or Wrong amount dispensed If notch signal is not seen game will stop trying until power reset Press and hold red menu button down to enter menu Enter N5 in...

Page 23: ...lean sensor and check for 5 volts dropping to zero when arm is in front of sensor Replace sensor if needed Check motor for proper resistance and replace main board if transistors are damaged A5NEWGEN1 Ball Gate does not turn Sensor on motor will go to home position at power up If sensor is not seen motor will stop and not start until power is cycled Check 12 Volts at motor on power up Sensor is fa...

Page 24: ...LED Light remains OFF That cable or related compo nent is shorted out See Jumper Cable Pin Outs to see which component might be at fault Short in Main Board Replace That cable is OK Green LED Light dims A related component such as a solenoid is causing an over load See Jumper Cable Pin Outs beginning on page 16 to see which component might be at fault Diagnose Power Supply Power Supply is located ...

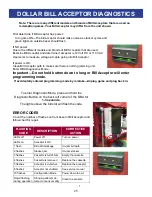
Page 25: ...l flash the code First determine if Bill Acceptor has power Turn game ON The bill acceptor should make noise as stacker cycles and green lights on outside bezel should flash If NO power Due to the different models and brands of Bill Acceptors that are used Examine Bill Acceptor and determine if acceptor is 12 Volt DC or 110 VAC Use meter to measure voltage at cable going into Bill Acceptor If powe...

Page 26: ...eft Decal PART DESCRIPTION A5DE2508 Window Top Right Decal A5DE2509 Window Bottom Right Decal AACB2501 Sensor for Ball Gate AABD4208 Score Time Display 2 per game A5NEWGEN1 Main Board A5TD1 Ticket Dispenser A5PS1001 Power Supply A5LK2000 Cash Box Key A5LK5001 Front Door Key A5FI9010 Line Filter for AC In AASW200 Low Ticket Switch A5CORD Power In Cord A5MI2300 Mirror Surface for Hoop Sensor AAMO100...

Page 27: ...02 AACE2503 AACE2504 AACE2505 AACE2506 AACE2507 AACE2508 AACE2509 AACE2510 AACE2511 AACE2512 AACE2513 AACE2514 AACO1000 AASE0020 AAPB2700 A5SP1050 AACB2501 A5TD1 A5NEWGEN1 A5PS1001 AABD4208 A5LK2000 A5LK5001 A5FI9010 AASW200 A5CORD5 A5MI2300 AAMO1001 A5PB8000 ...

Page 28: ...Decal Bottom Right A5DE2502 Seam Decal Right A5DE2505 Side Cabinet Decal A5DE2506 Window Decal Top Left A5DE2501 Seam Decal Left A5DE2507 Window Decal Bottom Left A5DE2505 Side Cabinet Decal A5DE2500 Backboard Decal A5DE2503 Control Panel Decal A5DE2504 Front Door Decal ...

Page 29: ... LOG If repairs are necessary it is good practice to keep a log of repairs done and parts ordered The chart below will assist you in tracking your game s maintenance DATE MAINTENANCE PERFORMED PARTS ORDERED INITIALS ...

Page 30: ...he quickest and provide you a valuable troubleshooting option Call our technicians to get recommendations for what you should keep on hand for spare parts Technical Support You are the best tool for troubleshooting Your abilities to understand the game and your skills to repair the game are invaluable to us If you need help you know you can call us It s not easy to diag nose a game remotely by pho...

Page 31: ... product or as a result of any unauthorized repairs or alterations The warranty does not apply if any serial number decal is altered defaced or removed from its original position Should you need your game serviced determine the serial number from the decal placed on the front of this manual or locate it on the back of the game Then contact our Service Department at 920 822 3951 or e mail service b...

Page 32: ...32 ...

Page 33: ...33 ...

Reviews: