162579
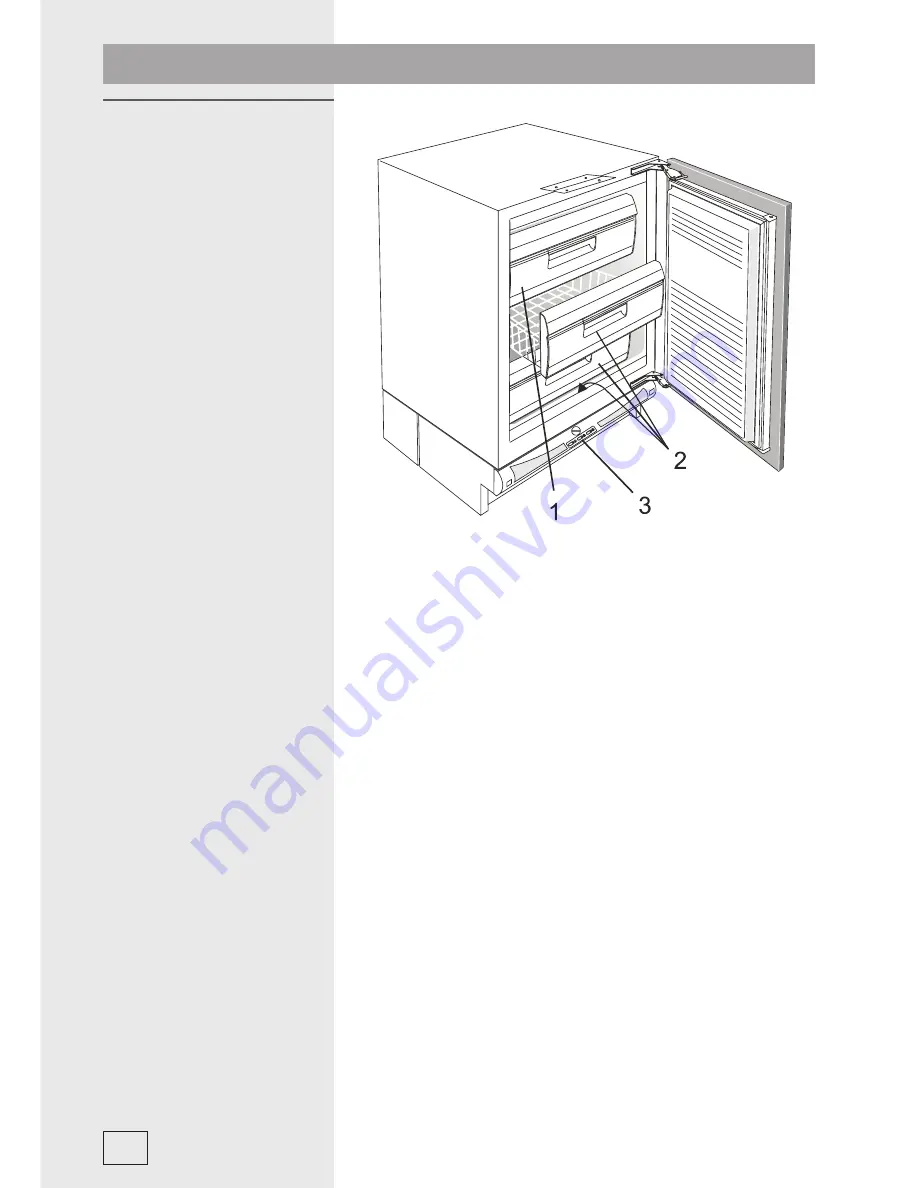
FREEZING COMPARTMENT (1)
is used for freezing fresh foods.
STORING BASKET (2)
is used for storing packages of frozen foods.
CONTROL PANEL (3)
See Operation Controls
6
Using your Baumatic BV14A FREEZER
Your B
V
14A Built-under
Freezer
Page 1: ......
Page 2: ...NOTE This User Instruction Manual contains important information including safety installation points which will enable you to get the most out of your appliance Please keep it in a safe place so tha...
Page 3: ...ur BV14A Freezer 7 Using your Baumatic BV14A Freezer 7 Temperature Selection 9 Proper Freezing Procedure 9 Arranging Food in your Fridge 11 Cleaning Maintenance 13 Never Use Solvents To Clean Your Fre...
Page 4: ...o non grounding of appliance DURING THE GUARANTEE PERIOD ONLY BAUMATIC SERVICE ENGINEERS OR AN AUTHORISED AGENT OF BAUMATIC SHOULD CARRY OUT REPAIRS ON THIS UNIT DO NOT USE IF THE SUPPLY CORD IS DAMAG...
Page 5: ...insert the plug with wet hands Before any cleaning or maintenance work ensure that the appliance has been disconnected from the power supply Never allow the back coils of the Appliance to come into c...
Page 6: ...ctly you will help prevent potential negative consequences for the environment and human health which could otherwise be caused by inappropriate waste handling of this product The symbol on the produc...
Page 7: ...COMPARTMENT 1 is used for freezing fresh foods STORING BASKET 2 is used for storing packages of frozen foods CONTROL PANEL 3 See Operation Controls 6 Using your Baumatic BV14A FREEZER Your BV14A Buil...
Page 8: ...PAGE 14 FOR FULL INSTALLATION ADVICE PLEASE SEE PAGE 14 MAKE A NOTE OF THE LOCATION FOR YOUR NEW FRIDGE FREEZER MAKE SURE THAT IT WILL FIT PROPERLY SO THAT 1 The doors can open freely and completely...
Page 9: ...u want to freeze large amounts of fresh foods and in case you want to deep freeze foods that are already frozen ii AUTOMATIC OPERATION the yellow light is off The interior temperature is controlled by...
Page 10: ...tch the alarm off by pressing the alarm button On the control panel switch to the continuous operation position All three signal lamps will light up Place fresh food into the freezer several hours aft...
Page 11: ...s or mouth Skin might stick to the cold surfaces and become damaged Do not freeze bottled drinks especially not fizzy ones such as mineral water sparkling wine beer cola etc because liquid expands dur...
Page 12: ...within the appliance and should clear in a few minutes Please give it this time before re opening NEVER place warm food inside the freezer Warm food must be allowed to cool to room temperature first...
Page 13: ...s alongside frozen ones in your freezer The freshly introduced food may cause a slight and potentially detrimental thaw in the frozen article s Use correct packaging and wrap items correctly The packa...
Page 14: ...pting to clean your appliance UNPLUG IT and make sure you do the following WE RECOMMEND THAT YOU CLEAN AND MAINTAIN YOUR REFRIGERATOR ONCE A MONTH Pay particular attention to the sealing rubber bars o...
Page 15: ...ounts of dust on the condenser by a sound alarm Upon hearing this alarm you should Check the air circulation through the bottom rail openings If necessary clean or vacuum the dust from the condenser S...
Page 16: ...freezer 24 hours prior to defrosting press the continuous operation mode button 2 in diagram on page 7 This will provide an extra low temperature of food inside the freezer After this period take the...
Page 17: ...es of fresh foods ensure they are first cooled to the ambient temperature If the door seal gasket is damaged the energy consumption will be much higher To keep the sealing in good condition be sure no...
Page 18: ...s and in a well ventilated position This should be at least 3 cm away from electric stoves and 30 cm from oil or coal stoves Do not place the appliance in the path of direct sunlight 2 After removing...
Page 19: ...entering it so that 262mm of its width is on either side of the imaginary vertical middle line of the d cor door 3 Clasp the eyelet holes in the rail on the inside of the d cor door over the bolts pro...
Page 20: ...your unit using these adjustable feet to compensate for dips and rises in your floor surface NOTE You can adjust the height from 82 to 90 cm The height MUST be adjusted before the appliance is built...
Page 21: ...remove the lower hinge 3 by doing the same as you had to the top hinge 4 Flip the top hinge and bring it over and down to the bottom corner that is diagonally opposed to it 4 Screw it in 5 Flip the b...
Page 22: ...overloaded the appliance or food has Been packed too tightly Take out And consume food look for out of date food That can be disposed of The thermostat setting is set too low Set it Higher Ensure tha...
Page 23: ...ditional 1 to 3 year insurance scheme for labour is available should you wish to extend the warranty period Should any person other than an authorised representative of Baumatic Ltd interfere with the...
Page 24: ...all reasonable care will be taken Baumatic Ltd cannot accept responsibility for damage sustained to any property whatsoever in this process This guarantee is in addition to and does not diminish your...
Page 25: ...shire RG2 0QX United Kingdom Sales Telephone 44 118 933 6900 Sales Fax 44 118 931 0035 Service Telephone 44 118 933 6911 Service Fax 44 118 986 9124 Spares Telephone 44 118 933 6922 Technical Advice T...
Page 26: ......
Page 27: ......
Page 28: ......