background image

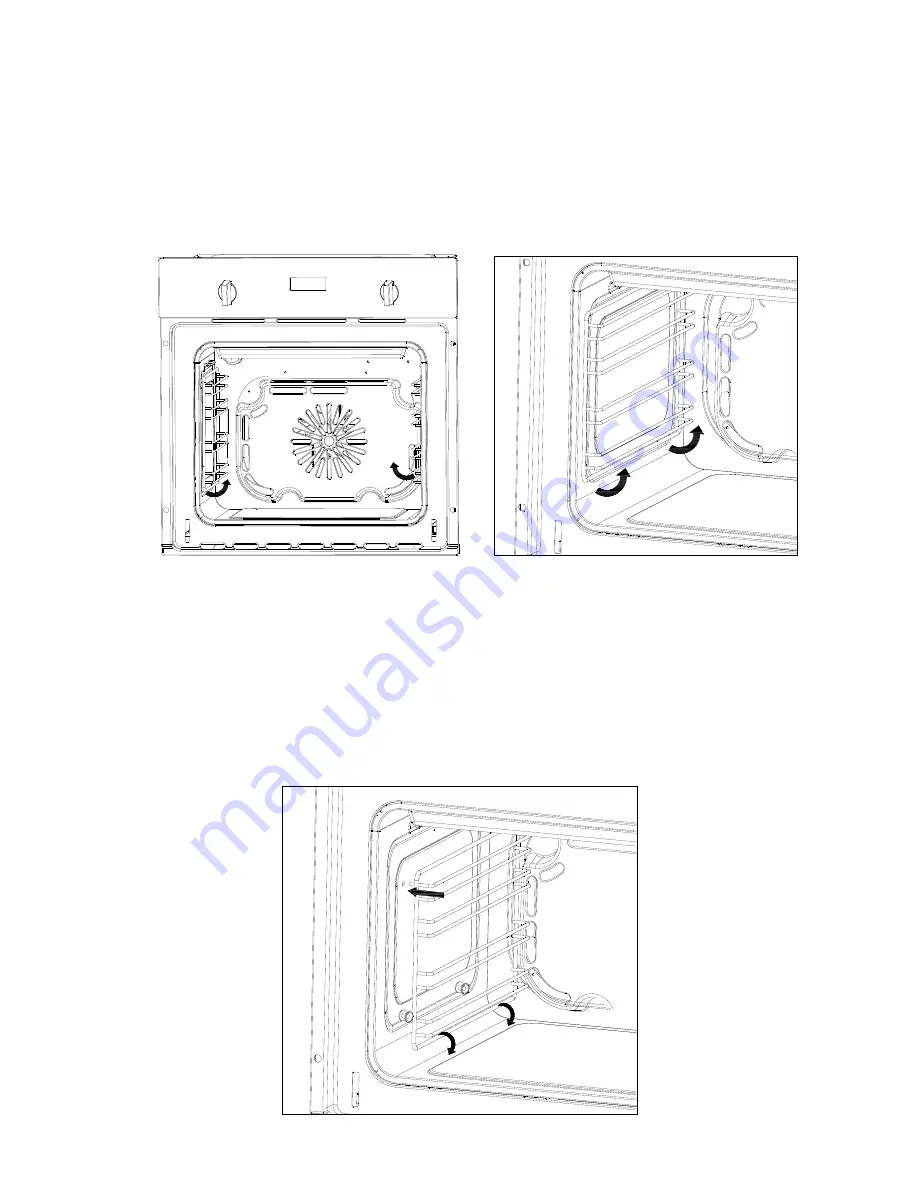
Removing the side racks 
 
IMPORTANT: You can remove the side racks of the oven for 
ease of cleaning. You can wash the side racks with detergent 
and/or wash them in a dishwasher. 
 

o


Pull the side racks free of their securing clips, by pulling them 
down and away from the clips on oven walls. Then unhook 
them at the top, and remove them from the oven cavity. 


27


o


To replace the side racks, insert them back into the oven cavity 
and hook the top of the racks back into the slots. 


o


Then push the bottom of the rack down, and clip them back onto 
the securing clips. 


o


Ensure that they are inserted into the correct side of the 
appliance, and secured back into the securing clamps. 


Summary of Contents for BOD890-SS/BL

Page 1: ...1 BOD890 SS BL 90 cm Built in multifunction electric double oven...

Page 2: ...truction Manual contains important information including safety installation points which will enable you to get the most out of your appliance Please keep it in a safe place so that it is easily avai...

Page 3: ...ay 17 Selecting a cooking function and temperature 17 22 Selecting a main oven function 17 18 Main oven thermostat control knob 18 Selecting a top oven function 19 Top oven thermostat control knob 19...

Page 4: ...Environmental note o The packaging materials that Baumatic uses are environmentally friendly and can be recycled all packaging material with due regard for the environment o Please discard 4...

Page 5: ...tallation must be able to withstand a minimum temperature of 85 C above is located in whilst in use o Certain types of vinyl or laminate kitchen furniture are particularly prone to heat damage o guide...

Page 6: ...ge to the appliance or result in injury to the person lifting the appliance o This appliance is not intended for use by persons including children with reduced physical se supervision Child Safety o p...

Page 7: ...d requires the appliance to be installed in accordance ith the standards currently in force This appliance must be used by a trained person for domestic purposes only C o Cleaning of the oven should b...

Page 8: ...Energy efficiency class A A LED full programmer o o 2 x Cooling fans o Thermostatically controlled grills o Triple glazed removable doors o Removable inner door glass Mechanically controllable thermos...

Page 9: ...on the front ate of Purchase Standard accessories o Removable side racks o 3 x Saf o Trivet Optional Extras Cooling fans o Two tangential cooling fans are fitted inside of this appl external surface...

Page 10: ...light nob Main oven operating light Decimal point symbol 7 Minute minder symbol 5 LED full programmer see 11 1 6 LED display 7 Main oven power indicator 8 Main oven function selection k 9 10 Main ove...

Page 11: ...ply for the first time you must set the time of day before you can use the oven o Make sure the oven is in manual operation mode as outlined above Press the program button 12 once to set the tim o the...

Page 12: ...ountdown time that you require o The maximum countdown time that can be set is 23 hours and 59 minutes o When the correct countdown time appears on the LED display release the plus and minus buttons a...

Page 13: ...set is 10 hours o When the correct countdown time appears on the LED display release the plus and minus buttons Cooking will begin immediately after a few seconds the countdown time will start o At th...

Page 14: ...end time that can be set is 10 hours into the future o When the correct end time appears on the LED display release the plus and minus buttons Cooking will begin immediately after a few seconds the c...

Page 15: ...Use the plus 13 and minus 11 buttons to set the cooking end time that you require o The maximum end time that can be set is 10 hours into the future o When the correct end time appears on the LED dis...

Page 16: ...ns when you reset the timer function it will continue to heat Adjusting the audible signal The audible signal has 3 tones To adjust the signal you should proceed as follows o IMPORTANT The oven timer...

Page 17: ...hod of cooking provides traditional cooking with heat from the top and lower elements This function is suitable for roasting and baking on one shelf only FAN OVEN This method of cooking uses the circu...

Page 18: ...sing and preserving jars CONVECTION OVEN AND FAN This method of cooking provides traditional cooking with heat from the top and the lower element it also utilises the circulation fan This ensures a fa...

Page 19: ...to direct heat upward to the food For slow cooking recipes or for warming up meals CONVENTIONAL OVEN top and lower element This method of cooking provides traditional cooking with heat from the top an...

Page 20: ...an be varied to suit personal preference o If you are using the fan oven function then you should follow the information given on the food packaging for this particular mode of cooking o You should pr...

Page 21: ...amage the grill element o You should also never line the base of your oven with aluminium foil o During cooking never place pans or cookware directly onto the bottom of your oven They should always be...

Page 22: ...y between the 2 side rails at any position 1 to 4 on both sides The oven shelf has safety stops to prevent accidental withdraw After engaging the oven shelf into the side rails as you push the oven sh...

Page 23: ...erature or being placed in cookware that is too small o You should select a cooking temperature and function that is appropriate for the food that you are cooking You should also ensure that the food...

Page 24: ...es o Using a screwdriver remove the lamp cover 1 o Unscrew the bulb 2 in a clockwise direction and remove it from its holder o Replace the bulb with a 25 W 300 C screw type pygmy o Do not use any othe...

Page 25: ...sure that the door is supported at all times and that you place the door on some padded material whilst cleaning it o The oven door and door glass should only be cleaned using a damp cloth and a smal...

Page 26: ...inner door glass can be lifted out o Unscrew the bracket latch that is in the corner of the top of the door Remove the glass from the door and clean with warm soapy water o After cleaning insert the...

Page 27: ...ing them down and away from the clips on oven walls Then unhook them at the top and remove them from the oven cavity 27 o To replace the side racks insert them back into the oven cavity and hook the t...

Page 28: ...ed spur outlet having 3 mm contact separation and placed in an easily accessible position adjacent to the appliance The spur outlet must still be accessible even when your oven is located in its housi...

Page 29: ...st be positioned as marked in the diagram above and once established ALL terminal screws must be tightened down firmly o If when the oven is first switched on it does not function correctly you should...

Page 30: ...en the terminal block on the back of the oven o Unscrew the terminal screws fixing the cable o Replace the cable with one of the same length and in accordance with the specification o The green yellow...

Page 31: ...s of the size given in the above diagram wn in the Ventilation requirements section on the next page t the rear panel of the furniture housing unit has been removed o Ensure that the aperture that you...

Page 32: ...l housing unit t and into the housing unit V Figure shows the ventilation and cut out requi in o Ensure that the oven has been securely fixed into the housing unit The fixing of the oven into the hous...

Page 33: ...rly ture by plus cooking results My food is not cooking evenly Check that the oven has been installed correctly and is level the correct temperatures and shelf positions are being used Check that yo t...

Page 34: ...a sign that the oven is not working correctly l after it has been cooked and the oven has been switched off hen cooking to reduce the amount of condensation that forms Steam and condensation is a nat...

Page 35: ...modify its roducts without prior notification IMPORTANT If your appliance appears not to be operating correctly then you sh Baumatic Customer Care on telephone nu DO NOT ATTEMPT TO REPAIR THE APPLIAN...

Page 36: ...cooking provides traditional cooking with heat f o r el s T u r Food Weight kg Preheat minutes rom the t oa a p and lowe ement one shelf o his function is s nly itable for sting nd baking on Tray posi...

Page 37: ...8 10 3 250 20 25 Pork 0 8 10 3 250 25 30 Chicken 1 2 10 3 250 40 45 Sausage 0 6 10 4 250 15 20 Hamburger 0 6 10 4 250 15 20 Cor 1 2 10 3 250 20 25 n Ve 0 5 10 4 250 15 20 getable FAN AND LOWER ELEMEN...

Page 38: ...7 E Cloth General Purpose Cloth o order a Baumatic consumable product please call 0123 5437 244 o BC002 Descaler for Washing Ma o BC003 Ceramic Hob Cleaner 250 ml o BC004 Oven Cleaner 250 ml o BC005 S...

Page 39: ...F www facebook com baumatic uk epublic of Ireland ervice Telephone R S 890 812 724 pares Telephone 1 S 91 756 771 Slovakia aumatic s r o erec 4 zech Republic 11 03 Bratislava Star Mesto 420 483 577 2...

Page 40: ...40 40...

Reviews: