background image

English

20

.

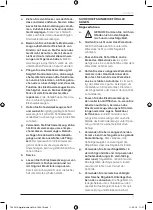
EXPLANATION OF THE SYMBOLS

 WARNING – To reduce the risk of 
injury during operation, read the 
instructions.


 Always wear hearing protection. The 
effects of noise can cause hearing 
loss.


 Wear a dust mask. When working 
with wood and other materials, 
harmful dust may be generated. 
Work with asbestos containing 
materials is not permitted.


 Wear safety glasses. When working 
with electric power tools, sparks, 
splinters, chips and dust particles 
may be generated and these can 
cause loss of sight.

 Denotes risk of personal injury, loss 
of life or damage to the tool in case 
of non­observance of the 
instructions in this manual.

Wear protective footwear.

Wear safety gloves.

 Electric power tool, protection class 
II. This sign symbolises that this unit 
corresponds to Protection Class II. 
This means that the unit is equipped 
with either reinforced or double 
insulation between the mains circuit 
and output voltage or metal housing 
respectively

 CE stands for “Conformité 
Européenne”, which means “In 
accordance with EU Regulations”. 
With the CE marking, the 
manufacturer confirms that this 
Electric tool complies with the 
applicable European directives.

Not for wet grinding.

Do not dispose the electric power 
tool with domestic refuse.

GENERAL SAFETY INSTRUCTIONS FOR 
POWER TOOLS


WARNING!

 READ ALL 

INSTRUCTIONS.

Failure to follow all instructions listed below 
may result in electric shock, fire and/or serious 
injury.

Save these instructions for future 
reference!

The term “power tool” in all of the warnings 
listed below refers to your mains operated 
(corded) power tool or battery operated (cord-
less) power tool.

1   Work area
a   Keep work area clean and well lit 

 Clut-

tered and dark areas invite accidents.

b   Do not operate power tools in explosive 

atmospheres, such as in the presence 
of flammable liquids, gasses or dust 


Power tools create sparks which may 
ignite the dust of fumes.

c   Keep children and bystanders away 

while operating a power tool  

Distrac-

tions can cause you to lose control.

2   Electrical safety
a   Power tool plugs must match the out-

let  Never modify the plug in any way  
Do not use any adapter plugs which 
earthed (grounded) power tools  

Unmodified plugs and matching outlets 
will reduce risk of electric shock.

b   Avoid body contact with earthed or 

grounded surfaces such as pipes, radi-
ators, ranges and refrigerators  

There is 

an increased risk of electric shock if your 
body is earthed or grounded.

c   Do not expose power tools to rain or 

wet conditions  

Water entering a power 

tool will increase the risk of electric shock.

d   Do not abuse the cord  Never use the 

cord for carrying, pulling or unplugging 
the power tool  Keep cord away from 
heat, oil, sharp edges or moving parts  

Damaged or entangled cords increase the 
risk of electric shock.

7062413-digital-display-MA-#-1604-19.indb   20

11-05-16   11:37

Summary of Contents for 7062413

Page 1: ...itung Original Operating instructions Gebruiksaanwijzing Mode d emploi Page 1 Modelnr BT CS012 Art Nr 7062413 PRECISIONPLUNGESAW DIGITAL SPEED CONTROL 500 W 7062413 digital display MA 1604 19 indb 1 1...

Page 2: ...FoldoutA 7062413 digital display MA 1604 19 indb 1 11 05 16 11 36...

Page 3: ...1 15 FoldoutB 3 10 9 A B 7 1 13 2 8 11 5 6 4 12 18 19 16 17 14 7062413 digital display MA 1604 19 indb 2 11 05 16 11 37...

Page 4: ...Page 2 7062413 digital display MA 1604 19 indb 2 11 05 16 11 37...

Page 5: ...ycling 31 EC Declaration of conformity 31 TABLE DES MATI RES Consignes de s curit 33 Emploi conforme 39 Caract ristiques techniques 39 Mise en service 40 Utilisation 40 Nettoyage et maintenance 44 R p...

Page 6: ...8 Befestigungsschraube an dem Schneidschuh f r Parallelanschlag und Rohrschneider 9 Display mit berlastungsanzeige 10 Verriegelungsknopf der Antriebswelle 11 Schraube der Antriebswelle 12 Innensechska...

Page 7: ...ERKZEUGE WARNUNG Lesen Sie alle Sicherheitshinweise und Anweisungen Vers umnisse bei der Einhaltung der Sicher heitshinweise und Anweisungen k nnen elekt rischen Schlag Brand und oder schwere Ver letz...

Page 8: ...des Elektrowerkzeu ges verringert das Risiko von Verletzungen c Vermeiden Sie eine unbeabsichtigte Inbetriebnahme Vergewissern Sie sich dass das Elektrowerkzeug ausgeschal tet ist bevor Sie es an die...

Page 9: ...lt dass die Sicher heit des Ger tes erhalten bleibt SICHERHEITSHINWEISE F R ALLE S GEN S geverfahren a GEFAHR Kommen Sie mit Ihren H nden nicht in den S gebe reich und an das S geblatt b Greifen Sie n...

Page 10: ...ttes c Wenn Sie eine S ge die im Werkst ck steckt wieder starten wollen zentrie ren Sie das S geblatt im S gespalt und berpr fen Sie ob die S gez hne nicht im Werkst ck verhakt sind Klemmt das S gebla...

Page 11: ...ind mit Sorgfalt zu behan deln und zu transportieren Einsatzwerkzeuge sind so zu lagern dass sie keinen mechani schen Besch digungen und sch digenden Umwelteinfl ssen ausgesetzt sind Zur Vermeidung vo...

Page 12: ...ie die Spannfl chen von Ver schmutzungen Fett l und Wasser Verwenden Sie keine losen Reduzierringe oder buchsen zum Reduzieren von Boh rungen bei Kreiss gebl ttern Achten Sie darauf dass fixierte Redu...

Page 13: ...andwerkli chen oder industriellen Einsatz konstruiert wurden Wir bernehmen keine Gew hrleistung wenn das Elektrowerkzeug in Gewerbe Hand werks oder Industriebetrieben sowie bei gleichzusetzenden T tig...

Page 14: ...lektrowerkzeug aus wenn es nicht benutzt wird INBETRIEBNAHME Auspacken 1 ffnen Sie die Verpackung und nehmen Sie das Elektrowerkzeug vorsichtig heraus 2 Entfernen Sie das Verpackungsmaterial 3 Entfern...

Page 15: ...terials eingestellt werden um zu vermeiden darunter liegende Oberfl chen zu besch di gen Allerdings f hrt ein solches Vorgehen zu einem etwas unsauberen Schnitt an der Unter seite des Werkst ckes Anze...

Page 16: ...n diesem Fall die Vorschubgeschwindig keit um ein optimales Schnittergebnis zu erhalten Ein dauerndes Aufleuchten der LED zeigt an dass das Ger t berlastet ist oder blockiert wurde Die Maschine schalt...

Page 17: ...Sie die Schnitttiefe ein schlie en Sie das Ger t ans Netz an und setzen Sie die Grundplatte auf das Werkst ck auf Achten Sie darauf dass sich die hintere seitliche Tiefenmarkierung auf H he des Schni...

Page 18: ...ngsmittel diese k nnten die Kunststoffteile des Elektrowerkzeuges angreifen Achten Sie darauf dass kein Wasser in das Innere des Elektrowerkzeu ges gelangen kann Entriegeln und entfernen Sie die Decke...

Page 19: ...geringer als die die festgelegt ist S gemehl hat sich angesammelt blockiert die Grundplatte Entfernen Sie das S gemehl durch Sch tteln Erw gen Sie den Anschluss eines Staubsaugers zu Staubabsaugung S...

Page 20: ...its und Gesundheitsanforderungen der EG Richtlinien entspricht Bei einer nicht mit uns abgestimmten nde rung der Elektrowerkzeug verliert diese Erkl rung ihre G ltigkeit Bezeichnung der Elektrowerkzeu...

Page 21: ...8 Safety Cutting Shoe Attachment Screw for parallel Guide and Tube Cutter 9 Display with Overload Indicator Light 10 Driveshaft Locking Button 11 Driveshaft Screw 12 Interior Hex Key 13 Power Cable 14...

Page 22: ...Failure to follow all instructions listed below may result in electric shock fire and or serious injury Save these instructions for future reference The term power tool in all of the warnings listed...

Page 23: ...nected and properly used The use of these pieces of equipment reduce hazards caused by dust 4 Power tool use and care a Do not force the power tool Use the correct power tool for your application The...

Page 24: ...AWS The causes of kickback and how to avoid them A kickback is a sudden reaction due to snagging jamming or misalignment of the saw blade which results in the uncon trolled saw jumping out of the work...

Page 25: ...n cause the saw blade to jam and hence result in kickback d Do not put down the saw on the work bench or floor without the lower safety guard covering the saw blade When slowing down after use an unpr...

Page 26: ...cracking in the core or segments breaking off Do not exert a strong grinding pressure the weight of the electric power tool will suffice Do not include any cooling breaks Caution The tool insert will...

Page 27: ...mercial trade or indus trial use We provide no warranty if the electric power tool is used for commercial trade or industrial applications or activities equivalent to these TECHNICAL DATA Type Model B...

Page 28: ...possible until the end of the warranty period Thereafter please dispose of the packaging in an environmentally friendly way by utilising a recycling system Warning The product and packaging are not to...

Page 29: ...n the material being cut Dust Extraction This saw is a powerful tool which produces a large amount of dust As the tool has a fully enclosed blade forced dust extraction is par ticularly efficient An i...

Page 30: ...urface to be cut For a full cut ensure that the rear half of the base plate over hangs the work piece Do not plunge the blade into the material 9 Switch on the tool and wait for two sec onds for the b...

Page 31: ...st can be hazardous to the operator and prevent the safety cutting shoe from operating correctly Applying masking or PVC tape to the base plate of the tool or alternatively to the work piece can make...

Page 32: ...original packaging Clean the tool before storage TROUBLESHOOTING Symptom Possible Causes Possible Solution Tool will not start when operating the on off switch Power cord not plugged in Power cord is...

Page 33: ...requirements which are defined in the European Directives Any unauthorized changes to the machine will invalidate this declaration Description of the machine Precision plunge saw model Nr BT CS012 Ar...

Page 34: ...urit 8 Boulon de fixation de l trier de s curit pour guide parall le et coupe tube 9 cran avec t moin de surcharge 10 Bouton de verrouillage de l arbre 11 crou de l arbre 12 Cl hexagonale 13 Cordon d...

Page 35: ...res m nag res CONSIGNES G N RALES DE S CURIT POUR APPAREILS LECTRIQUES Avertissement Lisez attenti vement les instructions Le non respect de toutes les instructions indi qu es ci dessous peut entra ne...

Page 36: ...curit utilis s dans de bonnes conditions r duiront le risque de blessures c vitez tout d marrage involontaire Assurez vous que l interrupteur est sur la position arr t avant de brancher l appareil En...

Page 37: ...nt en compte les conditions de travail et le travail effectuer L utilisation de l appa reil lectrique dans des applications diff rentes de celles pr vues peut entra ner des situations dangereuses 5 Ma...

Page 38: ...e usiner ou de la tirer vers l arri re tant que la lame est en rotation afin de limiter les risques de contre coup D terminez et liminez la cause du blocage de la lame de scie c Si vous voulez red mar...

Page 39: ...cessoires endomma g s mal fix s ou mont s est dangereuse et peut provoquer de graves blessures Manipulation et stockage Les accessoires doivent tre trait s et trans port s avec soin Les accessoires do...

Page 40: ...les surfaces de fixation en limi nant les salissures graisses huile et eau N utilisez pas d anneaux ou de douilles de r duction ind pendants pour r duire les per ages sur les lames de scies circulair...

Page 41: ...ndeur de coupe 0 12 mm Lame de scie 50 8 mm Insert lame 11 mm Classe de protection II Double isolation Poids 1 62 kg Niveau de pression acoustique LpA 94 dB A Incertitude KpA 3 dB A Niveau de puissanc...

Page 42: ...uit ainsi que les mat riaux de l emballage ne sont pas des jouets pour enfants Les enfants ne doivent pas jouer avec les sacs en plas tique les films et les accessoires Il y a un risque d ingestion et...

Page 43: ...de s curit avec la ligne de d part sur la pi ce couper 5 Effectuez la coupe jusqu ce que le rep re situ sous le chiffre en avant s aligne avec la ligne d arriv e trac e sur la pi ce couper Aspiration...

Page 44: ...ur de coupe 4 Placez le mat riau couper sur une sur face plane telle qu un tabli table ou par terre Placez un objet sous la pi ce pour viter de laisser des traces sur la surface de travail et pour ne...

Page 45: ...e s curit 3 Ins rez le guide parall le et le fixer avec le bouton 8 Couper des mat riaux difficiles ou poussi reux Il est recommand d essayer l outil avec du bois avant de l utiliser pour couper des m...

Page 46: ...aptateur Maintenance Charbons Si les charbons font trop d tincelles faites les contr ler par une personne qualifi e ATTENTION Seule une personne qualifi e est autoris e remplacer les charbons Il n y a...

Page 47: ...nf rieure la profondeur d finie De la sciure s est amass e bloque la plaque de base Retirez la sciure par secousses Envisagez le raccordement d un aspirateur pour enlever la poussi re Le disque de cou...

Page 48: ...e responsabilit que cet appareil est conforme aux exigences de base d finies dans les directives europ ennes Toute modification non autoris e de l appareil annule cette d claration Description de l ap...

Page 49: ...veiligheidszool voor zagen 8 Bevestigingsschroef op veiligheidszool voor zagen voor parallelle geleider en buizenzaag 9 Scherm met indicatielampje overbelasting 10 Vergrendelknop aandrijfas 11 Schroef...

Page 50: ...opvolgen van onderstaande instructies kan leiden tot een elektrische schok brand en of ernstig persoonlijk letsel Bewaar deze instructies De term elektrisch gereedschap in onder staande waarschuwinge...

Page 51: ...r op de schakelaar en steek ook nooit de stekker van ingescha kelde elektrische gereedschappen in het stopcontact dit leidt tot ongelukken d Verwijder alle instel en andere sleutels uit het elektrisch...

Page 52: ...pparaat VEILIGHEIDSRICHTLIJNEN VOOR ALLE ZAAGMACHINES Werken met het zaagblad a GEVAAR Kom met uw handen niet binnen het zaagbereik en raak het zaagblad niet aan b Grijp niet onder het werkstuk De bes...

Page 53: ...an het zaagblad in de zaagsnede en controleer dat de zaagtanden niet in het werkstuk haken Als het zaagblad klemt kan het wanneer de machine opnieuw wordt gestart uit het werkstuk slaan of terugslag v...

Page 54: ...de slijpschijf uit de machine te worden gehaald Selectie en veilig en voorgeschreven gebruik Let op de informatie op het etiket van de schijf en de gebruiksbeperkingen veiligheidsrichtlij nen of verde...

Page 55: ...het best bewaren in de originele verpakking of in een speciale doos Draag werkhand schoenen om de bladen beter beet te kunnen pakken en het risico op letsel te verminderen Zorg er voor het gebruik van...

Page 56: ...Onzekerheid KpA 3 dB A Geluidsvermogenniveau LWA 105 dB A Onzekerheid KWA 3 dB A Buitendiameter 50 mm Diameter boorgat 11 mm Dikte 1 4 mm Aantal tanden segmenten 18 Max toegestaan toerental 8000 min 1...

Page 57: ...j een recycling systeem WAARSCHUWING Het product en de verpakkingsmaterialen zijn geen kinderspeelgoed Kinderen mogen niet met de plastic zakken folie en kleine onderdelen spelen Er bestaat gevaar op...

Page 58: ...ol voor zagen 4 Breng de markering onder het achterste nummer op de veiligheidszool voor zagen in lijn met de startstreep voor het te zagen materiaal 5 Zaag verder totdat de indicatie onder het voorst...

Page 59: ...uiste zaagblad en verzeker dat het scherp in niet beschadigd is 3 Stel de zaagdiepte in 4 Leg het te zagen het materiaal op een vlakke ondergrond zoals een werkbank tafel of vloer Gebruik een afvalstu...

Page 60: ...de machine van het werkoppervlak voordat u hem uitschakelt Als er veel stof is veroor zaakt houd hem dan een paar seconden langer ingeschakeld zodat het stof van binnen de machine kan worden afgezoge...

Page 61: ...ter is verstopt ontgrendel dan het deksel en verwijder het Breng na het reinigen het deksel weer op de adapter aan Onderhoud Koolborstels Laat bij overmatig vonken de koolborstels door een gekwalifice...

Page 62: ...De zaagdiepte is minder dan is ingesteld Er heeft zich zaagsel onder de bodemplaat verzameld Verwijder het zaagsel door te schudden Overweeg het aansluiten van een stofzuiger om het zaagsel af te zuig...

Page 63: ...mbH dat het apparaat Precisie Invalzaag Artikel Nr 7062413 Model Nr BT CS012 op grond van zijn ontwerp en bouwwijze en in de door ons in omloop gebrachte uitvoering voldoet aan de desbetreffend van to...

Page 64: ...7062413 digital display MA 1604 19 indb 62 11 05 16 11 37...

Page 65: ...eerst tot onze klantenservice Bewaar altijd uw aankoopbewijs De garantieservice is alleen van toepassing op materiaal of productiefouten Uitgesloten zijn gebreken veroorzaakt door intensief gebruik mi...

Page 66: ...BATAVIA GmbH Weth Buitenhuisstraat 2a 7951SM Staphorst Netherlands www batavia eu Email info batavia eu 7062413 2 7062413 digital display MA 1604 19 indb 64 11 05 16 11 37...

Reviews: