background image


- 31 - 


5.2.1. Heat processing 

NOTE 

Improper use may cause damage. 

  Use  the  device  only  in  its  upright  position  in  the  pot  to  prevent  damage  to  the 

device. 


1.  Make sure that there is no packaging material on the device. 
2.  Position the device according to the description below 


When  the  product  is  being  placed  in  the  pot  the  water  level  rises.  Take  it  into 
consideration  by  pouring  in  slightly  less  water.  The  water  level  should  be  between 
both markings. The device is provided with the shut-off function. When the water level 
drops  below  the  Minimum  marking  (2)  the  device  switches  to  the  emergency  mode 
and indicates E05 error. 

  Turn off the device and ensure the correct water level. 

The device may be restarted. 


3.  Fill the pot with water. 
4.  Grip  the  handle  (5)  of  the  device  and  press  the  attachment  clamp  (8)  against  the 

handle (5). The attachment clamp (8) opens. 

5.  Fasten the device to the pot rim by the clamp (8). 
6.  Plug into a single grounded socket. 
7.  Press the switch ON/OFF button (11) and hold for approx. 5 seconds, 


The device is switched on. 


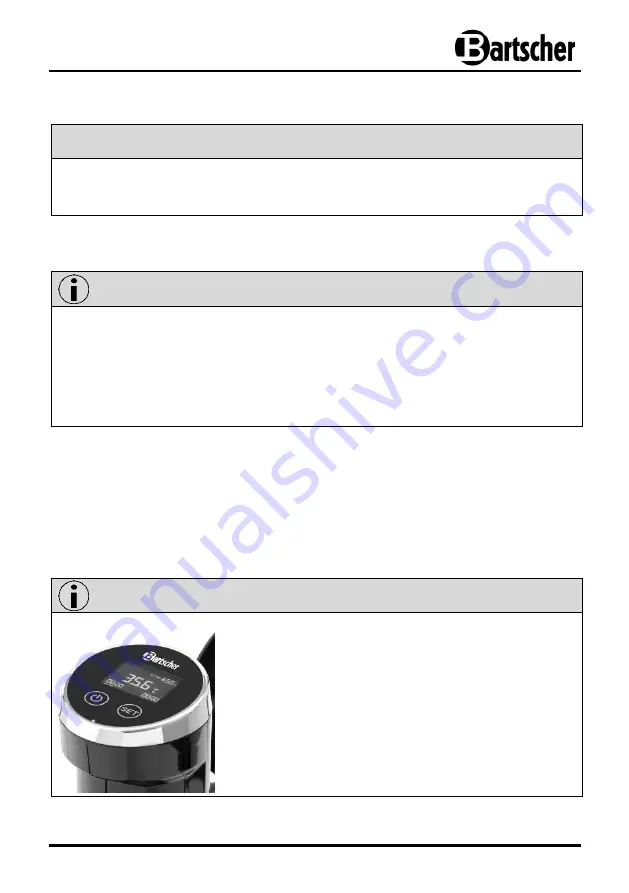
  The digital display (7) in the operating panel shows 

the set temperature in the first row. 

  The  current  temperature  is  dislayed  in  the  second 

row. 

  In the third row the set time is shown at the left and 

the operating time at the right. 

  Setting  the  temperature  you  can  choose 

between  celsius  or  fahrenheit.  To  do  so,  press 
the  ON/OFF  button  (11)  and  SET  button  (10) 
and  hold  for  2  seconds.  Maximum  temperature 
that may be set is 95 °C or 203 °F.


Summary of Contents for SV ST15L

Page 1: ...SV ST15L 115133 Original Bedienungsanleitung V3 0618...

Page 2: ......

Page 3: ...E Declaration of Conformity 25 3 Transport packaging and storage 26 3 1 Delivery check 26 3 2 Packaging 26 3 3 Storage 26 4 Technical data 27 4 1 Technical specification 27 4 2 List of components 28 5...

Page 4: ...them with this instruction manual 1 Safety This appliance is designed in accordance with the current technical standards However the appliance may be a source of dangers if used improperly or against...

Page 5: ...qualified staff only Any repairs or housing opening may be carried out by professionals and relevant workshop only Only the heating element should be immersed in water Never immerse the entire device...

Page 6: ...vice is not intended for use by persons including children having limited physical sensory or mental capacities or who have inadequate experience or knowledge Cleaning and maintenance works may not be...

Page 7: ...is connected to the power supply Risk of damage due to improper operation Incorrect handling may cause damage to the appliance Never expose the device to high temperature a cooker etc or weather cond...

Page 8: ...e inadmissible The liability for damage occurred during the use of the appliance against its intended purpose is borne solely and exclusively by the user 1 4 Use against the intended purpose Any use o...

Page 9: ...he appliance against the intended purpose alterations are made by the user inappropriate spare parts are used We reserve the right to introduce technical modifications to the product which are intende...

Page 10: ...hen relocating or when sending the appliance to our service point in case of any defaults Before you start the appliance completely discard any external or internal packaging material Check that the u...

Page 11: ...splay Memory Function Audible signal when the time expires Dry run protection Power 1 3 kW 220 240 V 50 60 Hz Temperature range 20 C 95 C Temperature control Electronic in 0 5 C steps Time setting 1 m...

Page 12: ...of components 1 Heating element 6 Rotary control 2 Minimum indication 7 Control panel with digital display 3 Maximum indication 8 Attachment clamp 4 Point of support 9 Power supply cable 5 Handle 1 2...

Page 13: ...in the pot Fasten the device to the pot by the clamp Never use the device with the pot standing at the edge of the table The pot and device may fall over and down Plug the device so that the plug is e...

Page 14: ...30 5 2 Operation 6 Rotary control 11 ON OFF button 10 SET button 12 Digital display 6 12 10 11...

Page 15: ...he device and ensure the correct water level The device may be restarted 3 Fill the pot with water 4 Grip the handle 5 of the device and press the attachment clamp 8 against the handle 5 The attachmen...

Page 16: ...ituation when the time indication is blinking in the display 14 Press ON OFF button 11 Slight circulation appears in the water The heating process is initiated WARNING HOT SURFACE Risk of burns by hot...

Page 17: ...vice is not in use switch it off Turning the device off 20 To turn off the device press the ON OFF button 11 and hold for approx 5 sec The device is turned on 21 Pull the plug from the socket 22 Grip...

Page 18: ...iance is not suited for direct washing via water jets Never use aggressive cleaning agents to clean the appliance 6 1 Cleaning the unit 1 Pull the plug from the socket 2 Leave the device to cool down...

Page 19: ...pliance 7 Possible defects In case of malfunction immediately disconnect the device from the power supply unplug Before contacting the customer service department or vendor check the troubleshooting t...

Page 20: ...ting plate on the back wall of the device 8 Disposal Old appliances The electric appliances are marked with this symbol You must not dispose of electric appliances with household waste When the applia...

Reviews: