


- 43 -
Automatic defrosting
Defrosting of the device is performer automatically by water evaporation.
At the default setting, the automatic defrosting is performed every 6 hours. The first
defrosting circle starts when you switch on the device for the first time.
Defrosting lasts 20 minutes. The next defrosting circle starts after 6 hours.
Activation of manual defrosting
1. Make sure that the buttons are not blocked and none of the processes is in progress.
2.
Press and hold the button
for 5 seconds. Defrosting shall be activated
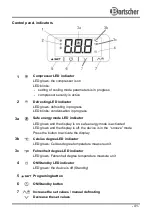
immediately. The defrosting LED indicator
glows and remains glowing until the
defrosting has finished. The next defrosting process starts 6 hours after the end of the
previous defrosting.
Blocking / unblocking buttons
Blocking the buttons:
1. Make sure that none of the processes is in progress.
2.
Do not perform any setting during 30 seconds: the message “Loc” appears
for 1 second on the display and the control panel buttons are blocked automatically.
When the control panel buttons are blocked the following functions are not available:
-
switch ON/OFF the device
-
indicate the temperature measured by the probe
-
activate the manual defrosting
-
set the working temperature
When you try to introduce a setting, the message “Loc” appears for 1 second
on the display. Unblock the buttons before you start introducing a setting.
3.
To unblock the buttons, press and hold for 2 seconds one of the buttons.
The message “UnL” appears for 1 second on the display.
Modify/set required temperature
1. Make sure that the buttons are unblocked and none of the processes is in progress.
2. Briefly press the button
, LED
blinks.
3.
In 15 seconds briefly press the button
or button
.
The parameters r1 (min. temperature) and r2 (max. temperature) appear on the
display.
Summary of Contents for 590LW
Page 1: ...590LW 700800 Original Gebrauchsanleitung V1 0216 ...
Page 2: ......
Page 4: ......
Page 41: ... 37 3 Remove the door 4 Unscrew hinge 1 5 Reverse both hinges Hinge 2 Hinge 1 Hinge 1 Hinge 2 ...
Page 161: ... 157 3 Снять дверь 4 Открутить навес 1 5 Заменить оба навеса Навес 2 Навес 1 Навес 1 Навес 2 ...


