4
Insertion Instructions
1. Identify the Vein and Insertion Site
A. Apply a tourniquet above the anticipated insertion site.
B. Select a vein by assessing patient anatomy and condition. Recommended veins are cephalic, basilic or median cubital basilic.
Caution: The PowerPICC SOLO
2
® catheter features a reverse-taper catheter design. Placement of larger catheters at or
below antecubital fossa may result in an increased incidence of phlebitis. Placement of PowerPICC SOLO
2
® catheter above
antecubital fossa is recommended.
C. Release tourniquet.
D. Set up the sterile field.
2. Preflush the Catheter and Hydrate Stylet
A. Flush the catheter with heparin flush solution solution or sterile normal saline.
Hydrate Stylet (Note: The use of the stiffening stylet is optional.)
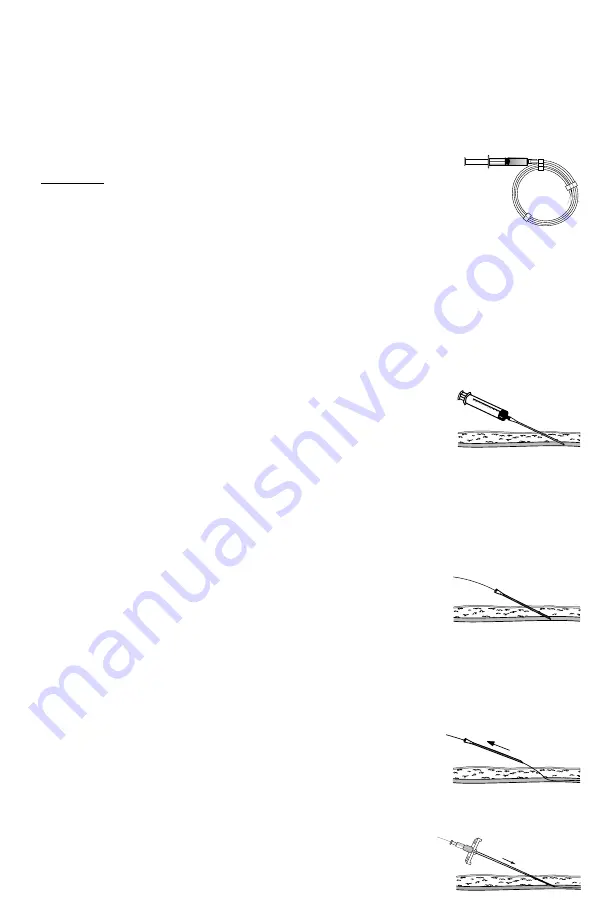
B. Attach a syringe with sterile normal saline to the luer lock fitting of the flush through stylet hub.
C. Inject enough solution to wet the stylet surface entirely. This will activate the hydrophylic
coating, making the stylet surface very lubricious.
D. Remove the stylet from its holder and insert it to the distal end of the catheter.
Note: If the surface of the stylet becomes dry after removal from the holder, wetting with additional sterile normal saline will
renew the hydrophylic effect.
E. The catheter stylet assembly can now be introduced.
3. Apply Tourniquet and Drape
A. Position arm at 90° angle.
B. Re-apply the tourniquet above the intended insertion site to distend the vessel.
C. Prepare the site according to institution policy using sterile technique.
D. Drape the patient by placing the fenestrated drape over the anticipated puncture site.
E. When alcohol is used as a skin prep, it must be allowed to completely air dry.
4. Perform Venipuncture
A. Anesthetize with local anesthesia as required.
B. Remove the needle guard.
C. Introduce the needle into the desired vein and observe for flashback.
WARNING: If the artery is entered, withdraw the needle and apply manual pressure for several
minutes.
D. Release tourniquet.
E. When the vein has been entered, remove the syringe leaving the needle in place.
Caution: Avoid placement or securement of the catheter where kinking may occur, to minimize stress on the catheter,
patency problems or patient discomfort.
Caution: The PowerPICC SOLO
2
® catheter features a reverse-taper catheter design. Placement of larger catheters at or below
antecubital fossa may result in an increased incidence of phlebitis. Placement of the PowerPICC SOLO
2
® catheter above
antecubital fossa is recommended.
5. Advance Guidewire
A. Introduce the guidewire through the needle; advance the guidewire 15 to 20 cm into the
vessel.
Caution: Do not advance the wire past the axilla without fluoroscopic guidance or other tip
locating methods.
Caution: Do not cut guidewire to alter length.
Caution: Do not insert stiff end of guidewire into vessel as this may result in vessel damage.
Caution: Keep sufficient guidewire length exposed at hub to allow for proper handling. A non-controlled guidewire can
lead to wire embolism.
Caution: Do not use excessive force when introducing guidewire or microintroducer as this can lead to vessel perforation
and bleeding.
6. Remove Needle
A. Release tourniquet. Apply slight pressure on the vessel above the insertion site to minimize
blood flow.
B. Leaving the guidewire in place, withdraw the needle.
Caution: If the guidewire must be withdrawn while the needle is inserted, remove both
needle and wire as a unit to prevent the needle from damaging or shearing the guidewire.
7. Introduce Microintroducer
A. Introduce the microintroducer assembly over the guidewire. Using a twisting motion,
advance the assembly into the vessel.
B. If necessary, a small incision may be made adjacent to the guidewire to facilitate insertion
of the sheath and dilator.
3
4
5
6
7
8
9
1011
12


