Manual 2100-749
Page
61 of 68
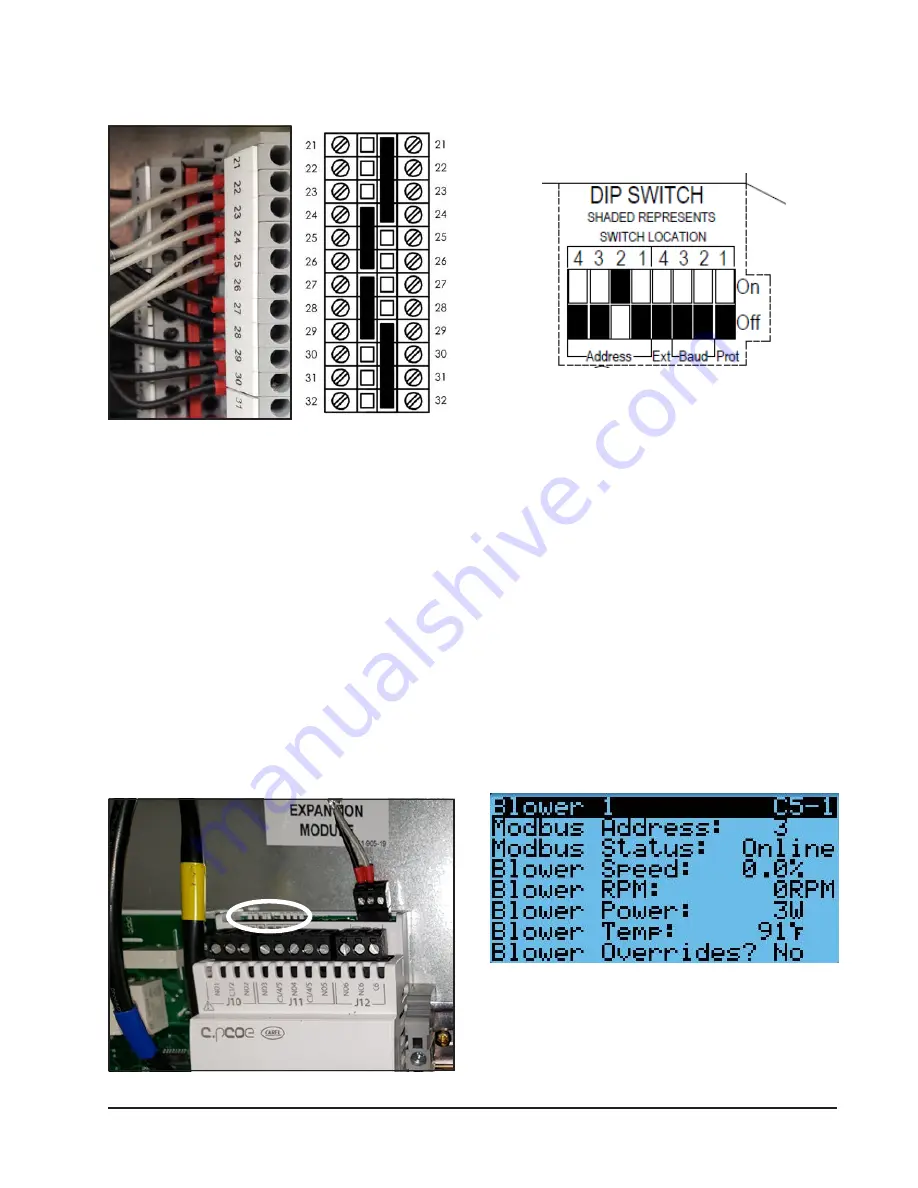
FIGURE 84
Communication Wires in Terminal Block
Verify the terminal block jumpers are placed correctly
as shown above. Terminals 21-26 should all be bonded
together and terminals 27-32 should all be bonded
together.
If problem still persists after verifying correct wiring
and polarity, proceed to the next steps.
NOTE:
The following steps are only for single
communication alarms at specific devices. If
there are multiple devices with communication
failures, the issue is either that polarity of the
wiring is incorrect, the jumpers in the terminal
block are incorrect or the communication port on
the PLC board is damaged.
c.pCOe Communication Failure
1. Locate the addressing DIP switches on the c.pCOe
(see Figure 85).
FIGURE 85
DIP Switch Location
FIGURE 86
Correct DIP Switch Settings
2. Verify the correct DIP switch settings on the
c.pCOe (see Figure 86).
3. If problem persists, verify 24VAC power to c.pCOe,
disconnect communication plug from c.pCOe
and disconnect wires from terminal block. Verify
continuity from end to end and then verify there
are no shorts to ground.
4. To verify the expansion module (C.PCOe) is faulty,
the communication wires should be isolated from
the blower and condenser fan and only connected
to the PLC to establish if communication is
possible.
c.pCOe Tx+/Rx+ wired to PLC FB+
c.pCOe Tx–/Rx– wired to PLC FB–
5. If problem persists after the previous steps, replace
c.pCOe.
Blower Communication Failure
For the following steps, use the TEC-EYE to view the
Modbus status of the blower. This screen is accessible
in the I/O Menu under Fans/Blowers (see Figure 87).
FIGURE 87
TEC-EYE Blower 1 Screen
1. Due to the inability to open the blower motor
terminal access panel while in the unit, swap
the polarity of the communication wires for the
effected blower.
Blower 1: Terminals 26 and 32
Blower 2: Terminals 24 and 30


