background image

19

Preparations

Others

Operation

18

Shooting a Document

Shooting a Document

○ ○ ○ ○ ○ ○ ○ ○ ○ ○ ○ ○ ○ ○ ○ ○ ○ ○ ○ ○ ○ ○ ○ ○ ○ ○ ○ ○ ○ ○ ○ ○ ○ ○ ○ ○ ○ ○ ○ ○ ○

Shooting a Document

This unit accepts both opaque (to be shot with overhead lighting) and transparent materials (such as films, to be shot
with base lighting).

1

Press the POWER switch to
turn the power on.

The POWER indicator lights.

2

Turn on the connected equip-
ment (monitor, etc.).

For details, refer to the operation manual for the
connected equipment.

For transparent material

Use the built-in light under the document stage.

For opaque material

Use the overhead lighting.

4

Press the LIGHTS button.

Each time you press the button, the illumination
changes as follows:

You can set the lights to turn on automatically when
the power is turned on (after a warmup period of
approx. 8 seconds). (

 p.24)

LOWER

UPPER

LIGHTS

POWER

LIGHTS

button

Overhead lighting on

(the UPPER indicator lights.)

Base lighting on

(the LOWER indicator lights.)

Both off, and so on.

3

Perform the input selection
on the connected equipment
(monitor, etc.) so that the pic-
ture from this Imager is dis-
played.

For details, refer to the operation manual for the
connected equipment.

The same operation can be performed
using the menu. (

 p.24)


Note

[

When turning the power off then on
again, leave it off for at least 10 sec-
onds before turning it back on.

ZOOM T button

Press to enlarge the
image (max. 6 times).

Continue

Adjust the image size by
pressing the ZOOM W or T
button.

When you hold the ZOOM W or T button pressed,
the image size changes continuously.
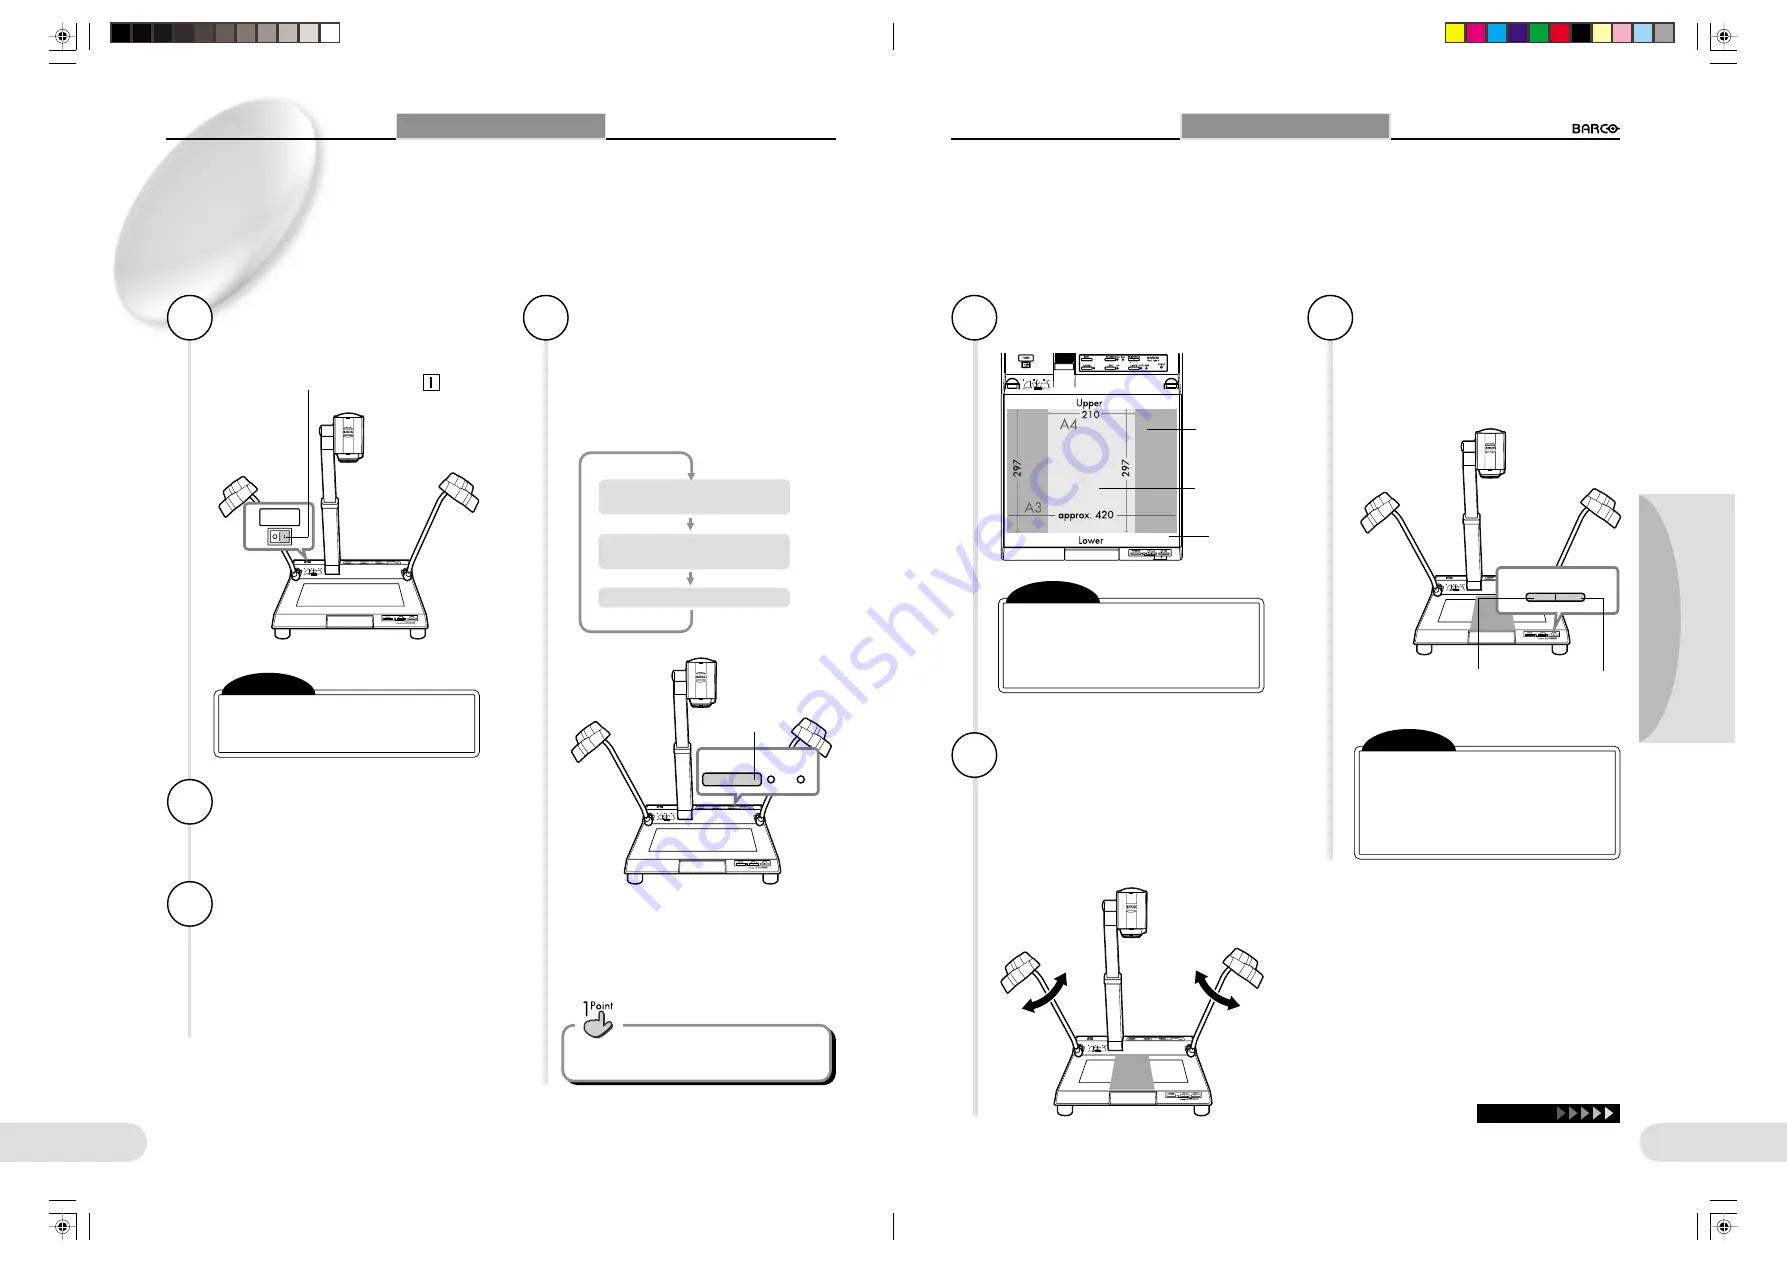
7

Place the material on the
document stage.

5

Note

[

When you press the E-ZOOM button,
the electronic zoom function is acti-
vated, and the E-ZOOM indicator
lights. The image size becomes two
or four times that adjusted with the
ZOOM W/T buttons.

CARD MENU

MENU

210 mm 

×

297 mm
upright

297 mm 

×

420 mm
widthwise

ZOOM

W

T

Document

stage

Note

[

The maximum size for opaque mate-
rial is 297 mm in height and approx.
420 mm in width. Transparent mate-
rial must fit within the area of the
document stage.

ZOOM W button

Press to widen the
area to be captured.

(Only when using an opaque
document)
Adjust the direction of the
lighting.

Finely adjust it while observing the room lighting
conditions so that the image will be clearly dis-
played.

6

Press the POWER switch down to the    side.

**BARCO 018-037(E)

2000.7.18, 8:19 PM

18-19

Summary of Contents for R9840700

Page 1: ...UE indicators For a negative image press the button Each time you press the button the display changes in the sequence Normal H Black White Reversal NEGA indicator lights H Blue display BLUE indicator...

Page 2: ...r on the rear of this unit For details refer to page 13 of the User s Manual 2 Turn on the unit Press the POWER switch down to the side 3 Turn on the monitor or projector For details refer to the oper...

Page 3: ...e holding the left mouse button pressed The lines drawn with the Pen function will disappear when another image on the PC card is displayed To deactivate the Pen function click the right mouse button...

Page 4: ...For documents with fine characters Linear2 For glossy documents the brightness will be decreased Picture For photos and colour printed matters L Sharpness To adjust the image contours which can be adj...

Page 5: ...BARCO E 2000 7 18 8 12 PM 44 45...

Page 6: ...ly to ensure safe and proper operation of the unit The precautions given here contain important instructions to ensure safe usage of the product Be sure to observe these precautions KEEP THIS MANUAL H...

Page 7: ...OOM W T FREEZE AF CARD MENU MENU Main Unit Continue Light arms pp 15 16 17 19 To light the document stage Document stage p 19 Place a document on the stage Fluorescent lamps are built in under the sta...

Page 8: ...me you press the button the illumination changes in the sequence Upper lamps on the UPPER indicator lights Lower lamps on the LOWER indicator lights Both off and so on E ZOOM button indicator p 19 Pre...

Page 9: ...cting a Projector and Monitor 13 Connecting a PC Ethernet 14 Connecting the Mouse 14 LPREPARATIONS 15 Raising the Camera Head and Light Arms 15 To Fold the Camera Arm and Light Stands 16 Attaching the...

Page 10: ...onic zoom pp 19 20 21 31 36 In addition to the freeze white balance auto focus color compensation gamma compensation and image inver sion functions the electronic zoom function up to 4x is provided In...

Page 11: ...ied to the video input S video cable supplied to the S video input D sub 15 pin cable supplied to the 15 pin connector Monitor Projector Signal flow TV receiver Using a screwdriver tighten the screws...

Page 12: ...the administrator of the network For information on network settings see Connecting to a Network p 32 10Base T REMOTE Using a screwdriver tighten the screws of the REMOTE connector Rear of this unit...

Page 13: ...rocedure of Raising the camera arm and light stands p 15 4 Fold the light stands Fold the light stands with the fluorescent lamps facing the document stage Fold the right stand first Then fold the lef...

Page 14: ...details refer to the operation manual for the connected equipment The same operation can be performed using the menu p 24 Note When turning the power off then on again leave it off for at least 10 se...

Page 15: ...3 Press the FREEZE button Press the button before removing the material The image will be frozen on the screen 1 You can draw lines on the screen using a mouse for smooth presentations p 33 To use th...

Page 16: ...fifth of the screen of the screen and click the right mouse button 2 Move the pointer and se lect the menu icon The status settings of the menu items etc of the selected menu is displayed beneath the...

Page 17: ...usted the Gain and Color settings return to the factory set values L Tone To adjust the tone gamma setting Natural Linear1 Document Linear2 Picture Using the TONE button on operation panel 2 you can t...

Page 18: ...FOCUS 8 or 9 button to select the color to be adjusted Buttons appears at the left and right ends of the adjust ment bar for the selected color 2 Press either the ZOOM W or T button to ad just the col...

Page 19: ...The Fit Over function does not operate in SXGA mode L Change Pointer To change the form and color of the pointer Fit Over Fit To display the full screen Over To display the center area Iris A M Fit Ov...

Page 20: ...k Setting Set the items relating to networking PowerOn Setting SAVE n o p q r s t u v w x y z a b c d e f g h i j k l m skip 0 1 2 3 4 5 6 7 8 9 Default NetWork Setting Enable NetWork Enable FTP Clien...

Page 21: ...ser ID and Password p 30 2 Click the button for downloading image files which is displayed in the upper portion of the screen when the network is connected The Web camera display appears 3 Click the d...

Page 22: ...u but ton using the ZOOM W T button 3 Press the FREEZE button The selection of the PC Card menu button is ex ecuted 1 Move the pointer to the lower area lower four fifths of the screen of the screen a...

Page 23: ...menu on a monitor or projector connected to the RGB connector The monitor to display the PC card menu can be speci fied using the Setup menu p 29 L ZOOM button To enlarge the image from a PC card file...

Page 24: ...luorescent Lamps The fluorescent lamps used with this unit are commercially available When a lamp has burned out purchase one by specifying the type name FPL13EX N Cleaning the Main Unit To remove dir...

Page 25: ...not go on No picture is obtained The picture is not clear The picture is not fully displayed Pale or muddy colors Measures Check that the power cable is not disconnected from the AC outlet or the AC p...

Page 26: ...020 Hz XGA H 48 363 kHz V 60 004 Hz NTSC H 15 734 kHz V 59 94 Hz PAL H 15 625 kHz V 50 Hz PC card Applicable cards PCMCIA ATA Type II flash card Recording format Conforms to JPEG BMP General Dimensio...

Reviews: