background image

Random Access Adjustment Mode

R5976101.02  BARCO CINE5 310102 ___________________________________________________________________________

6-5

Horizontal Phase Adjustment

Highlight

H PHASE

using the arrow keys and then press

ENTER

.

Note :

No Horizontal Phase adjustment is
available on the internal # pattern.

For external sources :
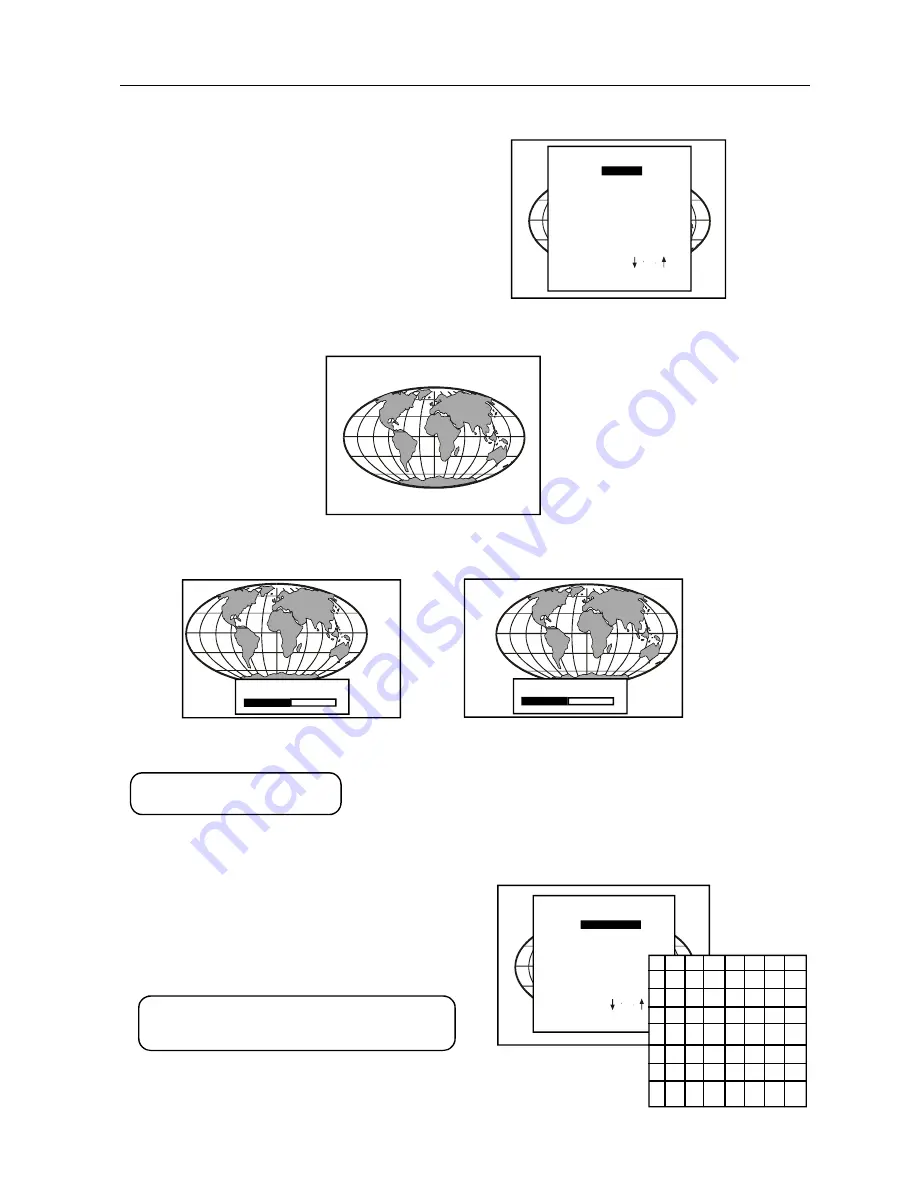
If the raster shift is correctly adjusted, the H Phase text box is projected in the lower center of the raster. At that moment, the
' >< ' icon indicates the center of the raster.
Adjust the H phase control until the middle of the projected image is equal with the center of the ' >< ' icon.

Note : If the genlocked pattern was selected, the external source will be displayed.

A bar scale and a value (between 0 and 100) on the screen give a visual indication of the horizontal phase adjustment.

Raster Shift Adjustment

The green raster must be centered both horizontally and vertically on the center of the CRT surface. To center the green raster,
look into the green lens and use the arrow keys on the RCU to move the raster.

CAUTION :

It is necessary to look into the lenses to perform these adjustments.
To avoid eye discomfort while looking into the lenses, reduce the
contrast and gradually increase the brightness level until the raster
becomes visible on the face of the CRT.

ENTER

continues to geometry menu

<EXIT> to return

then <ENTER>

or

Select with

GEOMETRY

RASTER SHIFT

LEFT-RIGHT (E-W)

TOP-BOTTOM (N-S)

H  SIZE

V  LINEARITY

V  SIZE

BLANKING

H  PHASE

Use Right arrow

to correct

Use Left arrow

to correct

<EXIT> to return

then <ENTER>

or

Select with

GEOMETRY

LEFT-RIGHT (E-W)

TOP-BOTTOM (N-S)

H  SIZE

V  LINEARITY

V  SIZE

BLANKING

H  PHASE

RASTER SHIFT

50

H  PHASE

><

50

H  PHASE

><

ENTER

will select green raster shift adjustment

EXIT

returns to Random Access adjustment mode menu

Summary of Contents for R9002411

Page 1: ...BARCO PROJECTION SYSTEMS Date 31012002 Rev 02 Art No R5976101 R9002411 R9002418 OWNER S MANUAL CINE 5...

Page 2: ...rates uses and can radiate radio frequency energy and if not installed and used in accordance with the instruction manual may cause harmful interference to radio communications Operation of this equip...

Page 3: ...source 3 3 Connecting a RF signal optional 3 3 Peripheral equipment 3 4 Connecting a RCVDS 05 switcher 3 4 Connecting a VS05 switcher 3 4 Connecting an IR Remote Receiver 3 4 CONTROLLING 4 1 Battery...

Page 4: ...assword 7 3 Change Projector Address 7 3 Power up mode 7 4 Common Address 7 4 Memory Management 7 4 Copy a Block 7 4 Deletion of Blocks 7 5 Deleting Block by Block 7 5 Deletion of all Blocks 7 5 All S...

Page 5: ...DICATION ON THE PRODUCT WARNING TO PREVENT FIRE OR ELECTRICAL SHOCK HAZARD DO NOT EXPOSE THIS EQUIPMENT TO RAIN OR MOISTURE FEDERAL COMMUNICATION COMMISSION FCC STATEMENT This equipment has been teste...

Page 6: ...f the ampere ratings on the products plugged into the extension cord does not exceed the extension cord ampere rating Also make sure that the total of all products plugged into the wall outlet does no...

Page 7: ...safety checks to determine that the product is in proper operating condition On cleaning Unplug this product from the wall outlet before cleaning Do not use liquid cleaners or aerosol cleaners Use a...

Page 8: ...to the projector 6 S VIDEO IN Separated Y C luma chroma signal inputs and outputs for higher quality playback of Super VHS signals 4 pin S VIDEO connector 7 Auto diagnosis display Stand By Operational...

Page 9: ...ol adaptation and set up It includes automatic storing of picture controls Brightness Sharpness picture geometry adjustments convergence adjustments Other functions of the remote control are switching...

Page 10: ...ing for each picture function TEXT During Video or RGB operations when adjusting one of the image controls the displayed bar scale can be removed by pressing TEXT key first To re display the bar scale...

Page 11: ...ce menu of the projector This is done during installation by a qualified technician If you want to change this start up mode call a qualified technician Stand by indication lamp No light up Projector...

Page 12: ...ighlighted source Connecting a RGB Analog source with sync on green Connecting RGB Analog Source with Sync on green at 15K Input Selection a with the RCU press digit 4 OR b with the local keypad press...

Page 13: ...OR b with the local keypad press ADJUST key the GENERAL ACCESS menu is displayed on the screen use the control keys to highlight 6 press ENTER to select the highlighted source GENERAL ACCESS 6 7 4 5 1...

Page 14: ...displayed on a 2 digit display and the selected input modules will be indicated with a LED on the rear For more information about the use of the RCVDS 05 consult the Owner s Manual order No R5975765 C...

Page 15: ...e bottom of the RCU Lift up the top side of the cover at the same time fig 1 Insert the new batteries AA type or equivalent in the compartment according to the markings in the compartment and put the...

Page 16: ...rojector address See Change Projector Address in chapter Service Mode Every projector requires an individual address between 0 and 255 which is set in the service mode Only projectors with addresses b...

Page 17: ...esired number Press ENTER to confirm your selection When a valid and connected source is selected information about that source will be displayed in a Text Box on the screen This information includes...

Page 18: ...l name e g Brightness appears on the screen only if TEXT is ON The length of the bar scale indicates the current setting of this control The bar scale changes as the left or right arrow keys on the RC...

Page 19: ...ing while pressing the or keys If the bar scale is not visible on the screen press the TEXT key once and retry the color key Tint Control Tint is only active for Video and S Video Tint control is only...

Page 20: ...technician to perform the installation procedure Service Service should be selected if the user wants to delete or modify memory blocks change password or apply information while in Guided or Random A...

Page 21: ...now also available if you stay in the adjustment mode ENTER continues to setup Pattern Selection EXIT returns to previous menu Overview of Random Access Adjustment mode RANDOMACCESS ADJUSTMENTMODE SE...

Page 22: ...RANDOM ACCESS ADJUSTMENT MODE Through this menu the following adjustments are accessible Picture Tuning Geometry Convergence Color Select Picture Tuning Highlight Picture Tuning with the arrow keys an...

Page 23: ...AMMA adjust function acts on the luminance content of the image It has a non linear amplification characteristic At minimum Gamma 1 the lower parts of the signal are amplified with higher gain Decodin...

Page 24: ...and press ENTER to display the Geometry menu Enter will display the Geometry menu Exit will return to the previous menu Adjustreturnstooperationalmode Within the Geometry Adjustment menu the following...

Page 25: ...tal phase adjustment Raster Shift Adjustment The green raster must be centered both horizontally and vertically on the center of the CRT surface To center the green raster look into the green lens and...

Page 26: ...T longevity and to avoid CRT damage do not shift the raster outside the phosphor area of the CRT Projected raster CRT faceplate border Phosphor border Forbidden area To start the adjustment use the ar...

Page 27: ...vertical centerline skew side keystone left and right side bow left and right All adjustments are indicated on the screen with the function name a bar scale and a value between 0 and 100 ENTER will se...

Page 28: ...centerline Bow Horizontal centerline Skew Top Bow Top Keystone Bottom Bow Bottom Keystone All adjustments are indicated on the screen with the function name a bar scale and a value between 0 and 100...

Page 29: ...adjustment function corrects for vertical nonlinearities which extend from the center of the image to the top and bottom Use the arrow keys to highlight V Linearity in the Geometry menu and then pres...

Page 30: ...the projected image on the screen and to blank out unwanted information or noise A 0 on the bar scale indicates no blanking To start up the Blanking adjustment use the following procedure Use the arr...

Page 31: ...adjustment at the Bottom of the image Blanking adjustment at the Left of the image Blanking adjustment at the Right of the image Adjust the blanking alignments until the image is correctly framed or t...

Page 32: ...ADJ with ENTER ENTER continue EXIT to return CONVERGE ADJUSTMENT 70 Use the arrow keys to move the box to the desired zone and then press ENTER to begin the convergence adjustment Start the convergen...

Page 33: ...ssword function is active Enter your password to continue All other password protected items are now also available if you stay in the adjustment mode ENTER continues to the Service mode main menu EXI...

Page 34: ...contact a qualified service technician Software version Configuration Possible configurations Front ceiling Front table Rear ceiling Rear table Baud rate PC Transfer speed for communication with an IB...

Page 35: ...will be displayed Press EXIT to return to the Projector Setup menu without saving the new password When the displayed password is correct press ENTER to save If not correct press EXIT to cancel the sa...

Page 36: ...owerup mode select Power up using the arrow keys and then press ENTER to toggle between Operating and Standby EXIT returns to SERVICE menu Common Address Common Address is an address that all projecto...

Page 37: ...t with DELETE ALL BLOCKS ALL SETTINGS TO MID POS R B CONVERGENCE TO MID COPY A BLOCK DELETE A BLOCK COPY MODE or EXIT toreturn Scroll with or ENTER tocopy Selectwith Nr Src Fh Fv inp Conf 1 1 15 6 50...

Page 38: ...ghlight R B Convergence Mid Press ENTER to select A confirmation screen will be displayed first Press ENTER to confirm Press EXIT to cancel the procedure MEMORY MANAGEMENT or EXIT toreturn then ENTER...

Page 39: ...AGEMENT COMMON SETTINGS I2C DIAGNOSTICS COMMON SETTINGS or EXIT toreturn then ENTER Selectwith G2 ADJUSTMENT CRT RUN IN CYCLE COMMON SETTINGS or EXIT toreturn then ENTER Selectwith G2 ADJUSTMENT CRT R...

Page 40: ...lable When one or more such blocks are available a flashing white image 5 sec on 5 sec off is generated and that for 5 min on the first internal block In the next 5 min a second internal block will be...

Page 41: ...e on a 7 segment display Order number R9827515 Hardwired RCU The control signals from the RCU can be sent to the projector via a wired connection Preparing your remote cable Use a shielded cable with...

Page 42: ...nd communication cables BARCO provides several cables to connect peripheral equipment to the projector a D9 D9 communication cable To connect an IBM PC or compatible to the projector only if the optio...

Page 43: ...ion When you want to leave the tuner mode press the BARCO key again 2 Using the local keypad Order no B roadcastin g S y s tem A u d io Type Teletext R9828590 B G L F M FM NIC A M TXT R9828600 I F M F...

Page 44: ...display the adjustment mode menu Highlight TUNER SETUP by pushing the control disc up or down and press ENTER to display the Tuner Setup menu Broadcasting System The broadcasting system is the way the...

Page 45: ...CHANNEL LIST Manual Search The desired channels can be search manually Highlight MANUAL SEARCH by pushing the control disc up or down and press ENTER to display the manual search menu The last select...

Page 46: ...t a frequency with the control disc press TEXT to reprogram the name The Compose menu will be displayed The first position blinks select with the control disc the desired character on the displayed ke...

Page 47: ...pages then press the FREEZ key To allow normal operation press this button again ENTER key To display a particular sub page of a page Select first your page Press ENTER to display at the top left corn...

Reviews: