background image

1. Welcome!

1. Stand base plate
2. Stand pillar
3. Jog dial

- Push long (5 sec):

o

to put display in standby mode

- Push short:

o

to exit standby mode

o

to active the OSD menu

o

to con

fi

rm selections in the OSD menu

- Turn right

o

to scroll up in the OSD menu

o

to increase values in the OSD menu

- Turn left

o

to scroll down in the OSD menu

o

to decrease values in the OSD menu

4. Front sensor
5. Ambient light sensor
6. Power status LED

- Off: Display is in normal operation mode, or display is not powered
- Blinking orange: Display is entering standby mode
- Steady orange: Display is in standby mode

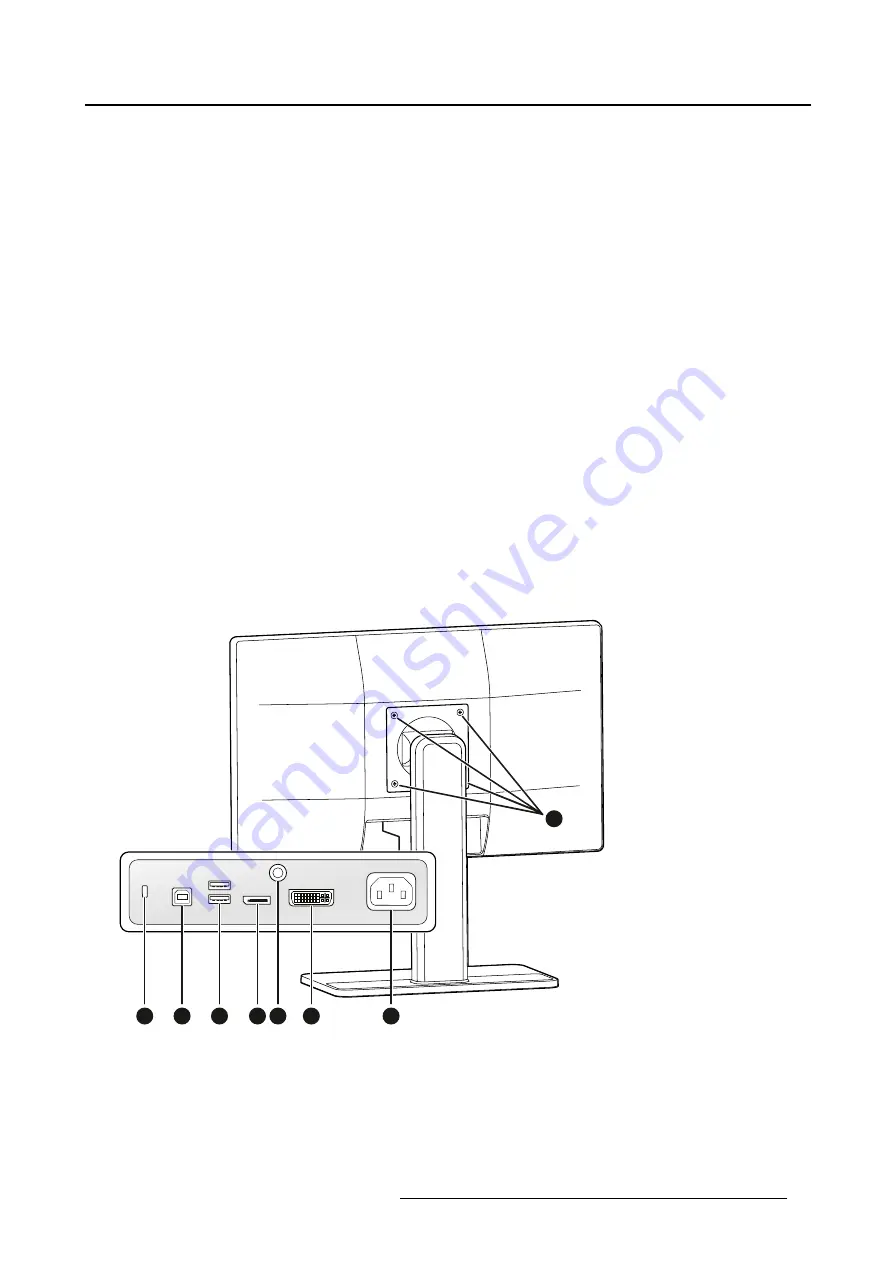
Back

8

1

2

3

4

6

7

5

Image 1-2

K5902134 NIO COLOR 2MP 23" 05/07/2017

5

Summary of Contents for MDNC-2123

Page 1: ...Nio Color 2MP 23 User Guide MDNC 2123 option DE K5902134 01 05 07 2017...

Page 2: ...26 22 62 Support www barco com en support Visit us at the web www barco com Registered address Barco NV President Kennedypark 35 8500 Kortrijk Belgium Phone 32 56 23 32 11 Fax 32 56 26 22 62 Support w...

Page 3: ...4 3 5 Input source selection 14 3 6 Luminance adjustment 15 3 7 sRGB color space 15 3 8 Display functions 15 3 9 White point selection 16 3 10 Power save mode 16 3 11 OSD menu language 17 3 12 Factory...

Page 4: ...Table of contents 2 K5902134 NIO COLOR 2MP 23 05 07 2017...

Page 5: ...dard because of Barco s luminance sensor technology and MediCal QAWeb software By constantly measuring and monitoring display brightness we can ensure that your dental images will look consistent and...

Page 6: ...uide 1x system disc 1x documentation disc 1x video signal cable 1x USB cable 1x set of AC power cords depending on the region of operation Keep your original packaging It is designed for this display...

Page 7: ...oll up in the OSD menu o to increase values in the OSD menu Turn left o to scroll down in the OSD menu o to decrease values in the OSD menu 4 Front sensor 5 Ambient light sensor 6 Power status LED Off...

Page 8: ...SB B 2 0 upstream connector 3 USB A 2 0 downstream connectors 2x 4 DisplayPort video input 5 Earth pin 6 DVI D video input 7 100 240 VAC mains power input IEC C14 8 VESA 100 mm mounting screw holes 4x...

Page 9: ...on CAUTION When the display is assembled in the medical system take care of the fixa tion of all cables to avoid unwanted detachment CAUTION The monitor is not intended to be sterilized 2 1 Stand base...

Page 10: ...iate video cable s to do this The input source to be displayed can be selected in the OSD menus see Input source selection page 14 Image 2 3 2 Connect the USB upstream connector to a PC USB host to ma...

Page 11: ...rounded outlet by means of a yellow green AWG18 wire maximum admitted cable length according to national regulation requirements Image 2 6 5 Route all cables through the provided cable routing clip at...

Page 12: ...de is functionally not supported 2 4 VESA mount installation To mount the display on a VESA arm The display panel standard attached to the stand is compatible with the VESA 100 mm standard 1 Unscrew t...

Page 13: ...4 M4 screws to attach the panel to a VESA approved arm Please respect the following rule to select an appropriate screw length Lmin T W 6 mm Lmax T W 14 mm T W Lmin Lmax Image 2 9 K5902134 NIO COLOR...

Page 14: ...2 Installation 12 K5902134 NIO COLOR 2MP 23 05 07 2017...

Page 15: ...n saver displays moving content In case you are working with the same image or an application with static image elements for several hours continuously so that the screen saver is not activated change...

Page 16: ...submenu or confirm adjustments and selections 3 4 OSD menu locking unlocking About To avoid unwanted or accidental activation of the OSD menu a lock mechanism can be enabled This mechanism will automa...

Page 17: ...parts contain more diagnostic information then others To respond to these conclusions display functions have been defined These functions emphasize on these parts containing crucial diag nostic infor...

Page 18: ...About white point selection This setting allows you to modify the display white point used as reference for all other colors to be dis played The available white point settings for your display are Na...

Page 19: ...SD main menu 2 Navigate to the Adjustments Settings menu 3 Enter the OSD Language submenu 4 Select one of the available languages 3 12 Factory reset About factory reset A factory reset allows you to f...

Page 20: ...3 Operation 18 K5902134 NIO COLOR 2MP 23 05 07 2017...

Page 21: ...ply excessive pressure on the front glass or LCD CAUTION Do not apply or spray liquid directly to the display as excess liquid may cause damage to internal electronics Instead apply the liquid to a cl...

Page 22: ...70 Strong alkalis lye strong solvents Acid Detergents with fluoride Detergents with ammonia at higher concentration 1 6 Detergents with abrasives Steel wool Sponge with abrasives Steel blades Cloth wi...

Page 23: ...xygen or nitrous oxide Non patient care equipment Equipment primarily for use in a health care facility that is intended for use where contact with a patient is unlikely no applied part The equipment...

Page 24: ...he safety standard of your particular country Water and moisture Never expose the display to rain or moisture Never use the display near water e g near a bathtub washbasin swimming pool kitchen sink l...

Page 25: ...te disposal service For details please visit the Barco website at http www barco com en AboutBarco weee Turkey RoHS compliance T rkiye Cumhuriyeti AEEE Y netmeli ine Uygundur Republic of Turkey In con...

Page 26: ...cts EIP that are sold within Chinese Mainland must comply with the Marking for the restriction of the use of hazardous substances in electrical and electronic product of Chi nese Mainland marked with...

Page 27: ...e must accept any interference re ceived including interference that may cause undesired operation This device has been tested and found to comply with the limits for a Class B digital device pursuant...

Page 28: ...on If this equipment does cause harmful interference to or suffer from harmful interference of surrounding equipment the user is encouraged to try to correct the interference by one or more of the fo...

Page 29: ...cy magnetic fields should be at levels characteristic of a typical location in a typical commercial or hospital environment Conducted RF IEC 61000 4 6 Radiated RF IEC 61000 4 3 3 Vrms 150 kHz to 80 MH...

Page 30: ...P 0 01 0 12 0 12 0 23 0 1 0 38 0 38 0 73 1 1 2 1 2 2 3 10 3 8 3 8 7 3 100 12 12 23 At 80 MHz and 800 MHz the separation distance for the higher frequency range applies 3 Field strengths from fixed tra...

Page 31: ...Canada and US Indicates the device is approved according to the UL regulations for Canada and US Indicates the device is approved according to the UL Demko regulations Indicates the device is approve...

Page 32: ...number or catalogue number Warning dangerous voltage Caution Consult the operating instructions Indicates this device must not be thrown in the trash but must be recycled according to the European WE...

Page 33: ...heric pressure to which the medical device can be safely exposed when being stored 5 7 Legal disclaimer Disclaimer notice Although every attempt has been made to achieve technical accuracy in this doc...

Page 34: ...ls Pixel pitch 0 2715 mm Color imaging Yes Gray imaging Yes Bit depth 30 bit Viewing angle H V 178 Ambient light presets Yes reading room selection Ambient light sensor Yes Front sensor Yes Maximum lu...

Page 35: ...eflective glass cover Option DE WH N A Recommended modalities All digital images except digital mammography Certifications CE0120 MDD 93 42 EEC A1 2007 47 EC class IIb product CE 2014 30 EU IEC 60950...

Page 36: ...arco Terms Conditions for specific Warranty conditions Operating temperature 0 C to 40 C 15 C to 35 C within specs Storage temperature 20 C to 60 C Operating humidity 8 to 80 non condensing Storage hu...

Reviews: