


3. Physical installation
3.2.3
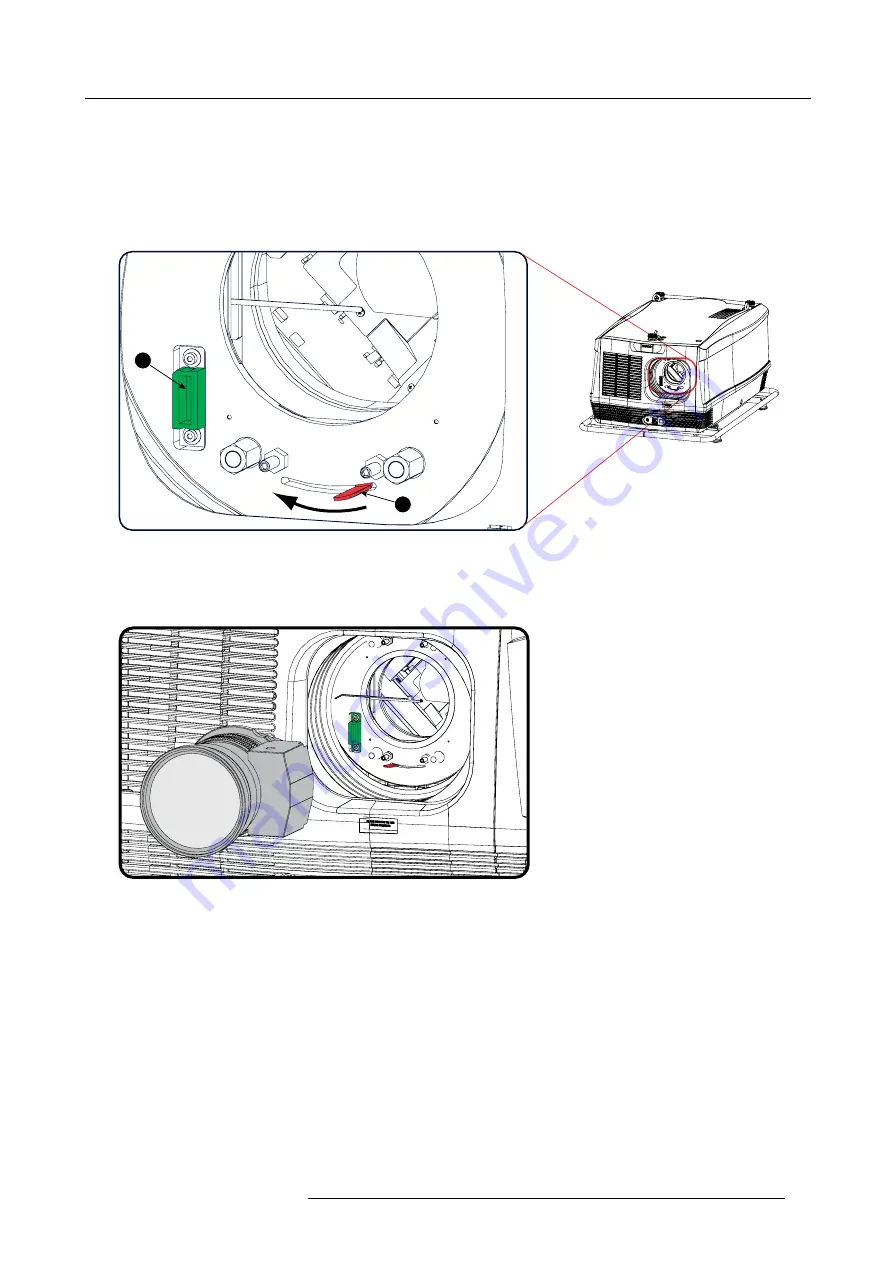
Lens installation
How to install
1. Remove the foam rubber in the opening of the lens holder if not removed yet.
2. Take the lens assembly out of its packing material and remove the lens caps on both sides.
3. Place the lens holder in the “unlocked” position by moving the lens lock handle (A) towards the lens power supply socket (B) as
illustrated.
A
B
Image 3-18
Lens installation, preparation
4. Ensure that the lens holder stands in the On-Axis position (horizontal and vertical mid position).
Note:
The lens holder is placed default in the On-Axis position at factory.
5. Gently insert the lens in such a way that the lens connector matches the socket (B).
Image 3-19
Lens insertion
6. Insert the lens until the connector seats into the socket.
Warning:
Do not release the Lens yet, as the Lens may fall out of the Lens Holder.
7. Secure the lens in the lens holder by sliding the lens lock handle into the “locked” position, which is away from the lens power
supply socket. Ensure the lens touches the front plate of the lens holder.
R5905158 HDF W SERIES 01/06/2012
33
Summary of Contents for HDF W22
Page 1: ...HDF W series Installation manual R5905158 00 01 06 2012...
Page 4: ......
Page 26: ...2 Configurations requirements and restrictions 22 R5905158 HDF W SERIES 01 06 2012...
Page 58: ...4 Input Communication 54 R5905158 HDF W SERIES 01 06 2012...
Page 70: ...5 Getting started 5 8 Projector Address 66 R5905158 HDF W SERIES 01 06 2012...
Page 76: ...5 Getting started 72 R5905158 HDF W SERIES 01 06 2012...
Page 84: ...6 Quick set up adjustment 80 R5905158 HDF W SERIES 01 06 2012...
Page 94: ...7 Start up of the adjustment mode 90 R5905158 HDF W SERIES 01 06 2012...
Page 120: ...8 Input 116 R5905158 HDF W SERIES 01 06 2012...
Page 123: ...9 Image Splash image On or Off Timeout sec R5905158 HDF W SERIES 01 06 2012 119...
Page 134: ...9 Image 9 3 7 Input Balance 130 R5905158 HDF W SERIES 01 06 2012...
Page 142: ...9 Image 9 5 Timings 138 R5905158 HDF W SERIES 01 06 2012...
Page 146: ...9 Image 9 6 Image File Services 142 R5905158 HDF W SERIES 01 06 2012...
Page 198: ...11 Lamp 194 R5905158 HDF W SERIES 01 06 2012...
Page 225: ...12 Alignment 12 14 Scenergix R5905158 HDF W SERIES 01 06 2012 221...
Page 238: ...12 Alignment 234 R5905158 HDF W SERIES 01 06 2012...
Page 275: ...13 Projector Control Image 13 84 DMX overview list R5905158 HDF W SERIES 01 06 2012 271...
Page 290: ...13 Projector Control 286 R5905158 HDF W SERIES 01 06 2012...
Page 297: ...14 Service Image 14 7 Diagnosis versions list R5905158 HDF W SERIES 01 06 2012 293...
Page 301: ...14 Service Image 14 20 Lamp power supply logging R5905158 HDF W SERIES 01 06 2012 297...
Page 304: ...14 Service Image 14 28 Notification overview list 300 R5905158 HDF W SERIES 01 06 2012...
Page 322: ...14 Service 318 R5905158 HDF W SERIES 01 06 2012...
Page 326: ...15 Maintenance 322 R5905158 HDF W SERIES 01 06 2012...
Page 336: ...16 Removal and installation of the projector covers 332 R5905158 HDF W SERIES 01 06 2012...
Page 349: ...A Specifications A SPECIFICATIONS R5905158 HDF W SERIES 01 06 2012 345...
Page 350: ...A Specifications 346 R5905158 HDF W SERIES 01 06 2012...
Page 359: ...C Standard source files C STANDARD SOURCE FILES R5905158 HDF W SERIES 01 06 2012 355...
Page 360: ...C Standard source files 356 R5905158 HDF W SERIES 01 06 2012...
Page 364: ...C Standard source files 360 R5905158 HDF W SERIES 01 06 2012...
Page 375: ...F Environmental information F ENVIRONMENTAL INFORMATION R5905158 HDF W SERIES 01 06 2012 371...
Page 376: ...F Environmental information 372 R5905158 HDF W SERIES 01 06 2012...
Page 380: ...F Environmental information 376 R5905158 HDF W SERIES 01 06 2012...


