


5. Connections
Wired remote control
If desired the remote control unit can be wired and plugged in into the 3,5 mm mini jack socket (L) or, when using a rugged wire
with XLR plugs, plugged in into the male XLR port (M) on the communication interface. Besides the XLR input port a female XLR
connector (N) for wired RC5 output is provided. This connector creates a buffered RC5 signal, available for the next projector in
the daisy chain. Whenever the projector has no power, a passive loop through is created from the remote control input port to the
female XLR output port (N). So, the following projector in the daisy chain will still receive his RC5 code. Note that the RC5 in/out
signals are without carrier.
Mini jack plug
XLR – Remote CTRL in
XLR – Remote CTRL out
Pin Description
Pin Description
Pin Description
S
GND
1
GND
1
GND
T
RC5 in
2
RC5 in
2
RC5 out
R
n.c. or GND
3
XLR present sense
3
XLR present sense
S
R
T
A
B
C
1
2
3
2
1
3
PUSH
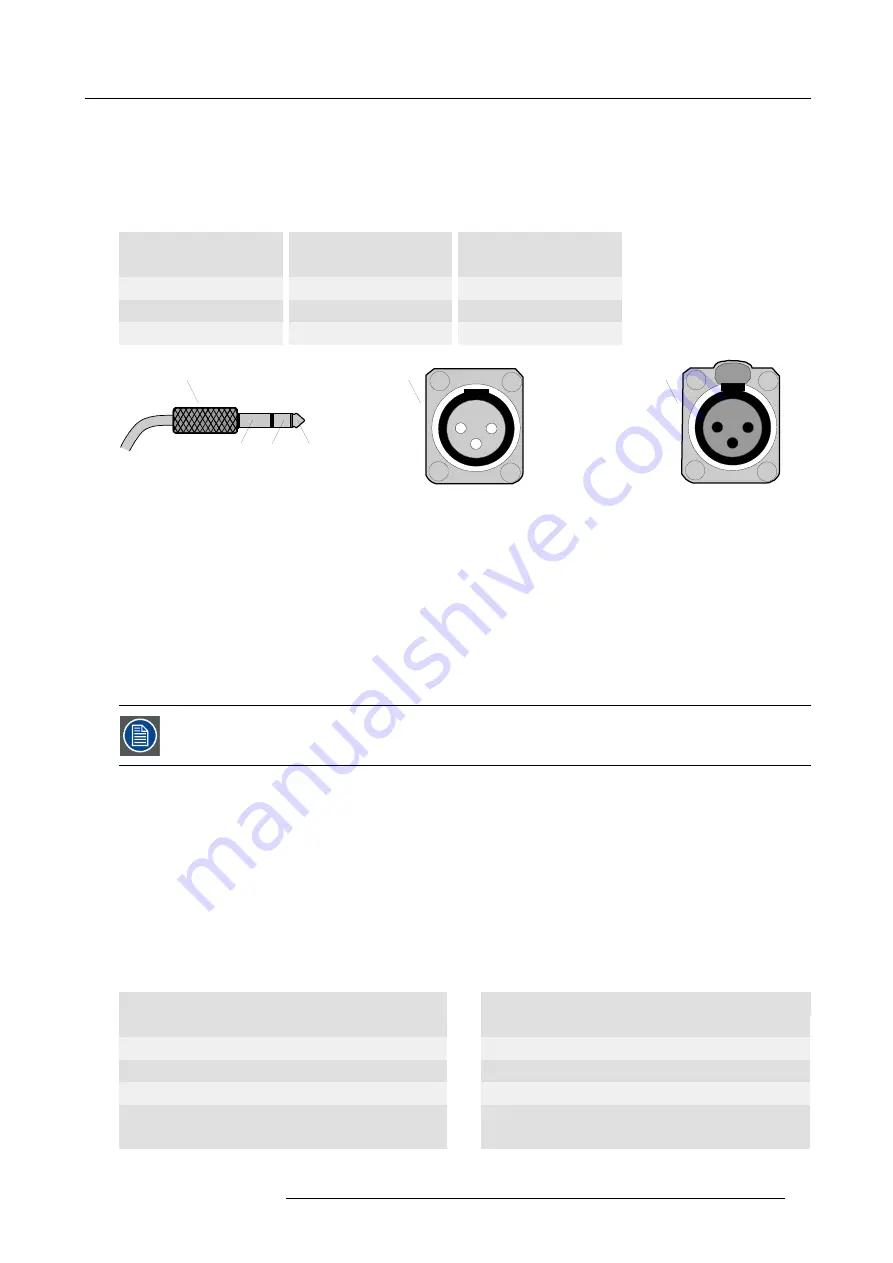
Image 5-10
A
Mini stereo jack plug.
•
S : SLeeve (shield)
•
R : Ring
•
T : Tip
B
Male XLR socket.
C Female XLR socket.
RS232/422 serial communication
The communication interface of the FLM HD20 supports RS232 and RS422 serial communication. You can use the RS232/RS422
input port (O) to connect a local PC to your FLM projector. This way you can con
fi
gure and control your FLM projector from your
local PC.
Do not forget to set the projector’s baud rate (default = 115200) to match that of the computer.
The communication interface has also an active RS232/RS422 loop through output port (E). Whenever the projector has no power, a
passive loop through is created from the RS232/RS422 input port (O) to the RS232/RS422 output port (E). So, the following projector
in the daisy chain will still receive his RS232/RS422 commands.
Advantages of using RS232/RS422 serial communication:
•
easy adjustment of the projector via PC (or MAC).
•
allow storage of multiple projector con
fi
gurations and set ups.
•
wide range of control possibilities.
•
address range from 0 to 255.
•
sending data to the projector (update).
•
copying data from the projector (backup).
RS232/422 input port
RS232/422 output port
Pin Description
Pin Description
1
DCD : Data Carrier Detect
1
— (not connected) —
2
RXD- : Receive Data
2
RXD- : Receive Data
3
TXD- : Transmitted Data
3
TXD- : Transmitted Data
4
DTR : Data Terminal Ready [RS232]
TXD+ : Transmitted Data [RS422]
4
DTR : Data Terminal Ready [RS232]
TXD+ : Transmitted Data [RS422]
R59770180 FLM HD20 11/07/2008
39
Summary of Contents for FLM HD20
Page 1: ...FLM HD20 User guide R59770180 00 11 07 2008...
Page 4: ......
Page 14: ...1 Safety 10 R59770180 FLM HD20 11 07 2008...
Page 46: ...5 Connections 42 R59770180 FLM HD20 11 07 2008...
Page 58: ...6 Getting started 54 R59770180 FLM HD20 11 07 2008...
Page 62: ...7 Start up of the Adjustment Mode 58 R59770180 FLM HD20 11 07 2008...
Page 72: ...8 Input menu 68 R59770180 FLM HD20 11 07 2008...
Page 97: ...9 Image menu Image 9 105 Image 9 106 Image 9 107 R59770180 FLM HD20 11 07 2008 93...
Page 98: ...9 Image menu 94 R59770180 FLM HD20 11 07 2008...
Page 112: ...10 Layout menu Image 10 56 108 R59770180 FLM HD20 11 07 2008...
Page 116: ...11 Lamp menu Image 11 11 Image 11 12 Image 11 13 112 R59770180 FLM HD20 11 07 2008...
Page 156: ...13 Projector control 152 R59770180 FLM HD20 11 07 2008...
Page 190: ...17 Removal of the projector covers 186 R59770180 FLM HD20 11 07 2008...
Page 194: ...18 Dimensions 190 R59770180 FLM HD20 11 07 2008...
Page 204: ...20 Troubleshooting 200 R59770180 FLM HD20 11 07 2008...
Page 212: ...21 Specifications 208 R59770180 FLM HD20 11 07 2008...
Page 214: ...22 Order information 210 R59770180 FLM HD20 11 07 2008...


