


13. Projector control
What should be set up for an Ethernet address?
2 ways can be used to assign an address:
•
use the DHCP setting so that an automatic address will be assigned.
•
Assign manually an IP address, Net-mask (subnet-mask), (default) gateway address.
-
Set the IP-Address
fi
eld to the desired value. This must NOT be 0.0.0.0 for static IP-Address assignment. The IP address
identi
fi
es a projector’s location on the network in the same way a street address identi
fi
es a house on a city block. Just as
a street address must identify a unique residence, an IP address must be globally unique and have a uniform format.
-
Set the Subnet-Mask as appropriate for the local subnet.
-
Set the Default-Gateway to the IP-Address of the local router (MUST be on the local subnet!) on the same network as this
projector that is used to forward traf
fi
c to destinations beyond the local network. This must not be 0.0.0.0. If there is no
router on the projector’s local subnet then just set this
fi
eld to any IP-Address on the subnet.
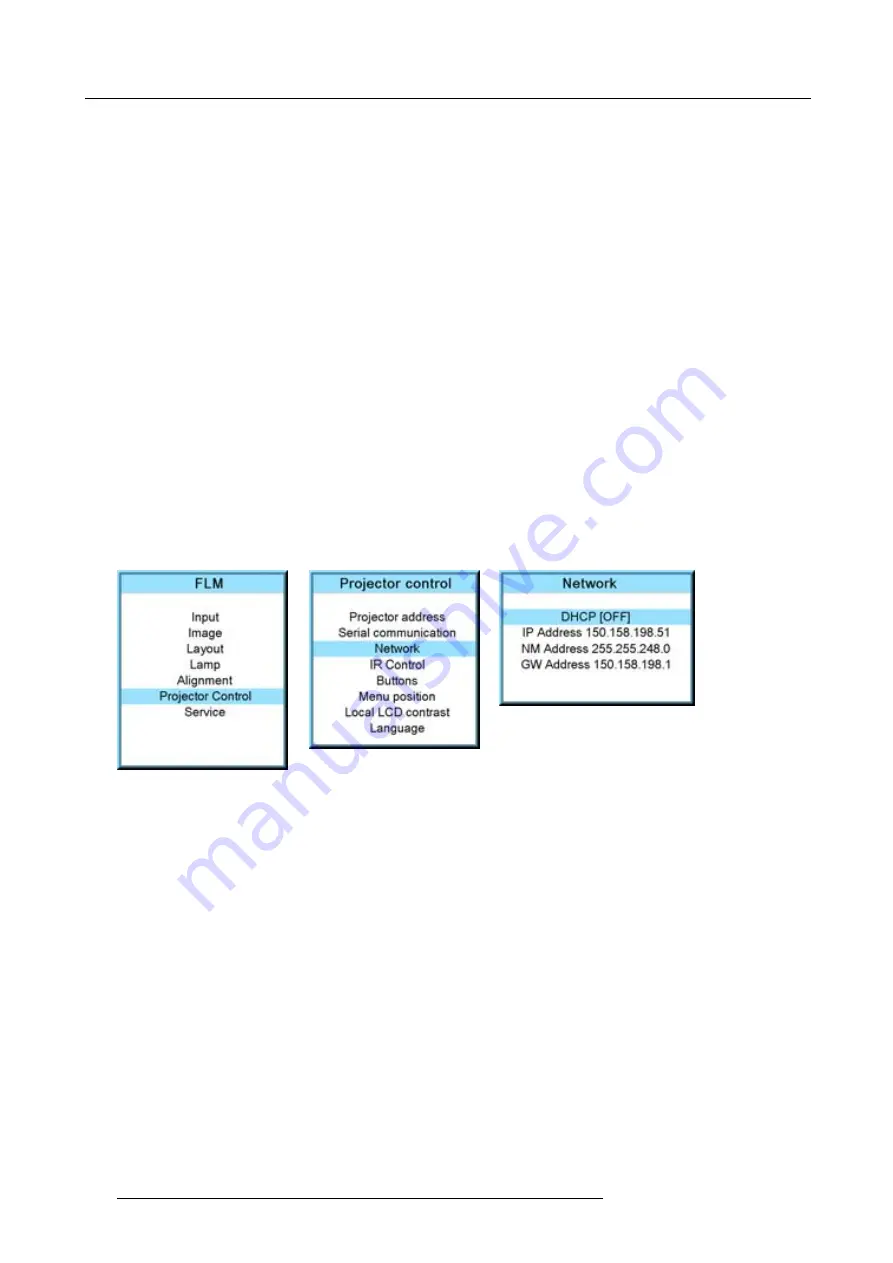
13.4.2 DHCP setup
How to switch DHCP setting?
1. Press
MENU
to activate the menus.
2. Use the
▲
or
▼
key to select
Projector control
and press
ENTER
.
3. Use the
▲
or
▼
key to select
Ethernet
and press
ENTER
.
The Ethernet menu opens.
4. Use the
▲
or
▼
key to select
DHCP
.
5. Press
ENTER
to toggle the DHCP setting.
[ON] = DHCP is activated. Automatic assigning of an address is activated.
[OFF ] = DHCP is deactivated. A
fi
xed address will be used.
Image 13-18
Image 13-19
Image 13-20
13.4.3 IP-address set up
How to set up?
1. Press
MENU
to activate the menus.
2. Use the
▲
or
▼
key to select
Projector control
and press
ENTER
.
3. Use the
▲
or
▼
key to select
Network
and press
ENTER
.
The Network menu opens.
4. Use the
▲
or
▼
key to select
IP-address
and press
ENTER
to select.
Note:
An address contains 4 octets with a maximum value of 255.
This must NOT be 0.0.0.0 for static IP-Address assignment.
5. Use the
▲
or
▼
key to select the desired digit and press
◄
or
►
key to select the next digit in the address.
Or,
enter the value with the digit keys on the remote control or local keypad. The next digit in the address will be selected automati-
cally.
6. Press
EXIT
to return.
144
R59770180 FLM HD20 11/07/2008
Summary of Contents for FLM HD20
Page 1: ...FLM HD20 User guide R59770180 00 11 07 2008...
Page 4: ......
Page 14: ...1 Safety 10 R59770180 FLM HD20 11 07 2008...
Page 46: ...5 Connections 42 R59770180 FLM HD20 11 07 2008...
Page 58: ...6 Getting started 54 R59770180 FLM HD20 11 07 2008...
Page 62: ...7 Start up of the Adjustment Mode 58 R59770180 FLM HD20 11 07 2008...
Page 72: ...8 Input menu 68 R59770180 FLM HD20 11 07 2008...
Page 97: ...9 Image menu Image 9 105 Image 9 106 Image 9 107 R59770180 FLM HD20 11 07 2008 93...
Page 98: ...9 Image menu 94 R59770180 FLM HD20 11 07 2008...
Page 112: ...10 Layout menu Image 10 56 108 R59770180 FLM HD20 11 07 2008...
Page 116: ...11 Lamp menu Image 11 11 Image 11 12 Image 11 13 112 R59770180 FLM HD20 11 07 2008...
Page 156: ...13 Projector control 152 R59770180 FLM HD20 11 07 2008...
Page 190: ...17 Removal of the projector covers 186 R59770180 FLM HD20 11 07 2008...
Page 194: ...18 Dimensions 190 R59770180 FLM HD20 11 07 2008...
Page 204: ...20 Troubleshooting 200 R59770180 FLM HD20 11 07 2008...
Page 212: ...21 Specifications 208 R59770180 FLM HD20 11 07 2008...
Page 214: ...22 Order information 210 R59770180 FLM HD20 11 07 2008...


