4. Stacking CLM projectors
D
C
B
A
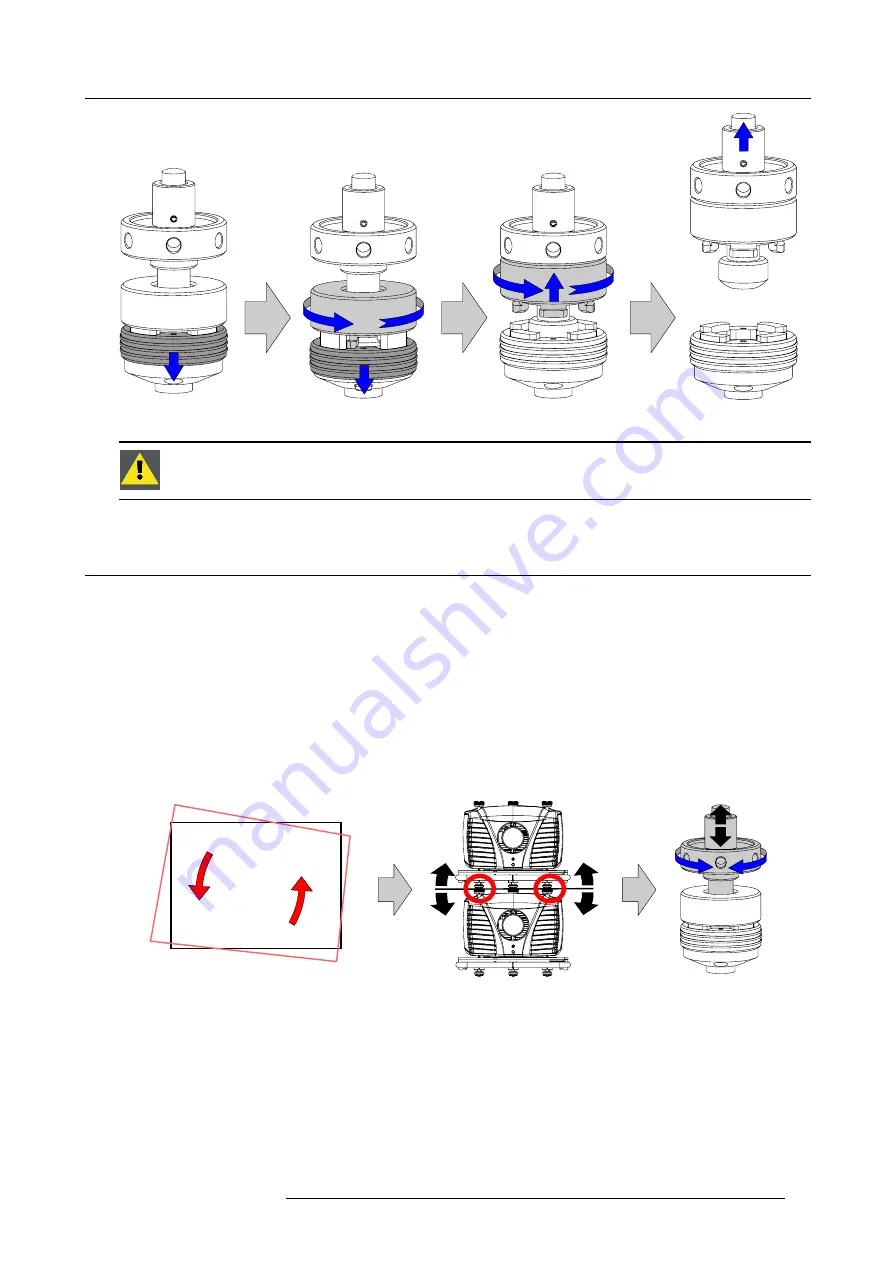
Image 4-4
Open the interlocking
W
ARNING
:
Never open an interlocking adapter of a stacked projector which is still suspended. First place
the stacked projectors on the
fl
oor.
4.2
Aligning stacked CLM projectors
How to align two stacked CLM projectors
1. Make sure that the internal hatch pattern projected by the reference projector is sharp and has a perfect rectangle outline. If this
is not the case, readjust the reference projector before aligning the other stacked projector(s) with the reference hatch pattern.
Note:
The reference projector in a stacked con
fi
guration is the lowest projector in case of table mount and the uppermost
projector in case of ceiling mount.
2. Project with the stacked projector the same internal hatch pattern as the reference projector.
Tip:
Use a white colored hatch pattern for the reference projector and e.g. green colored for the stacked projector. This
makes it easier to see the difference between both hatch patterns projected.
3. If necessary, adjust the rotation of the stacked projector with respect to the reference projector by turning in or out the height
adjustment ring of the interlocking adaptors at the front of the stacked projector. Adjust until the outline of the hatch pattern is
most symmetric with the reference hatch pattern.
Tip:
You can increase leverage by using a screw driver in the holes of the adjustment ring
Rotation
Image 4-5
Rotation adjustment
4. If necessary, adjust the inclination of the stacked projector with respect to the reference projector by turning the height adjustment
ring of the interlocking adaptor at the rear of the stacked projector in or out. Adjust until the outline of the hatch pattern is most
symmetric with the reference hatch pattern.
R59770021 CLM R10+ 15/03/2010
35
Summary of Contents for CLM R10+ R9050100
Page 1: ...CLM R10 Users manual R9050100 R90501001 R59770021 10 15 03 2010 ...
Page 14: ...1 Safety 10 R59770021 CLM R10 15 03 2010 ...
Page 22: ...2 General 18 R59770021 CLM R10 15 03 2010 ...
Page 35: ...3 Physical installation Skew Image 3 28 Skew adjustment R59770021 CLM R10 15 03 2010 31 ...
Page 36: ...3 Physical installation 32 R59770021 CLM R10 15 03 2010 ...
Page 48: ...5 Connections 44 R59770021 CLM R10 15 03 2010 ...
Page 64: ...7 Start up of the Adjustment mode 60 R59770021 CLM R10 15 03 2010 ...
Page 74: ...8 Input menu 70 R59770021 CLM R10 15 03 2010 ...
Page 116: ...10 Layout menu 112 R59770021 CLM R10 15 03 2010 ...
Page 158: ...13 Projector control 154 R59770021 CLM R10 15 03 2010 ...
Page 172: ...14 Service menu 168 R59770021 CLM R10 15 03 2010 ...
Page 186: ...16 Servicing 182 R59770021 CLM R10 15 03 2010 ...
Page 196: ...17 Projector covers removal and installation 192 R59770021 CLM R10 15 03 2010 ...
Page 204: ...C DMX Chart 200 R59770021 CLM R10 15 03 2010 ...
Page 210: ...D Specifications 206 R59770021 CLM R10 15 03 2010 ...
Page 216: ...E Troubleshooting 212 R59770021 CLM R10 15 03 2010 ...
Page 222: ...F Mounting optional Carry handle 218 R59770021 CLM R10 15 03 2010 ...
Page 224: ...G Order info 220 R59770021 CLM R10 15 03 2010 ...


