background image

601

0443 /03

Balder

23

1

2

3

4

9

8

5

7

6

10

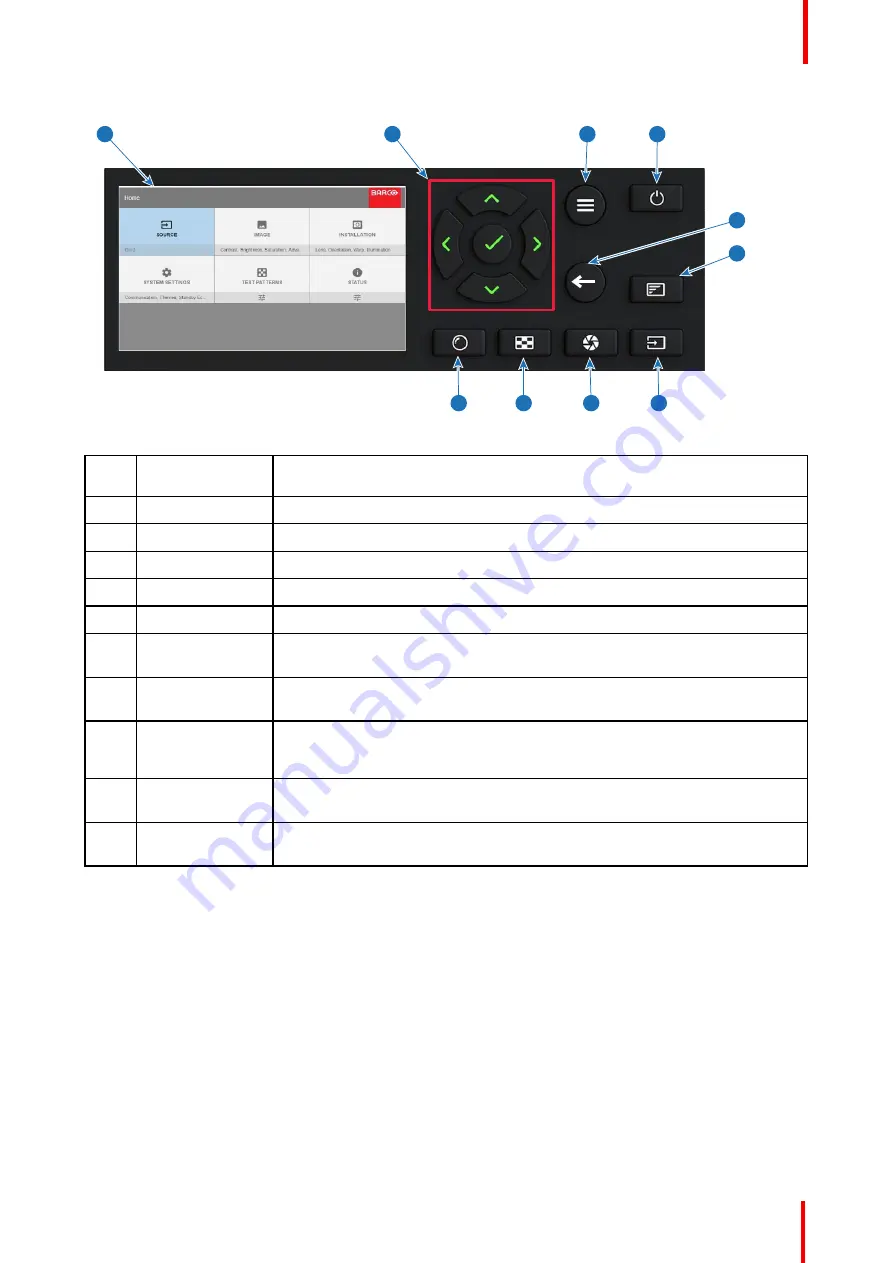
Image 2-3

Item

No.

Name

Description

1

LCD Display

Shows Projector status and navigation menu.

2

Navigation keys

Navigation arrows (up, down, left, right), confirm selection (

)

3

Menu button

Toggle between OSD / Information menu.

4

Standby

Power on / standby

5

Back

Undo action / back to previous screen.

6

OSD ON/OFF

Deactivate the On Screen Display (OSD). Only critical warnings will be
displayed.

7

Input

Shortcut to input source menu on LCD. Use navigation keys to select and
enable input.

8

Shutter

Enable and disable the lens shutter function. This is not a mechanical shutter,
but it toggles the laser source on and off. Backlight is red when the shutter are
enabled.

9

Test Patterns

Shortcut to test pattern menu on LCD. Use navigation keys to select the desired
pattern.

10

Lens

Shortcut to lens function. A test pattern displays on the OSD. LCD screen
displays the navigation keys to manage and confirm actions.

2.8 Remote Control

2.8.1 Remote control, Battery installation

Where to find the batteries for the remote control ?

The batteries are not placed in the remote control unit to avoid control operation in its package, resulting in a
shorter battery life time. At delivery the batteries can be found in a separated bag attached to the remote
control unit. Before using your remote control, install the batteries first.

How to install

1.

Push the battery cover tab with the fingernail a little backwards (1) and pull, at the same time, the cover
upwards (2).

Getting to know the projector.

Summary of Contents for Balder Series

Page 1: ...ENABLING BRIGHT OUTCOMES User Manual Balder ...

Page 2: ...Barco Fredrikstad AS Habornveien 53 N 1630 Gamle Fredrikstad Norway Support fre barco com www barco com ...

Page 3: ...nterference at his own expense Changes or modifications not expressly approved by the party responsible for compliance could void the user s authority to operate the equipment FCC responsible Barco Inc 3059 Premiere Parkway Suite 400 30097 Duluth GA United States Tel 1 678 475 8000 Trademarks Brand and product names mentioned in this manual may be trademarks registered trademarks or copyrights of ...

Page 4: ...guaranteed in writing or due to the intent or gross negligence or part of Barco If the purchaser or a third party carries out modifications or repairs on goods delivered by Barco or if the goods are handled incorrectly in particular if the systems are operated incorrectly or if after the transfer of risks the goods are subject to influences not agreed upon in the contract all guarantee claims of t...

Page 5: ... 21 2 6 LCD functionality in Ready Mode 22 2 7 Local keypad 22 2 8 Remote Control 23 2 8 1 Remote control Battery installation 23 2 8 2 Remote control protocol setup 25 2 8 3 Functionality overview 26 2 8 4 Remote control on off button 26 2 8 5 Function of the RGB filter button 27 2 8 6 Enable Disable Remote Control 27 2 8 7 Wired RC connection 28 2 9 Projector Address 28 2 9 1 Controlling the pro...

Page 6: ...dby 39 3 4 6 Going from ECO to ON 39 3 4 7 Wake On LAN WOL 39 3 5 Power modes 39 3 6 Customize projector settings 40 3 7 User interface 40 3 7 1 On Screen Display OSD 40 4 User Maintenance 43 4 1 Update Projector Firmware 44 5 Cleaning the projector 45 5 1 Projector lenses 46 5 2 Projector cabinet 46 5 3 Filters 46 6 Risk Group 3 Safety 47 6 1 General considerations 48 6 2 Safety Training provided...

Page 7: ... that you understand and follow all safety guidelines instructions and warnings included in this chapter and this manual Clarification of the term Balder used in this document When referring in this manual to the term Balder means that the content is applicable for the following products Balder Model certification name The Balder products in general are all products within the Barco GP7 Platform 6...

Page 8: ...nd throw ratio before operation Refer to chapter Risk Group 3 Safety page 47for Risk Group 3 installation Such combination of projector and lens are intended for professional use only and are not intended for consumer use For RG3 no direct exposure to the beam shall be permitted For RG3 operators shall control access to the beam within the hazard distance or install the product at a height that wi...

Page 9: ... projector and lens are intended for professional use only and are not intended for consumer use 1 2 Important safety instructions To prevent the risk of electrical shock This product should be operated from a mono phase AC power source This apparatus must be grounded earthed via the supplied 3 conductor AC power cable If none of the supplied power cables are the correct one consult your dealer If...

Page 10: ...ith cracks or deep scratches to such an extent that their effectiveness is impaired To prevent fire hazard Barco projection products are designed and manufactured to meet the most stringent safety regulations This projector radiates heat on its external surfaces and from ventilation ducts during normal operation which is both normal and safe Exposing flammable or combustible materials into close p...

Page 11: ... than 100 cm 40 and to the intake area not less than 50 cm 20 Do not use this equipment near water Do not operate the projector outside its temperature and humidity specifications as this may result in overheating and malfunction Never place the projector in direct sun light Sun light on the lens can severely damage the Digital Mirror Devices in which case there is a loss of warranty Save the orig...

Page 12: ...oduct Image Description Refer to user manual for further information Caution Do not stare into beam RG2 product No telephone Do not connect to telephone lines Balder Warning label For North America this projector may become RG3 when an interchangeable lens with throw ratio greater than 2 5 is installed Refer to the manual for the lens list and hazard distance before operation Such combinations of ...

Page 13: ...DARDS FOR LASER PRODUCTS UNDER 21 CFR 1040 EXCEPT WITH RESPECT TO THOSE CHARACTERISTICS AUTHORIZED BY VARIANCE NUMBER 2016 V 0144 EFFECTIVE MARCH 6 2017 Balder EMC label This is a class A product In a domestic environment this product may cause radio Interference in which case the user may be required to take adequate measures This device complies with part 15 of the FCC Rules Operation is subject...

Page 14: ...nce Türkiye Cumhuriyeti AEEE Yönetmeliğine Uygundur Republic of Turkey In conformity with the WEEE Regulation 1 7 China RoHS compliance 中国大陆 RoHS Information for China ROHS compliance 根据中国大陆 电器电子产品有害物质限制使用管理办法 也称为中国大陆RoHS 以下部分列出了 Barco产品中可能包含的有毒和 或有害物质的名称和含量 中国大陆RoHS指令包含在中国信息产业部MCV标 准 电子信息产品中有毒物质的限量要求 中 According to the Management Methods for the Restriction of the Use of Hazardous Substances in E...

Page 15: ...中国大陆销售的相应电子信息产品 EIP 都必须遵照中国大陆 电子电气产品有害物质 限制使用标识要求 标准贴上环保使用期限 EFUP 标签 Barco产品所采用的EFUP标签 请参阅实例 徽标内部的编号使用于指定产品 基于中国大陆的 电子信息产品环保使用 期限通则 标准 All Electronic Information Products EIP that are sold within Chinese Mainland must comply with the Marking for the restriction of the use of hazardous substances in electrical and electronic product of Chinese Mainland marked with the Environmental Friendly Use Per...

Page 16: ...he restricted substance exceeds the reference percentage value of presence condition 備考2 〇 係指該項限用物質之百分比含量未超出百分比含量基準值 Note 2 〇 indicates that the percentage content of the restricted substance does not exceed the percentage of reference value of presence 備考3 係指該項限用物質為排除項目 Note 3 The indicates that the restricted substance corresponds to the exemption 備註 此RoHS表格適用於以下產品型號 GP6 GP7 GP8 GPC Hint This Ro...

Page 17: ...0 Product Info Product info Image 1 2 product name 產品名稱 projector 投影機 model 型號 GP7 1 11 Statement EN55032 CISPR32 Class A MME MultiMedia Equipment Warning This equipment is compliant with Class A of CISPR 32 In a residential environment this equipment may cause radio interference Class A ITE Information Technology Equipment Warning This is a class A product In a domestic environment this product m...

Page 18: ...601 0443 03 Balder 18 Safety ...

Page 19: ...tus Light Power on Standby button backlight indications LCD panel LCD functionality in Ready Mode Local keypad Remote Control Projector Address Connector panel Color Wheels Color Wheel Type Optional Accessories 601 0443 03 Balder Getting to know the projector 2 ...

Page 20: ...ctor Items Overview 7 6 3 5 1 5 2 4 9 8 Image 2 2 Item No Item Description 1 1 LED Warning Indicator 1 2 Adjustable Feet 1 3 Lens 1 4 Lens Holder 1 5 IR Receiver For receiving remote control signals 1 6 LCD Display 1 7 Keypad Panel Used for local operation of the projector Getting to know the projector ...

Page 21: ...econnected again If the reason for the error persist the projector will again go to critical error status By high temperature the projector can be restarted when it has cooled down and the temperature is back within the normal operating limitations 2 4 Power on Standby button backlight indications Indicator In addition to the LED indicator the projector also displays status indications in the back...

Page 22: ...D display in order to set or check values and settings before the lamp is switched on Ready mode is enabled either when the power cable is connected after the startup sequence or when pressing the Power Off for 3 seconds when the projector is in On mode See chapter 5 4 Power Mode Transitions for a graphic presentation of the ready mode Procedure When in ready mode press the Menu button either on t...

Page 23: ...ight is red when the shutter are enabled 9 Test Patterns Shortcut to test pattern menu on LCD Use navigation keys to select the desired pattern 10 Lens Shortcut to lens function A test pattern displays on the OSD LCD screen displays the navigation keys to manage and confirm actions 2 8 Remote Control 2 8 1 Remote control Battery installation Where to find the batteries for the remote control The b...

Page 24: ...he bottom of the remote control and press 2 the cover until it clicks in place 1 2 Image 2 6 When replacing batteries the broadcast address of the RCU will be reset to its default value 0 CAUTION Replace with the correct battery type Use two AA size batteries There is a risk of explosion if the battery is replaced with an incorrect type CAUTION Replace the battery as explained above There is a ris...

Page 25: ...be used for Barco projectors based on the Pulse platform Loki Balder F70 F80 F90 HDX 4K UDX The RC5 protocol have to be use all other Barco projectors HDX W HDF W HDQ 2K How to set 1 Remove the cover For more info on how to remove see Remote control Battery installation page 23 2 Place the switch in the NEC position Image 2 7 Remark with RC5 protocol Not all buttons of the Pulse RCU are one to one...

Page 26: ...l is a full feature wireless remote control powered by two 2 standard AA batteries The battery compartment is on the back side of the remote control The remote control is backlit for use in dark environments It also has an Jack connector for wired connection to the projector When the wire is connected the IR beam is switched off 2 8 4 Remote control on off button Purpose of the remote control on o...

Page 27: ...pot and adjust the overlap section By pressing this button multiple times you will have different active filters in the following cycle Red Green Blue default Red only Green only Blue only Red Green Green Blue Red Blue Red Green Blue etc After powering up the colors will always revert back to full RGB 2 8 6 Enable Disable Remote Control About This function are for disabling the IR sensors for the ...

Page 28: ...dcast address Projector will always execute the command coming from a RCU programmed with that broadcast address 2 9 1 Controlling the projector Why a projector address As more than one projector can be installed in a room each projector should be separately addressable with an RCU or computer Therefore each projector has its own address Set up an individual Projector Address The set up of a proje...

Page 29: ...or Projector Control USB 3 USB 2 0 type A 4 pin 2x Rear and 1x Front For Software upgrade LAN 1 Standard RJ45 connector For Projector Control DP 2 Standard display port For Projector Input DL DVI D 2 Dual DVI I 1 0 DVI_D Functionallity For Projector Input These connectors can also be used to form one uniform image by feeding half of the image into each connector HDCP compliant for sources up 165 M...

Page 30: ...ectors When installed i the frame the projector can be rotated around the x y and z axis in order to obtain a seamless adjustment in applications using multiple projectors Can be installed from a truss or a pedestal Can be easily stacked one on top of another for instance a dual or multichannel installations Flight Case F70 use the same Flight case as the F90 series projectors Item Number Item Des...

Page 31: ... a custom designed container that is suitable for shipping the projector including flight frame signal and power cords and up to two lenses The case is fully lined to protect the projector and lenses during transit and storage Getting to know the projector ...

Page 32: ...601 0443 03 Balder 32 Getting to know the projector ...

Page 33: ...rojector setup when the physical installation process is complete Overview Projector source and control connections Power up the projector Power down the projector Power mode transitions Power modes Customize projector settings User interface 601 0443 03 Balder Getting started 3 ...

Page 34: ...unctionality 2x DisplayPort 1 2 1x HDMI 2 0 1x HDBaseT 1x SDI input initially designed for 3G SDI input signals 12G SDI signals are now supported 3 1 2 Connector specifications Overview DVI I Display Port 1 2 HDMI 2 0 SDI HDBase T 3 1 2 1 DVI I Specifications Parameter Value Connector DVI I female digital RGB Signal characteristics DVI 1 0 Digital TMDS Max cable length 25 m 24 AWG Max pixel rate 3...

Page 35: ...cifications Regarding HDMI 2 0 The decryption protocol HDCP 2 2 are enabled and valid in this unit Parameter Value Connector Standard HDMI Signal characteristics Digital TMDS Max cable length 2 m 24 AWG Max pixel rate 594MHz Max input data resolution 3840x2160 60Hz Bit depth 8 10 12 bits EDID Supported HDCP Supported Ethernet No Audio return No 3 1 2 4 SDI Specifications Parameter 12G SDI 3G SDI S...

Page 36: ... 5 3Gbps Max TMDS Clock Frequency 270 MHz Max video resolution supported 1920x1200 60Hz WUXGA 60Hz HDCP Pass Through Yes from Source to Projector IR Extension Not Supported RS 232 Extension Not Supported 10 100Mbps Ethernet Pass Through Not Supported Fallback to 100BaseTx IEEE 802 3u Not Supported USB Over Centre Tap Not Supported Power Over Ethernet Not Supported Audio Not Supported LEDs HD Base ...

Page 37: ...y power cords following the unit designed for your projector model Do not use unauthorized replacements Do not use power cords which are damaged Power up the projector using the keypad or remote 1 Connect the line cord to the projector 2 Plug the 3 pronged cord into a grounded AC outlet The projector will begin warming up and the backlight of the Standby power button are flashing white 3 When the ...

Page 38: ... transitions 3 4 1 General Transition Diagram This diagram shows all modes available on the projector unplug ON READY ECO and the actions necessary to change mode 2 ECO READY ON 1 50 50 Image 3 1 Projector mains powered Auto transition after x minutes if ECO mode enables Press power On Off button remote On Off button 3 4 2 Power on projector If not already connected connect the female side of the ...

Page 39: ...m READY to ECO standby Description If ECO Standby mode is enabled in the service menu refer to the section GUI system settings Standby ECO in User Guide the projector will automatically go to ECO standby mode after a time out default 15 minutes All electronics including fans pumps go down except for a very small wake up controller The Power on off button will FLASH WHITE every second 3 4 6 Going f...

Page 40: ...tton must be disabled White backlight on the button When the button have blue illumination the OSD will not appear and the display information are only visible on the LCD Display Only Critical warnings will be displayed User access levels The projector s software platform uses access levels to define what each user can do There are two user access levels Standard User and Power User In addition th...

Page 41: ...ing checkboxes barscale sliders and drop down lists To set a value Press OK to select or deselect a checkbox turn a function ON or OFF Use the arrow keys to move the barscale slider up or down on the value line For a barscale 0 9 each step will equal 10 of the total value To enter the value as a direct number press ENTER input the digit s and then Press ENTER again to execute and exit cursor mode ...

Page 42: ...601 0443 03 Balder 42 Getting started ...

Page 43: ...43 Overview Update Projector Firmware 601 0443 03 Balder User Maintenance 4 ...

Page 44: ...r Place the projector in Ready mode status indicator is steady White Insert the USB Stick in to the rear USB port on the projector After a few seconds the status indicator will flash rate 3 Hz 180 FPM This signals that the upgrade is in progress If the upgrade file is corrupt or invalid the status indicator will turn red and the upgrade process will stop Note The upgrade will not be installed in t...

Page 45: ...45 601 0443 03 Balder Cleaning the projector 5 ...

Page 46: ...projector cabinet exterior only Clean the housing of the projector with a damp cloth Stubborn stains may be removed with a cloth lightly dampened with a mild detergent solution 5 3 Filters General info regarding Air intake and filters The product is shipped default without any filters and by avoiding filters the ventilation system operates for longer periods between maintenance since no clogging o...

Page 47: ...47 601 0443 03 Balder Risk Group 3 Safety 6 ...

Page 48: ...ergy sources This personnel must instruct the user about High intensity light beam The user must respect the exclusion zone based on the light beam Hazard Distance HD Dangerous energy sources inside the projector The user is not allowed to remove any cover from the projector The installation maintenance or service is for skilled persons only The requirements for a restricted access location and an...

Page 49: ...system or other applicable control measure shall prevent hazardous eye access to the radiation within the hazard distance For example projectors that have a HD greater than 1 m and emit light into an uncontrolled area where persons may be present should be positioned in accordance with the fixed projector installation parameters resulting in a HD that does not extend into the audience area unless ...

Page 50: ...at a height vertically above the floor such that the bottom plane of the Hazard distance Zone shall be no lower than 3 meters above the floor Horizontal clearance to the hazard distance zone shall be not less than 2 5 meters Any human access horizontally to the Hazard Zone if applicable shall be restricted by barriers If human access is possible in an unsupervised environment the horizontal or ver...
Page 51: ...losed projection system HD Hazard Distance HD is the distance measured from the projection lens at which the intensity or the energy per surface unit becomes lower than the applicable exposure limit on the cornea or on the skin The light beam is considered to be unsafe for exposure if the distance from a person to the light source is less than the HD Restriction Zone RZ Based on the HD The project...

Page 52: ...e projection distance to the rear projection screen To determine the HD distance for the used lens and projector model see graphs in chapter HD in function of the lens Throw Ratio TR page 8 HDreflection 25 HD PD The light emitted from the screen within the observation shall never exceed the RG2 exposure limit determined at 10 cm The HDdiffuse can be neglected if the measured light at the screen su...

Page 53: ...he distance to the screen throw to the screen width Hazard Distance Thermal Accidental exposure Hazard Distance m Trow Ratio Image 6 5 Hazard Distance in meters versus Throw ratio of the lens for the Balder Cinemascpope projector Graphs shows Hazard Distance in meters versus Throw ratio of the lens Risk Group 3 Safety ...

Page 54: ...Barco Fredrikstad AS Habornveien 53 N 1630 Gamle Fredrikstad Norway www barco com 601 0443 03 2018 10 17 ...

Reviews: