601
–
0443 /03
Balder
26
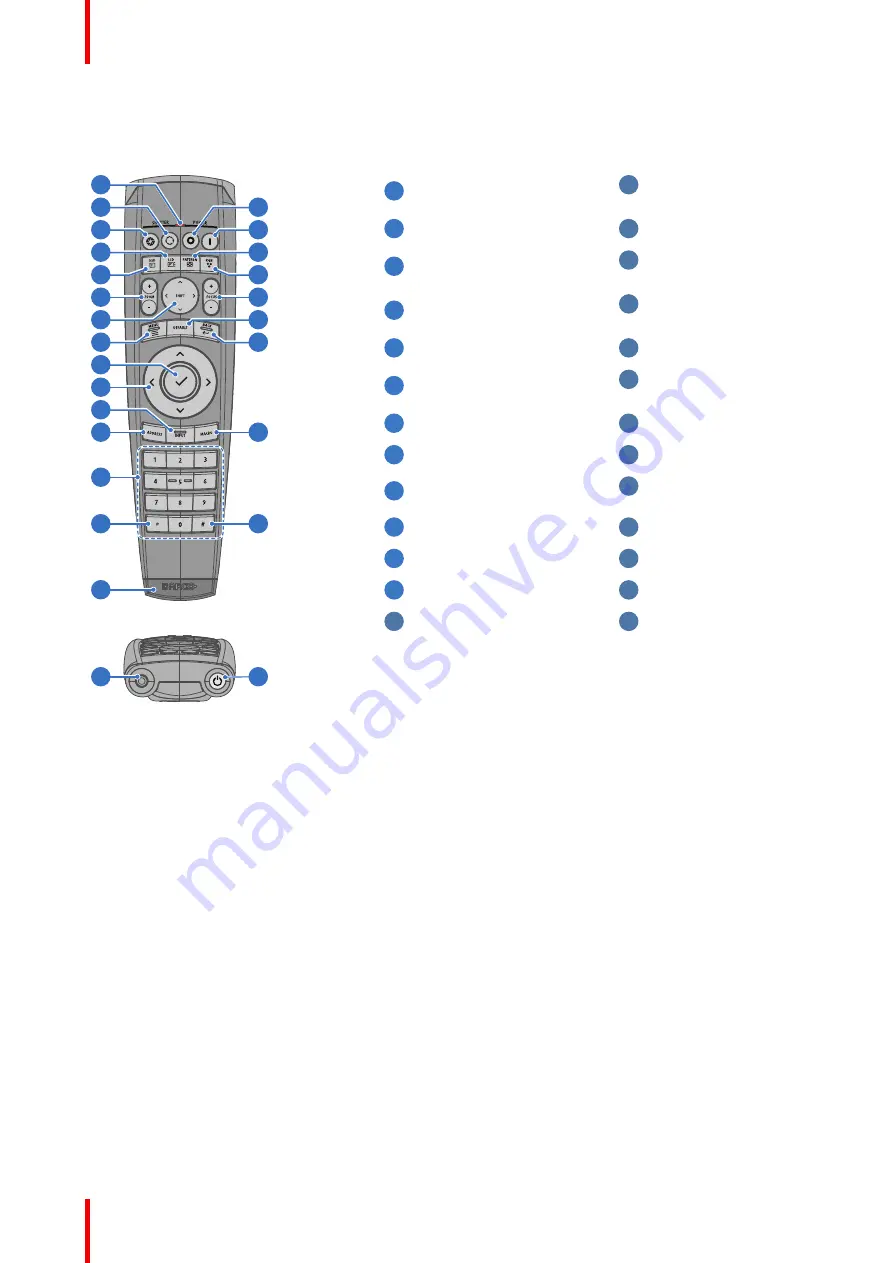
2.8.3 Functionality overview
Remote Control Unit buttons
1
2
3
4
5
6
7
8
9
10
11
12
15
24
23
22
21
20
19
18
17
16
13
14
26
25
1
Button pressed indicator.
14
Backspace (while
entering values)
2
Shutter Open.
15
XLR connector.
3
Shutter Close.
16
Decimal mark (while
entering values)
4
Touch Panel On/Off.
(Not in use).
17
Macro button. (Not in
use)
5
OSD On/Off.
18
Menu Back.
6
Lens Zoom.
19
Default button. (Not in
use).
7
Lens Shift.
20
Lens Focus.
8
Menu Activation.
21
RGB Button.
9
Menu Selection, OK
button.
22
Test Patterns.
10
Menu Navigation.
23
Power On.
11
Input Selection.
24
Power Off.
12
Address button.
25
Stereo Jack.
13
Numeric buttons.
26
RCU On/Off.
The projector remote control is a full feature wireless remote control, powered by two (2) standard AA
batteries. The battery compartment is on the back side of the remote control.
The remote control is backlit for use in dark environments. It also has an Jack connector for wired connection
to the projector. When the wire is connected, the IR beam is switched off.
2.8.4 Remote control, on/off button
Purpose of the remote control on/off button
The Pulse remote control unit has at the front side an on/off switch (reference 1 Image 2-8). Switching off the
remote control prevents that unwanted commands are send due to an accidental key press. Furthermore,
switching the RCU off will extend the battery life time of the remote control.
To activate the remote control press the on/off button.
To deactivate the remote control press the on/off button again.
Default when (re)placing batteries, is
“
ON
”
.
Summary of Contents for Balder GP7
Page 1: ...ENABLING BRIGHT OUTCOMES User Manual Balder ...
Page 18: ...601 0443 03 Balder 18 Safety ...
Page 32: ...601 0443 03 Balder 32 Getting to know the projector ...
Page 42: ...601 0443 03 Balder 42 Getting started ...
Page 43: ...43 Overview Update Projector Firmware 601 0443 03 Balder User Maintenance 4 ...
Page 45: ...45 601 0443 03 Balder Cleaning the projector 5 ...


