background image

33 


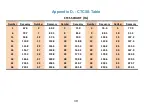
Appendix C. - 

Shortcut Menu operations 

MENU 

No. 

Name 

(Full Name) 

Enter item 

LCD display 

Selectable 

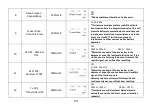
Squelch - Squelch 

Level 

MENU+0 


0-9 Levels 
0:Lowest 
9:Highest 

Step –Step 

Frequency 

MENU+1 


2.5K/5.0K/6.25K/10.0K 
12.5K/20.0K/25.0K/50.0K 

Power save – 

Battery Saving 

MENU+3 


OFF/ Mode 1/ Mode 2/ Mode 3 
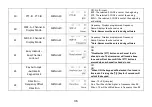
*Selects the ratio of sleep cycles to awake cycles 

(Mode 1/ Mode 2/ Mode 3). The higher the number 
the longer the battery lasts. The higher number 
increases the RX sleep cycle, but you may miss the 
first few syllables before the RX opens. 

Vox Level - VOX 

MENU+4 


OFF, 1-10 
OFF: off 
1:Highest Sensitivity 
10:Highest Sensitivity 

Backlight –Auto 

Backlight 

MENU+6 


bright/1,2,3…8

9,10Sec 

*Time-out for the LCD backlight. (seconds) 

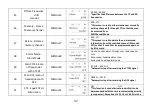
Dual Standby – 

Dual Watch 

Operation 

MENU+7 


OFF                                ON 

*Monitor [A] and [B] at the same time. The display 

with the most recent activity ([A] or [B]) becomes 
the selected display. 

Summary of Contents for Pofung P10UV Series

Page 1: ...USER S MANUAL...

Page 2: ...loss that may arise from improper operation please read all the information carefully before using our products This contains instructions for safe usage and RF energy awareness and control for compl...

Page 3: ...tallation of Accessories 6 7 Flashlight 19 3 1 Installing Removing the Antenna 09 6 8 1000Hz 1450Hz 1750Hz Tone burst 19 3 2 Installing the belt clip 09 6 9 Manual Programming Channels Memory 19 3 3 I...

Page 4: ...on NOTICE Use of this radio outside the country where it was intended to be distributed is subject to government regulations and may be prohibited FCC Regulatory Conformance This equipment has been te...

Page 5: ...llowing RF energy exposure standards and guidelines United States Federal Communications Commission Code of Federal Regulations 47 CFR 1 1307 1 1310 and 2 1093 American National Standards Institute AN...

Page 6: ...batteries and accessories causes the radio to exceed the FCC RF exposure guidelines Contact your local dealer for the product s optional accessories Precautions for Portable Terminals Operating Prohib...

Page 7: ...injury or even death be sure to observe the following safety instructions 1 Do not charge or replace your battery in a location containing fuels chemicals explosive atmospheres and other flammable or...

Page 8: ...ust be switched off and secured against switch on if the battery is attached The content of the shipment must be declared in the shipping documents and by a Battery Shipping Label on the packaging Con...

Page 9: ...d at the factory please charge it before use Charging the battery pack for the first time after purchase or extended storage more than 2 months may not bring the battery pack to its normal maximum ope...

Page 10: ...attery or the radio if it is damp Dry it before charging to avoid damage WARNING When keys ornamental chain or other electric metals contact the battery terminal the battery may become damage or injur...

Page 11: ...r STATUS LED No Battery Green and red alternately flashing Charge Normally Red Fully Charged Green Trouble Red blinks fast for a long time NOTE Trouble means battery too warm battery short circuited o...

Page 12: ...d then gently pull the belt clip up toward the top of the radio 3 3 Installing the battery pack Before attaching or removing the battery make sure your radio is turned off by turning the power volume...

Page 13: ...10 Chapter4 Radio Overview...

Page 14: ...nitor function presses the button for a long time 8 Menu key press to enter the Menu functions and to confirm your selections In standby mode press and hold the key to switch between frequency mode an...

Page 15: ...dio LCD Display 1 Received signal strength 3 Appears when DTMFST DT ST DT ANI ANI ST is activated 4 These symbols show that you set a DCS or CTCSS code in tx or rx In tx mode it appears while you are...

Page 16: ...io will start beeping periodically as well as flash the backlight of the display and when voice prompts are enabled a Low Voltage announcement will be heard indicating that you need to change your bat...

Page 17: ...information or your selections on the radio In tx mode push the number keys to send a corresponding DTMF code Key A short momentary press of the key enables the reverse function If you press this but...

Page 18: ...olume down turn the Volume Power knob counter clock wise Be careful not to turn it too far as you may inadvertently turn your radio off 5 3 Making a call NOTE Press the Back key to switch the main cha...

Page 19: ...ode you can navigate up and down the band by using the keys Each press will increment or decrement your frequency according to the frequency step you ve set your transceiver to You can also input freq...

Page 20: ...quency scanning This function can scan the frequency a In frequency mode press key for more than 2 seconds The radio will start scanning the frequency according to the set frequency step b You can cha...

Page 21: ...ving band will detect a signal 6 5 Cursor Conversion A B Directly press Back key to move the cursor up and down Then you can modify or confirm the parameters indicated by the cursor Important1 P10UV h...

Page 22: ...SK1 to send 1750Hz repeaters tone This function is useful for communications through repeaters If you have the keypad lock enabled on your radio you can still send a 1750Hz tone the regular way witho...

Page 23: ...55000 f MENU 2 6 MENU 1 0 MENU Enter the desired channel Ex 10 Back RX has been added g Enter TX frequency Ex 43755000 h MENU 2 6 MENU 1 0 MENU Enter the same channel Ex 10 Back TX has been added i Pr...

Page 24: ...cy offset e Press MENU key to select f Use the numerical keypad to enter the specified frequency offset See the section called 25 OFFSET Frequency shift amount for details g Press MENU to confirm and...

Page 25: ...nnel lock out channel name edit 7 1 Basic use Using the menu with arrow keys a Press the MENU key to enter the menu b Use the keys to navigate between menu items c Once you find the desired menu item...

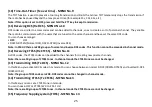
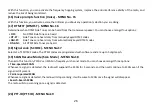
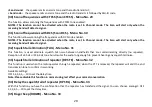
Page 26: ...t out of the menu at any time press the Back key g All further examples and procedures in this manual will use the numerical menu short cuts 7 3 Functions and operations 1 Squelch level Squelch MENU N...

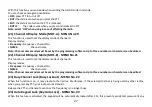
Page 27: ...t one If this option is set to OFF the VOX function is turned off Note the higher is the level the higher is the microphone sensitivity The VOX function cannot be modified in SCAN and FM radio mode 7...

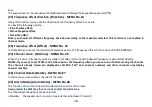
Page 28: ...nverse DCS Note In P10UV there are 208 groups of normal and inverse DCS codes This function cannot be amended in channel mode 12 Receiving CTCSS Rx CTCSS MENU No 11 As DCS codes the CTCSS codes can be...

Page 29: ...eard only from automatically keyed DTMF codes DT ANI All DTMF Side Tones are heard 18 Signal code S CODE MENU No 17 Selects 1 of 15 DTMF codes The DTMF codes are programmed with software and are up to...

Page 30: ...Up to three numbers or characters can be edited 22 Channel B Display Mode MDF B MENU No 21 This function is used to set the display mode of channel B Display modes Frequency Frequency channel No NAME...

Page 31: ...is 00 000 99 998MHz 27 Channel store Memory MENU No 26 When the radio is in frequency working mode or standby mode input the desired frequency or parameters directly NOTES If you want to set CTCSS to...

Page 32: ...tect a signal 32 Squelch tail elimination TAIL Menu No 31 This function is used eliminate squelch tail noise between handhelds that are communicating directly no repeater Reception of a 55 Hz or 134 4...

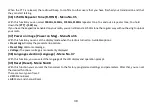
Page 33: ...ck your radio 37 Power on image Power on Msg Menu No 36 With this function you can set the display mode when the radio is turned on Available options Preset Logo Display the preset startup picture Pre...

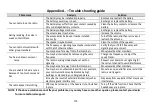
Page 34: ...oo far away from other members Move towards other members You hear unknown voices or noise You may be interrupted by radios using the same frequency Change the frequency or adjust the squelch level Th...

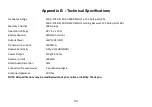
Page 35: ...Groups Operation Voltage DC 7 4 V 10 Battery Capacity 1800mAh Li Ion Output Power 2W VHF UHF Transmission current 1000mA Receive Sensitivity 0 25 V 12dB SINAD Power Output 1W 16 ohms Receive current...

Page 36: ...ke cycles Mode 1 Mode 2 Mode 3 The higher the number the longer the battery lasts The higher number increases the RX sleep cycle but you may miss the first few syllables before the RX opens 4 Vox Leve...

Page 37: ...OFF D023N D754N D023I D754I Mutes the speaker of the transceiver in the absence of a specific low level digital signal If the station you are listening to does not transmit this specific signal you w...

Page 38: ...key press 16 DTMFST DTMFST MENU 16 OFF No DTMF Side Tones are heard DT ST Side Tones are heard only from manually keyed DTMF codes ANI ST Side Tones are heard only from automatically keyed DTMF codes...

Page 39: ...isplays the channel name Note Names must be entered using software 22 Busy Lockout Busy Channel Lock out MENU 22 OFF ON Disables the PTT button on a channel that is already in use The transceiver will...

Page 40: ...ough 127 so that it can either be programmed again or be left empty 28 Alarm Mode Alarm Mode MENU 28 On site Sounds alarm through your radio speaker only Send sound Sending alarm tone Send code Sendin...

Page 41: ...ON Sends an end of transmission tone to indicate to other stations that the transmission has ended 35 R TONE Repeater Tone MENU 35 1000Hz 1450Hz 1750Hz 2100Hz To send out a repeater tone You hold dow...

Page 42: ...85 4 9 88 5 10 91 5 11 94 8 12 97 4 13 100 14 103 5 15 107 2 16 110 9 17 114 8 18 118 8 19 123 0 20 127 3 21 131 8 22 136 5 23 141 3 24 146 2 25 151 4 26 156 7 27 159 8 28 162 2 29 165 5 30 167 9 31...

Page 43: ...35 D212N 36 D223N 37 D225N 38 D226N 39 D243N 40 D244N 41 D245N 42 D246N 43 D251N 44 D252N 45 D255N 46 D261N 47 D263N 48 D265N 49 D266N 50 D271N 51 D274N 52 D306N 53 D311N 54 D315N 55 D325N 56 D331N 57...

Page 44: ...I 146 D245I 147 D246I 148 D251I 149 D252I 150 D255I 151 D261I 152 D263I 153 D265I 154 D266I 155 D271I 156 D274I 157 D306I 158 D311I 159 D315I 160 D325I 161 D331I 162 D332I 163 D343I 164 D346I 165 D351...

Page 45: ...l but no warranty of accuracy or reliability is given All the specifications and designs are subject to change without notice due to continuous technological development No part of this manual may be...

Reviews: