background image

ST

OP

PLA

Y

BA

CK


Living Room

TV 

V.MEM 

RADIO

DTV 

N.MUSIC 

N.RADIO

PC 

DVD 

CD

D

ai

ly

 u

se

2

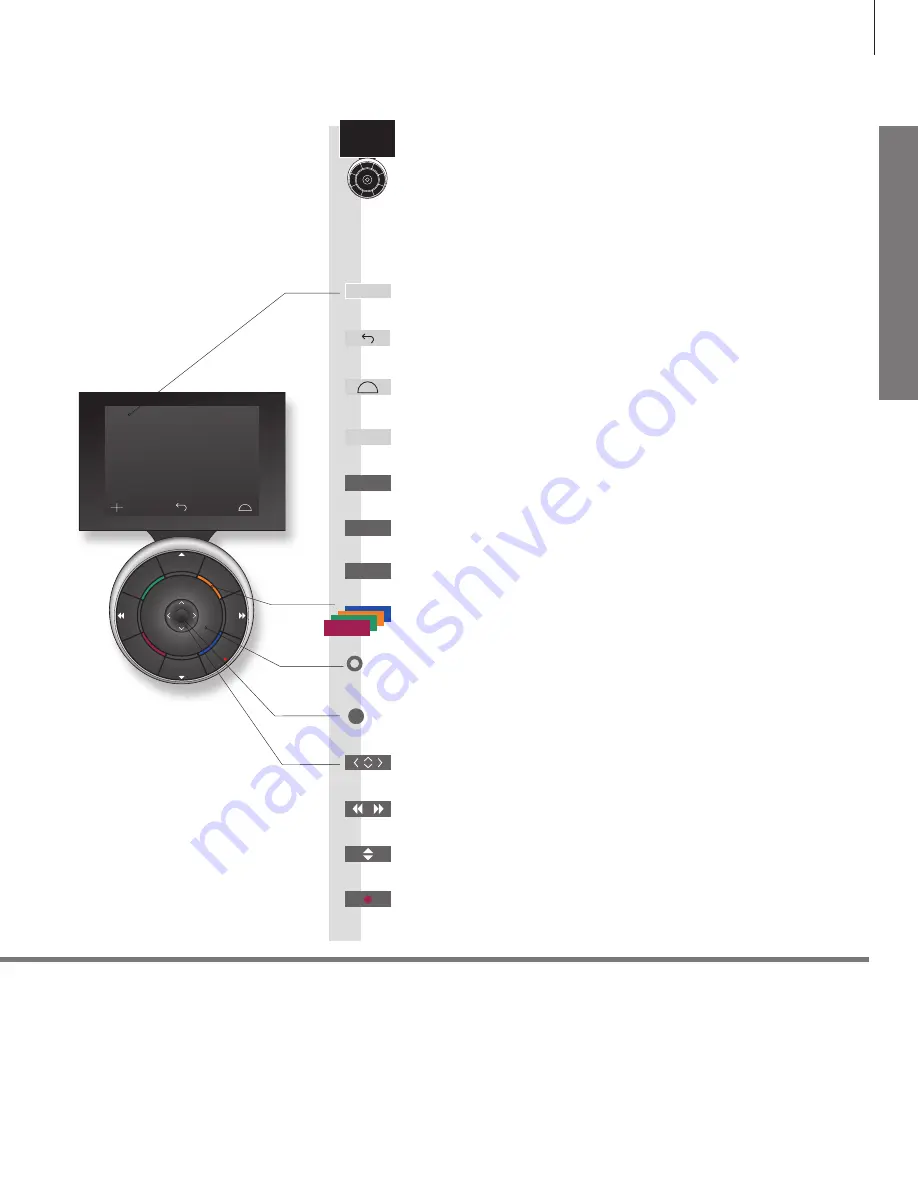
*About buttons 

3

*Coloured buttons 

Actual zone 

Soft buttons on Beo6  

Light grey buttons indicate that you have to press a text in the display. Dark grey buttons indicate that you have to 
press a hard button. 
Press the wheel next to the colour to activate a coloured button. 
Indicates the actual zone on Beo6 as it was named during the setup process. 
Depending on the activated source, different soft buttons appear on the screen. Touch the screen to activate the function. 

Start playback of a DVD or CD 

Step through channels 

Hold for continuous step 

Navigation button left, right, up and down – move in menus by pressing the 

button in the direction you need  

Standby 

Rewind or wind, search backwards or forwards 

Pause and stop playback 

Soft button, touch screen to select*

2

Switch on a source or select a function 

Centre button is used for selecting and accepting 

Turn to adjust volume 

To mute, turn quickly counter-clockwise 

Bring up Scene buttons, such as Zones or Speaker 

Press again to return 

Select colour specific functions*

3


Press volume wheel next to the colour 

Bring up digits to select, for example, channels 

Press again to return 

Back up through Beo6 displays 

Move backwards through menus. Long press to exit menus completely 

Beo6 operation 

Your television can also be operated with the Beo6 remote control as 

described in this Getting Started and the Guide, but you can also 
operate your television with Beo5 which is operated similarly to Beo6. 

PLAY

STOP

TV 

BACK

+

7

Summary of Contents for BEOVISION 10-32

Page 1: ...BeoVision 10...

Page 2: ......

Page 3: ...in this Getting Started Among other things Timer functions and auto standby These and other features are described in more detail in a Guide The Guides are found on www bang olufsen com guides On www...

Page 4: ...roduce heat Do not defeat the safety purpose of the polarized or grounding type plug A polarized plug has two blades with one wider than the other A grounding type plug has two blades and a third grou...

Page 5: ...e picture format and speaker combinations Installation and setting up 12 Set up your television BeoVision 10 32 14 Set up your television BeoVision 10 40 46 15 Cleaning 16 Connection panels BeoVision...

Page 6: ...DVD or CD Switch on a connected set top box Standby Bring up the main menu of the active source Pause and stop playback Switch on the TV 1 Select channels and enter information in on screen menus Step...

Page 7: ...move in menus by pressing the button in the direction you need Standby Rewind or wind search backwards or forwards Pause and stop playback Soft button touch screen to select 2 Switch on a source or s...

Page 8: ...and menus Introduction Show menu Switch on TV Switch on connected equipment or Important On the first pages in this Getting Started you will find an overview of the buttons on Beo4 and Beo6 For genera...

Page 9: ...ed with a Beo4 with or without a navigation button Remember to set your Beo4 remote control to the correct mode See the Beo4 Guide or contact your Bang Olufsen retailer for further information This Ge...

Page 10: ...ons However if you wish you can adjust these setting to your liking You can also select different speaker combinations Useful hints Select picture format The TV automatically adapts the picture to fil...

Page 11: ...nge of 10 40 C 50 105 F and at an altitude of no more than 1 500 5 000 ft Do not place the television in direct sunlight as this may reduce the sensitivity of the remote control receiver Leave enough...

Page 12: ...om for available stands and brackets or contact your Bang Olufsen retailer To ensure proper ventilation allow enough space around the screen Do not cover the fans At over heating flashing standby indi...

Page 13: ...Carefully remove the speaker cover by supporting it in the side and at the bottom 1 Mounting bracket for wall bracket 2 Mounting slot for stand or wall bracket 3 Cover for the connection panel Here yo...

Page 14: ...n com for available stands and brackets or contact your Bang Olufsen retailer Due to the weight of the TV any moving or lifting of the TV should be performed by qualified personnel using the proper eq...

Page 15: ...speakers use a soft cloth instead Carefully remove the speaker cover by supporting it in the side and at the bottom 1 Mounting bracket for wall bracket 2 Mounting bracket for stand 3 Cover for the co...

Page 16: ...R L video For audio connection right and left sound channel respectively and video signals from an external source Y Pb Pr AV2 AV4 AV6 For video signals from an external source e g HDTV source You can...

Page 17: ...ible Bang Olufsen audio or video system STAND For connection of a motorised stand AERIAL Not for use Y Pb Pr AV2 4 6 For video signals from an external source e g HDTV source You can use the socket in...

Page 18: ...ings in a menu you may have to press the green button to continue to the next menu in the first time setup procedure Follow the on screen instructions Select settings You are led through the first tim...

Page 19: ...the stand before you can use the motorised movement of the stand The menus SPEAKER DISTANCE and SPEAKER LEVEL are only available on BeoVision 10 40 46 Calibrate the stand Set the maximum angle the TV...

Page 20: ...particular installation If this equipment does cause harmful interference to radio or television reception which can be determined by turning the equip ment off and on the user is encouraged to try to...

Page 21: ...onal use of natural resources Collecting electrical and electronic equipment batteries and waste prevents the potential contamination of nature with the hazardous substances which may be present in el...

Page 22: ......

Page 23: ......

Page 24: ......

Reviews: