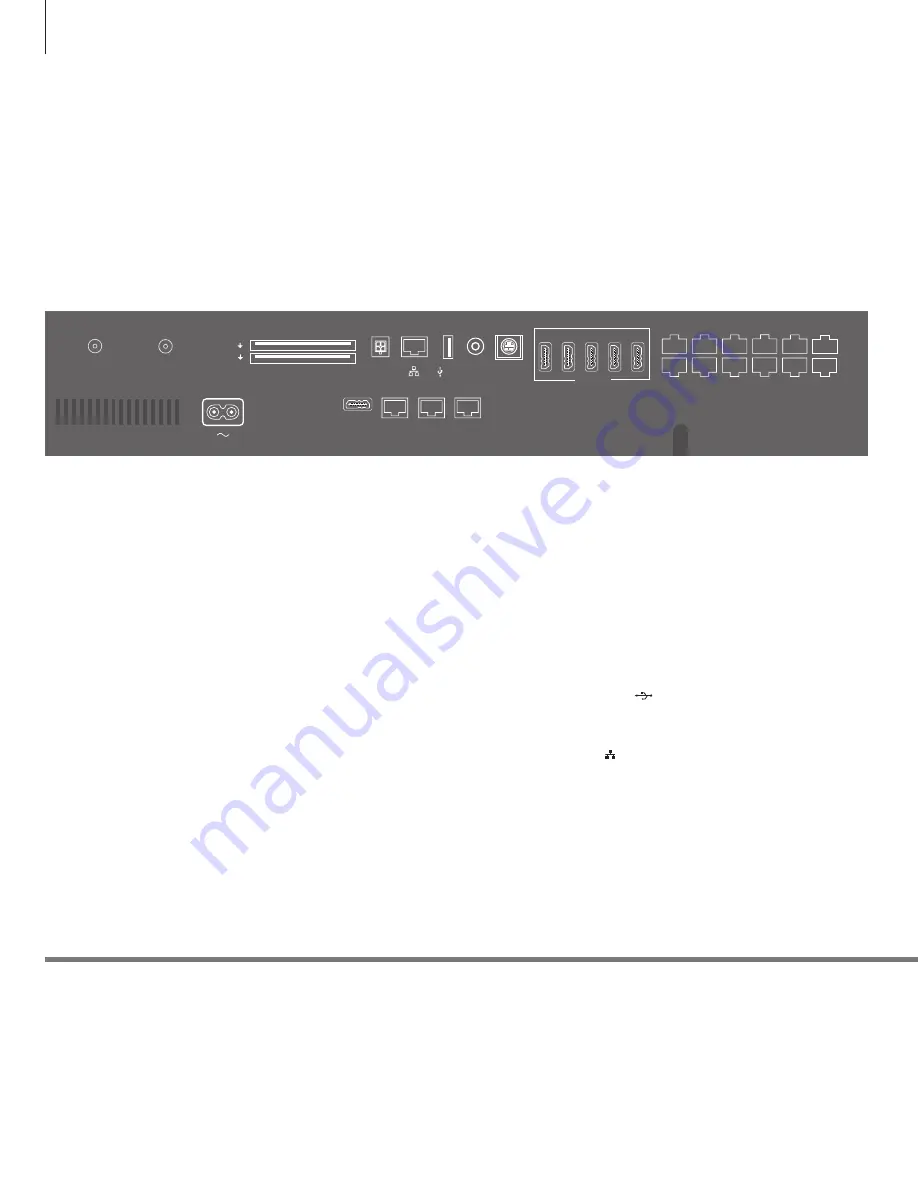
background image

Connection panel 

Any equipment you connect to the connection panel must be registered in the 
SOURCE LIST SETUP menu. 

Information 

Connect the 

socket on the connection panel of your system to the wall 

outlet. The system is in standby mode and ready to be used. 

The supplied plug and mains cord are specially designed for the product. Do 

not change the plug, and if the mains cord is damaged, you must buy a new 

one from your Bang & Olufsen retailer. 

 Mains supply 

Connection to the mains supply. 

PL 1–6 (Power Link) 

For connection of external speakers in a surround 

sound setup. See the online guide for more 
information. Depending on the television screen, 

a PL socket, for example PL6, can also be used for 

connection of a television screen’s build in centre 
speaker. 

MONITOR CONTROL 

For connection of a Bang & Olufsen television 

screen. 

PUC 1–3 A+B 

For IR control signals to external equipment 
connected to an HDMI IN, HDMI OUT or AV IN 
socket. Allows you to control non-Bang & Olufsen 
equipment with your Bang & Olufsen remote 

control.  

CTRL (1–2) 

For future use. 

EXT. IR 

For connection of a secondary external IR-receiver. 

HDMI IN (1–5) 

The High Definition Multimedia Interface allows 

you to connect many different video sources, such 
as set-top boxes, multimedia players, Blu-ray 
players, or a PC. 

AV IN 

For connection of analogue video equipment. 

S/P-DIF IN 

Digital audio input socket, for example, a PC. 

USB


(

For connection of a USB device to browse digital 
photos, video or music files. 

 Ethernet*

1

For connection to the Internet. For software 

updates, access to WebMedia and PUC 
downloads. 

1

*Make sure the cable connection between the 

product and the router does not exit the building 

to avoid contact with high voltage.

Mains cord and plug 

CTRL 1 CTRL 2

CTRL 3

PUC 3 A+B PL 1

PL 2

PL 3

EXT IR

PUC 1

A+B

CTRL 4

PUC 2

A+B

CTRL 5

NOT

USED

PL 4

PL 5

1

2

3

4

5

HDMI IN

AV

IN

S/P-DIF

IN

5V

0,5A

12V=1.0A

STAND

COMMON INTERFACE

CHIPSIDE
CHIPSIDE

5V=50mA

AERIAL

14/18V=0.4A

SATELLITE

HDMI

OUT

MONITOR

CONTROL

IR/AUTO

CONTRAST

PL 6

20

Summary of Contents for BeoSystem 4

Page 1: ...BeoSystem 4...

Page 2: ......

Page 3: ...in more detail in the product s online guide The guides are found on www bang olufsen com guides The guides are also kept up to date if new software introduces new or modified features and functions...

Page 4: ...potlight as this may reduce the sensitivity of the remote control receiver WARNING Do not expose this equip ment to dripping or splashing and ensure that no objects filled with liquids such as vases a...

Page 5: ...use your remote control 8 How to navigate in menus 10 Watch television 12 Watch 3D television 14 HomeMedia 15 Change picture and sound settings Installation and setting up 18 Set up your system 19 Cl...

Page 6: ...the Beo4 list Long press to exit menus completely Beo4 operation Your television can be operated with the Beo4 with navigation button as described in this Getting Started and the online guide availab...

Page 7: ...channels Navigation button left right up and down Move in menus by pressing the button in the direction you need Standby Pause and stop playback Soft button touch screen to select 3 Switch on a source...

Page 8: ...he top of a list to the bottom use the navigation button up Step between menu pages Step in pages Scroll through menu items A solid line indicates that selection must be made using the centre button A...

Page 9: ...elect a source via the menu Select source Select source Bring up main menu Select SOURCE LIST The standby indicator is solid green shortly and the TV is ready to be used To reduce start up time see th...

Page 10: ...ng olufsen com guides To access RADIO mode radio stations need to be tuned in first See the online guide Operation If available from your programme provider you can bring up teletext for the selected...

Page 11: ...el or Select previous channel Beo6 Press Previous Press Activate the desired function 1 or Bring up SOURCE LIST Select TV or Press Enter page number Move to PAGE and step Step up or down in pages Shor...

Page 12: ...ct SETUP Select 3D or 2D Accept and watch 3D or 2D respectively or select mode If automatic 3D signalling is available the TV automatically switches to 3D when you select 3D and to 2D when you select...

Page 13: ...m 3D signal into full screen 2D representation by scaling one picture vertically Shows an ordinary 2D TV picture without any conversion STANDARD 2D SIDE BY SIDE 2D TOP BOTTOM 2D 3D modes Select the 3D...

Page 14: ...meMedia Bring up H MEDIA in your Beo4 display 1 Select storage device with music Select storage device with photos Step between previous and next photo Browse files and folders and press to start slid...

Page 15: ...as several sound modes optimised for different types of programmes In the SOURCE LIST SETUP menu you can for each source set up a sound mode to be used each time you activate this source Bring up soun...

Page 16: ...16...

Page 17: ...Installation and setting up 18 Set up your system 19 Cleaning 20 Connection panel Contents Installation and setting up 17...

Page 18: ...over NOTE Do not allow still pictures such as logos video games computer images and images displayed in 4 3 format to be displayed on the screen for an extended period of time This can cause a permane...

Page 19: ...ng a dry soft cloth To remove stains or dirt use a soft damp cloth and a solution of water and mild detergent such as washing up liquid Never use alcohol or other solvents to clean any parts of the sy...

Page 20: ...DMI IN HDMI OUT or AV IN socket Allows you to control non Bang Olufsen equipment with your Bang Olufsen remote control CTRL 1 2 For future use EXT IR For connection of a secondary external IR receiver...

Page 21: ...e a satellite socket 2 x PCMCIA CA Module For insertion of a module and card for access to coded digital channels For more information about compatible card and module combinations contact your Bang O...

Page 22: ......

Reviews: