background image

Section 8 - Appendix 

Vlinx VESR4x4 Serial Server 

Page 69 of 70 


www.bb-elec.com/


www.bb-europe.com/


Appendix D: Connector Pinouts 

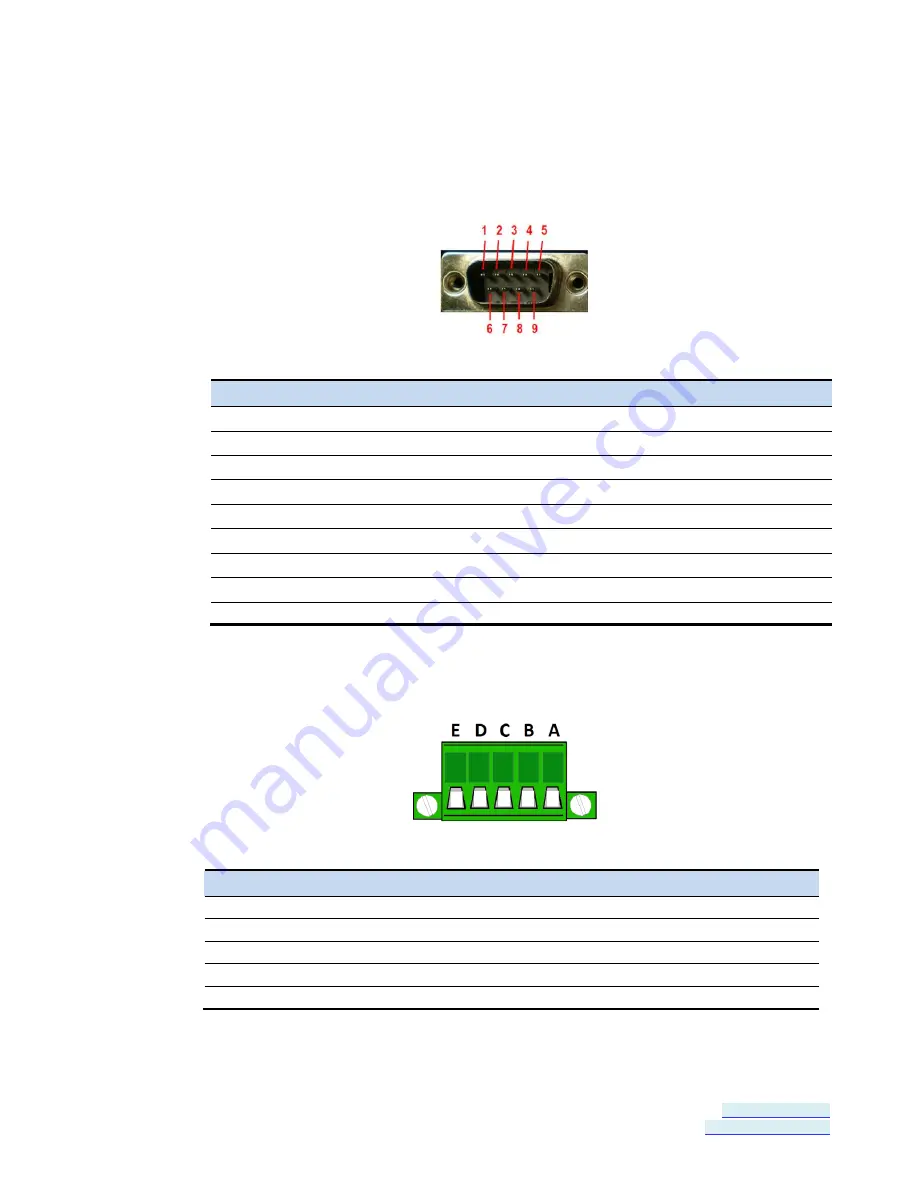
DB-9M Connnector 


DB-9M Pin 

RS-232 

Direction (RS-232) 

RS-422/485 4-Wire 

RS-485 2-Wire 

DCD 

Input 

RDA (-) 

--- 

RD 

Input 

RDB (+) 

--- 

TD 

Output 

TDB (+) 

Data B (+) 

DTR 

Output 

TDA (-) 

Data A (-) 

GND 

--- 

GND 

GND 

DSR 

Input 

--- 

--- 

RTS 

Output 

--- 

--- 

CTS 

Input 

--- 

--- 

--- 

--- 

--- 

--- 


Terminal Block 


Terminal 

RS-232 

Direction (RS-232) 

RS-422 

RS-485 

RTS 

Output 

TDA (-) 

Data A (-) 

TD 

Output 

TDB (+) 

Data B (+) 

CTS 

Input 

RDA (-) 

--- 

RD 

Input 

RDB (+) 

--- 

GND 

--- 

GND 

GND 

Summary of Contents for Vlinx VESR4 4 Series

Page 1: ...User Manual V VL LI IN NX X V VE ES SR R4 4X X4 4 S SE ER RI IA AL L S SE ER RV VE ER R ...

Page 2: ...o Inc No part of this publication may be reproduced or transmitted in any form or by any means electronic or mechanical including photography recording or any information storage and retrieval system without written consent Information in this manual is subject to change without notice and does not represent a commitment on the part B B Electronics Mfg Co Inc B B Electronics Mfg Co Inc shall not b...

Page 3: ...erial Port LEDs P1 P2 P3 P4 12 Reset Switch 13 Using the Reset Switch to Initiate a Hardware Reset 13 Using the Reset Switch to Enter Console Mode 13 Using the Reset Switch to exit Console Mode 13 Using the Reset Switch to Reload Factory Default Settings 14 Ethernet Connector 14 Fiber Optic Connectors 14 Serial Port Connectors 15 Power Connector 15 Mounting Hardware 16 Installation and Initial Set...

Page 4: ...r Name and Password 32 Changing the serial server s name 32 Changing the password 32 Setting up IP Addressing 33 Setting up Dynamic IP Addressing 33 Setting up Static IP Addressing 33 Setting up Serial Ports 34 Setting up Port Network Parameters 34 TCP Configuration 35 UDP Configuration 36 Setting up Virtual COM VCOM Operation 38 Setting up Paired Mode Operation 39 Setting up Advanced Network Sett...

Page 5: ...erver Settings 54 Appendix 63 Appendix A Default Server Settings 63 Appendix B Product Specifications 64 General Specifications 64 Controls Indicators and Connector Specifications 65 Serial Interface Specifications 65 Network Specifications 66 TCP UDP Ports Table 66 Appendix C Dimensional Diagrams 68 Appendix D Connector Pinouts 69 DB 9M Connnector 69 Terminal Block 69 Standard Ethernet Cable RJ 4...

Page 6: ...Page 6 of 70 www bb elec com www bb europe com ...

Page 7: ...come a node on the network The serial ports can be accessed over a LAN WAN using Direct IP Mode Virtual COM Port or Paired Mode connections VESR4x4 Serial Servers feature 10BaseT or 100BaseTX copper network media and several fiber optic media options depending on the model Many models also feature an additional copper Ethernet pass through port VESR4x4 Serial Servers are built for use in industria...

Page 8: ...llowing table lists the various VESR4x4 models available Model Number Ethernet Ports Ethernet Connector 1 Ethernet Connector 2 Serial Connector x4 VESR414D 1 RJ 45 DB9 Male VESR414T 1 RJ 45 Terminal Block VESR424D 2 RJ 45 RJ 45 DB9 Male VESR424D MC 2 Multi mode SC RJ 45 DB9 Male VESR424D MT 2 Multi mode ST RJ 45 DB9 Male VESR424D SC 2 Single mode SC RJ 45 DB9 Male VESR424D ST 2 Single mode ST RJ 4...

Page 9: ...ions pluggable terminal strip and locking barrel connector can be used for redundant power supply 10 100 Mbps Ethernet with Auto Selection TCP Client or Server or UDP operation configurable Virtual COM port and Paired Mode capabilities Firmware Upload over the Ethernet port for future revisions upgrades Software Support Windows 2000 XP 32 64 bit 2003 Server 32 64 bit Vista 32 64 bit 2008 Server 32...

Page 10: ......

Page 11: ...ist VESR4x4 Serial Servers are shipped with the following items included VESR4x4 Serial Server Module Quick Start Guide CD with User Manual Quick Start Guide Panel mount and DIN rail mount adapters VESR4x4 Serial Server Enclosures and Mounting All VESR4x4 models are built into similar enclosures Modules are DIN rail or panel mountable Figure 2 Front View of the VESR4x4 Serial Server LED Indicators...

Page 12: ...hat something is wrong e g another device on the network at the same IP address Ethernet Speed LEDs 1 2 The Ethernet Speed LED illuminates green if the Ethernet connection is operating at 100Mbit sec The LED is off if the connection is operating at 10Mbit sec Ethernet Link LEDs 1 2 The Ethernet Link LED illuminates when a connection has been made It flashes when there is data traffic on the Ethern...

Page 13: ... P1 LED illuminates while the switch is being held in Release the switch in less than two seconds or the serial server will enter Console Mode Using the Reset Switch to Enter Console Mode Hold the Reset switch for between two and ten seconds The P1 LED illuminates for the first two seconds and the P1 LED goes out then the P2 LED illuminates until the Reset switch is released Release the switch in ...

Page 14: ...tory default settings and then the server will re boot Ethernet Connector Serial server models equipped with 10BaseT 100BaseTX network connections use an RJ45 receptacle The serial server is connected to a standard Ethernet network drop using a straight through RJ45 male Ethernet cable Models with a second RJ45 receptacle act as an Ethernet switch enabling the connection of other devices to the ne...

Page 15: ...S 422 and RS 485 connections VESR4x4T x serial servers feature four serial ports all of which use five position removable terminal blocks for RS 232 RS 422 and RS 485 connections Figure 7 DB 9M Serial Port Connector with Pinout Figure 8 Five Position Pluggable Terminal Blocks Note Refer to Appendix D for connector pinouts Power Connector VESR4x4 serial servers provide two power connectors One is a...

Page 16: ...unting the serial server flush to a panel or behind a rack mount instrument panel Figure 10 Panel Mount Brackets Each bracket is mounted using two 4 40 flat head screws included The additional threaded holes on the side of the serial server allow the unit to be mounted in six different configurations Figure 11 VESR4x4 showing Panel Mount Bracket options If extra mounting brackets are needed they c...

Page 17: ...Section 2 VESR4x4 Hardware Vlinx VESR4x4 Serial Server Page 17 of 70 www bb elec com www bb europe com Figure 12 VESR424 with DIN Rail Clip Mounted ...

Page 18: ......

Page 19: ...Polarity of the wires is indicated underneath each connector Acceptable voltages are between 10 VDC and 58 VDC The power supply must be capable of supplying 6 watts Figure 13 Power Supply Connections Connecting VESR4x4 Serial Servers to Serial Devices VESR4x4 Serial Servers can be connected to serial devices using RS 232 RS 422 RS 485 2 wire or RS 485 4 wire communication VESR4x4D models use DB 9M...

Page 20: ...round provides a common mode reference for the signal lines RS 485 RS 485 connections support 2 wire or 4 wire operation In RS 485 mode the transmitter is only enabled when the serial server is transmitting data on the line This allows other devices to share the bus When configured for 4 wire operation the connection supports two signal pairs TDA TDB RDA RDB and GND This makes full duplex operatio...

Page 21: ...utomatic MDIX interface which will sense the pinout of the network interface and provide a cross over connection if required Fiber Optic Connection When connecting a serial server equipped with a fiber optic interface to an Ethernet network the appropriate fiber optic cable must be connected between the serial server and the network interface The TX output of the serial server port must be connect...

Page 22: ...Section 3 Installation and Initial Setup Vlinx VESR4x4 Serial Server Page 22 of 70 www bb elec com www bb europe com Figure 15 Ethernet Pass through Port ...

Page 23: ...ossible to detect the serial server on the network if you do not know its IP address Once the serial server has been detected the Vlinx Manager Software can be used to change its settings Note For more information on how to use Vlinx Manager to configure your serial server refer to Section 4 Configuring the Serial Server Figure 16 Network Setup Configuring via the network using a Browser VESR4x4 S...

Page 24: ...re 17 Console Mode Setup To configure the serial server it must be put into Console Mode using the Reset switch Note Refer to Section 2 for information on how to use the Reset switch to enter Console Mode VESR4x4 Serial Server Operational Connections VESR4x4 Serial Servers can operate in Direct IP Virtual COM Port and Paired Modes In Direct IP Mode applications can use TCP IP socket connections or...

Page 25: ...ger Windows programs are able to interface to the virtual COM port using standard Windows API calls When a program on the PC opens the new COM port it communicates directly with the remote serial device connected to the serial server In Paired Mode two serial servers are used to provide a virtual cable connection between two remote serial devices using the Ethernet network The end serial devices c...

Page 26: ...Manager Vlinx Manager is a Windows based application used to configure serial servers Install it on your PC from the included CD Installation should launch automatically when the CD is placed in the CD ROM drive Follow the prompts to install the software Once the program is installed go to the Start Programs menu and run the program The Vlinx Manager Discovery window appears ...

Page 27: ...IP address if not leave I don t know the IP address of the device selected Click Connect The Progress text box and bar graph provide information to indicate whether serial servers are detected and how far along the process is The text in the Progress box appears in various colors depending on the message type Color Description Black A step in the discovery process Dark Blue A device was not found ...

Page 28: ...ger configuration window includes three areas Icons Serial Server Information Table Configuration pane Figure 21 Vlinx Manager Configuration Window Note The screen shots shown in this manual refer to the VESR901 Your screen will display the model name number and serial number of your VESR4x4 device All menus functions and options shown on the screen shots in this manual apply to your VESR4x4 devic...

Page 29: ...on 51 Serial Server Information Table The serial server information table contains information about all serial servers that have been discovered on the network or serial ports Figure 23 Serial Server Information Table The table displays the following information for each serial server Server Name the name reported by the serial server Connection the IP address of the serial server Port 1 Port 2 P...

Page 30: ... Pane It includes the following Masthead with the name and IP address of the currently selected serial server Contents sidebar on the left side containing hyperlinks to the following configuration pages General Network Port x Serial x port number each serial port connection is represented by a hyperlink Port x Network x port number each serial port connection is represented by a hyperlink Save Log...

Page 31: ...ver The Login page appears 2 Type the password into the Password box The default password is blank Figure 25 Login Page 3 Click Login The General Configuration page appears Navigating the Configuration Pages There are two ways to move from page to page in the Vlinx Manager Software by clicking a specific link or by clicking Next or Back to move through the pages sequentially Note Always remember t...

Page 32: ... can do the following Change the name of the serial server Initiate a login password change Figure 26 General Configuration Page Changing the serial server s name 1 Type the new name into the Serial Server Name text box 2 Click Save Changing the password 1 Select the I want to change the password check box Two text boxes appear Figure 27 Changing the Password 2 Type the new password into both boxe...

Page 33: ...erver to use dynamic DHCP or static IP addressing on the network Figure 28 Network Configuration Page Setting up Dynamic IP Addressing 1 Select the I want to use DHCP to setup the network check box Setting up Static IP Addressing 1 Ensure the I want to use DHCP to setup the network box is un checked Figure 29 IP Address Settings 2 Type the IP Address Subnet Mask and Default Gateway addresses in th...

Page 34: ... Rate select the Baud Rate between 75 baud and 230 400 baud required to communicate with the serial device 3 Data Bits select the number of Data Bits 5 6 7 or 8 required to communicate with the serial device 4 Stop Bits select the number of Stop Bits 1 1 5 or 2 required to communicate with the serial device 5 Parity select the Parity setting None Even Odd Mark or Space required to communicate with...

Page 35: ...hether you want the serial server to connect at power up or only when it receives data from the device connected to its serial port When the serial server is configured as a TCP server it waits for an incoming connection request from another network device You must set up the TCP port number that the serial server will listen to for incoming connections and set the maximum number of simultaneous c...

Page 36: ...ion on TCP port number box 4 Select the maximum number of connections desired in the and limit the number of connections to drop down box Figure 32 TCP Server Settings UDP Configuration UDP User Datagram Protocol enables applications using UDP socket programs to communicate with the serial ports on the serial server UDP protocol provides connectionless communications which allows data to be broadc...

Page 37: ... communication only Everyone on a specific UDP Port Only specific IP addresses Only a range of IP addresses Additional configuration fields appear depending on the options chosen 2 Select the required Send options a nobody sends to nobody b everyone on a specific UDP port send broadcast sends to all UDP ports on the network specified later c only specific IP addresses send unicast sends to specifi...

Page 38: ...ific IP addresses receive unicast receives from specific network IP addresses specified later d only a range of IP addresses receive unicast range receives from all IP addresses within a specified range specified later 5 Configure the Receive IP addresses and port numbers If you selected everyone on a specific UDP port receive broadcast type the UDP port number into the This is the UDP port I want...

Page 39: ...st be configured to initiate connections client and the other must be configured to wait for connections server The serial server configured as the client initiates the connection You must set up the IP address and port number of the server that you want the client serial server to communicate with You also select whether you want the serial server to connect at power up or only when it receives d...

Page 40: ...nitiate connections client 3 Type the IP address and TCP port numbers of the server in the appropriate text boxes 4 Select at power up if you want the serial server to always be connected when the serial port receives data if you only want to establish a connection when there is data to be sent Setting the serial server to operate in Paired Mode as a server 1 Select Paired protocol 2 Select to wai...

Page 41: ...cific range of IP addresses to connect if you want to specify a range of IP addresses that can connect 6 If you selected and allow a specific IP address to connect in the area of the window that appears select one or more IP address boxes and type in the desired IP address Figure 37 IP Addresses and allow a specific range of IP addresses to connect in the area of the window that appears select an ...

Page 42: ...ta transmission latency For most applications the VESR will transmit data back and forth seamlessly between the end devices However certain applications may require additional control over this process In these cases the Advanced Port Settings can be used to fine tune the serial server performance Figure 39 Advanced Network Settings Window with nothing selected Configuring when network connections...

Page 43: ... 2 Type the desired time period in seconds into the text box To close a connection if no data is received by the serial port for a period of time 1 Select the I want to close all connections when data is not received by the serial port for a period of time checkbox 2 Type the desired time period in milliseconds into the text box Configuring when data packets are sent 1 Select the I want to control...

Page 44: ...sending it across the network 1 Select I want to wait for a specific amount of data to be received by the serial port before sending it in the Character Count box 2 Type the desired number of characters into the text box To force the serial server to send all buffered data received on the serial port within a specified length of time 1 Select I want to wait no longer than a specific amount of time...

Page 45: ...ceived by the serial port in the Delimiter 1 box 2 Type the decimal value for the ASCII character into the text box For instance if you want to send data when a is received enter 36 into the test box Note If Delimiter 1 is selected Delimiter 2 must also be used To force the serial server to send its buffered data when it receives a specified ASCII character on its serial port 1 Select I want to se...

Page 46: ...ww bb europe com Saving Restoring the Configuration Settings When all configuration windows are complete the Save Configuration page appears Figure 42 Save Configuration Page To save the configuration to the serial server and re boot it so that the configuration settings will take effect 1 Click Save ...

Page 47: ...rial port on the serial server and the COM port on the local computer The information box displays the server name its IP address operating mode and TCP port 1 On the Vlinx Manager window click the Add icon The Add Virtual COM Port dialog box appears 2 Select the serial server to which you want to map the virtual COM port 3 Select the serial port number on the serial server 4 Select the COM port n...

Page 48: ...ialog Box Using the drop down box you can select the virtual COM port on the local computer The information box displays the server name its IP address operating mode and TCP port 1 Click the Remove icon The Remove Virtual COM Port dialog box appears 2 Select the COM port number you want to remove from the local computer 3 Click the Remove button When the process of removing the virtual COM port i...

Page 49: ...dow Figure 45 Firmware Upgrade Dialog Box The name of the currently selected serial server appears in the top drop down list Other serial servers that have already been discovered can be selected from the drop down list if desired The current firmware version of the selected serial server is shown in the text below the serial server name Information about the selected firmware file is shown in the...

Page 50: ...Open File dialog box 2 Browse to the drive and folder containing the firmware file 3 Select and download the file to the local firmware folder Uploading the Firmware to the Serial Server 1 In the Serial Server Selection drop down list select the serial server to be upgraded 2 In the Firmware Description drop down list select the firmware to upload to the serial server 3 Click the Upgrade button Pr...

Page 51: ...uter Information box displays information about the type of network connections the IP addresses Subnet Masks and Default Gateways in use Figure 46 Diagnostics Dialog Box Testing a Serial Server Connection 1 Click the Diagnostics icon The Diagnostics dialog box appears 2 Select the option a serial server 3 In the drop down box select the specific serial server you want to check 4 Click the Start b...

Page 52: ...nnection Testing a Virtual COM Port 1 Click the Diagnostics icon The Diagnostics dialog box appears 2 Select the option a virtual communications port 3 In the drop down box select the specific COM port you want to check 4 Click the Start button Information about the progress of the pinging process is displayed in the Test Progress box ...

Page 53: ...Section 6 Diagnostics Vlinx VESR4x4 Serial Server Page 53 of 70 www bb elec com www bb europe com Figure 48 Testing a VCOM Port ...

Page 54: ...gured you can save the settings using Vlinx Manager Existing configuration files can be Opened from Vlinx Manager which loads them into the serial server This allows the same configuration to be applied to multiple serial servers or to reload a previously used configuration Data Parity Stop Bits The number of Data bits type of Parity and number of Stop bits selected define the serial port paramete...

Page 55: ...ter is received When both Delimiter 1 start delimiter and Delimiter 2 end delimiter are enabled characters received by the serial port will be discarded until the start delimiter character is detected on the serial port The serial server then buffers the start delimiter character and all subsequent characters received after it until the end delimiter is detected When the end delimiter is received ...

Page 56: ...ote Select No Flow Control when setting the port as RS 422 or RS 485 4 wire Forced Transmit controls the maximum amount of time that characters can be buffered before sending the characters to the network Larger values decrease the number of network packets but increase the amount of time to receive characters Smaller values increase the number of network packets but decrease the amount of time to...

Page 57: ...ing IP Address 169 254 102 1 Subnet Mask 255 255 255 0 Default Gateway 169 254 102 100 Figure 50 TCP IP Properties c Use the Vlinx Manager Software to search for discover and configure the unit 2 Method Two Change the serial server s network setting to match your PC using Console Mode a Connect a null modem serial cable crossover cable from any port on the serial server to an available COM port on...

Page 58: ...ce g After logging in click Network h De select I want DHCP to setup the Network i Re configure the serial server s network settings to an address within the range of your PC s network setting For example if your PC is configured to the following settings IP Address 192 168 0 1 Network Mask 255 255 255 0 Default Gateway 192 168 0 100 Configure the serial server to IP Address 192 168 0 50 Network M...

Page 59: ...nd the other as a TCP client The serial server configured as the TCP client initiates connections You must set up the IP address and port number of the server that you want the client serial server to communicate with You also select whether you want the serial server to connect at power up or only when it receives data from the device connected to its serial port The serial server configured as a...

Page 60: ...r s serial port and the device connected to it Note Refer to the Appendix D for connector and pinout details Serial Server Name is a unique name assigned to the serial server It must be a valid hostname as defined by RFC 952 and RFC 1123 The rules are It must consist only of the characters A to Z a to z 0 to 9 or It can start or end with a letter or a number but it must not start or end with a It ...

Page 61: ...must set up the TCP port number that it will listen to for connections and set the maximum up to four number of simultaneous connections it will accept You can filter the connections it will accept based on specific IP addresses or ranges of IP addresses that you specify UDP User Datagram Protocol enables applications using UDP socket programs to communicate with the serial ports on the serial ser...

Page 62: ...erver Settings Vlinx VESR4x4 Serial Server Page 62 of 70 www bb elec com www bb europe com Both the serial server and the computer must be configured for VCOM operation Virtual COM ports can be set up on the PC using the Vlinx Manager software ...

Page 63: ...t available the device will default to 169 254 102 39 Net Mask 255 255 255 0 Gateway 169 254 102 100 MAC Address Fixed see bottom label Firmware Version X X X Current Version Hardware Version X X Current Version Port 1 2 3 4 Serial port mode RS 232 Baud Rate 9600 Data bits 8 Parity None Stop bits 1 Flow Control None Protocol TCP Serial timeout 0 seconds TCP alive timeout 0 minutes Connection Mode ...

Page 64: ...a a Ethernet connection Using a standard web browser such as Internet Explorer 7 8 or 9 or Firefox 3 or 4 Software Vlinx Manager for serial server configuration Windows 2000 XP 32 64 bit 2003 Server 32 64 bit Vista 32 64 bit 2008 Server 32 64 bit Windows 7 32 64 bit Environment Operating Temperature 40 to 80 C 40 to 176 F Storage Temperature 40 to 85 C 40 to 185 F Operating Humidity 10 to 95 non c...

Page 65: ...nd System Re boot Off System NOT OK Connectors 10BaseT 100BaseTX Ethernet Single RJ 45F 8 pin SC fiber SC connector ST fiber ST connector Serial VESR4x4D four DB 9M connectors VESR4x4T four pluggable terminal blocks DC Power 3 position pluggable terminal block or locking barrel connector Serial Interface Specifications Serial Interfaces Mode Selection RS 232 422 485 software selectable RS 232 line...

Page 66: ...rt Description Comments 80 tcp Always open for the web server This port is used for configuration of the device using a web browser This port is always open no matter how you configure the device If you want to use this method to configure the device from outside of a firewall then a firewall must allow incoming connections to this port If you want to use this method to configure the device from t...

Page 67: ... network mode is DHCP This port is used if you configure the device for DHCP mode as opposed to Static IP It is used to communicate with the DHCP server This should only be used inside of a firewall or NAT 7000 udp Always open for serial server configuration over UDP These ports are used for configuration and firmware upgrade of the device using the serial server manager These ports are always ope...

Page 68: ... 8 Appendix Vlinx VESR4x4 Serial Server Page 68 of 70 www bb elec com www bb europe com Appendix C Dimensional Diagrams Figure 51 Dimensional Diagram of a VESR424 Serial Server dimensions in inches millimeters ...

Page 69: ...M Pin RS 232 Direction RS 232 RS 422 485 4 Wire RS 485 2 Wire 1 DCD Input RDA 2 RD Input RDB 3 TD Output TDB Data B 4 DTR Output TDA Data A 5 GND GND GND 6 DSR Input 7 RTS Output 8 CTS Input 9 Terminal Block Terminal RS 232 Direction RS 232 RS 422 RS 485 A RTS Output TDA Data A B TD Output TDB Data B C CTS Input RDA D RD Input RDB E GND GND GND ...

Page 70: ...e of the serial device and the serial server TXA to the RXA of the serial device Note 2 Ground is signal ground and provides a common mode reference for the RS 422 Receiver and Transmitters Standard Ethernet Cable RJ 45 Pinout RJ 45 Pin Signal Wire Color RJ 45 Pin 1 TX White Green 1 2 TX Green 2 3 RX White Orange 3 4 Not used Blue 4 5 Not used White Blue 5 6 RX Orange 6 7 Not used White Brown 7 8 ...

Reviews: