background image

BTL5-A/C/E/G_ _-M/U_ _ _ _-P-S 32/KA_ _
Micropulse Linear Transducer in Profile Housing

7

english

5

Startup

5.1

Check connections

Although the connections are polar-
ity reversal protected, components
can be damaged by improper con-
nections and overvoltage. Before
you apply power, check the connec-
tions carefully.

5.2

Turning on the system

Note that the system may execute
uncontrolled movements when first
turned on or when the transducer is
part of a closed-loop system whose
parameters have not yet been set.
Therefore make sure that no haz-
ards could result from these situa-
tions.

If there is no magnet in the stroke
range, the integrated function moni-
tor provides the following defined
output signals:

6

Versions (indicated on part label)

Supply voltage 1 = DC 24 V, 2 = DC ±15 V

Electr. connection S32: with connector,

BTL5-A11-M0450-P-S32

KA05: with 5 m cable

Profile form factor

Nom. length (4 digits), M = metric in mm

U

= inches in 1/10 inch

Analog interface:

Voltage output

A_1 = 10 ... 0 V and 0 ... 10 V
G_1 = 10 ... –10 V and –10 ... 10 V

Current output

C_0 = 0 ... 20 mA

E_0 = 4 ... 20 mA

C_7 = 20 ... 0 mA

E_7 = 20 ... 4 mA

Micropulse

Linear T

ransducer

Voltage output 10 V
increasing

decreasing

U

A

 > 10 V

< 0 V

Current output 20 mA
increasing

decreasing

I

A

 > 20 mA

0 mA for BTL5-C...

I

A

 > 20 mA

< 4 mA for BTL5-E...

5.3

Check output values

After replacing or repairing a trans-
ducer, it is advisable to verify the
values for the start and end position
of the magnet in manual mode. If
values other* than those present
before the replacement or repair are
found, a correction should be made.

* Transducers are subject to modifi-

cation or manufacturing tolerances.

5.4

Check functionality

The functionality of the transducer
system and all its associated com-

ponents should be regularly
checked and recorded.

5.5

Fault conditions

When there is evidence that the
transducer system is not operating
properly, it should be taken out of
service and guarded against unau-
thorized use.

5.6

Noise elimination

Any difference in potential - current
flow - through the cable shield
should be avoided. Therefore:

Use the isolation bushings, and

Make sure the control cabinet
and the system in which the
BTL5 is contained are at the
same ground potential.
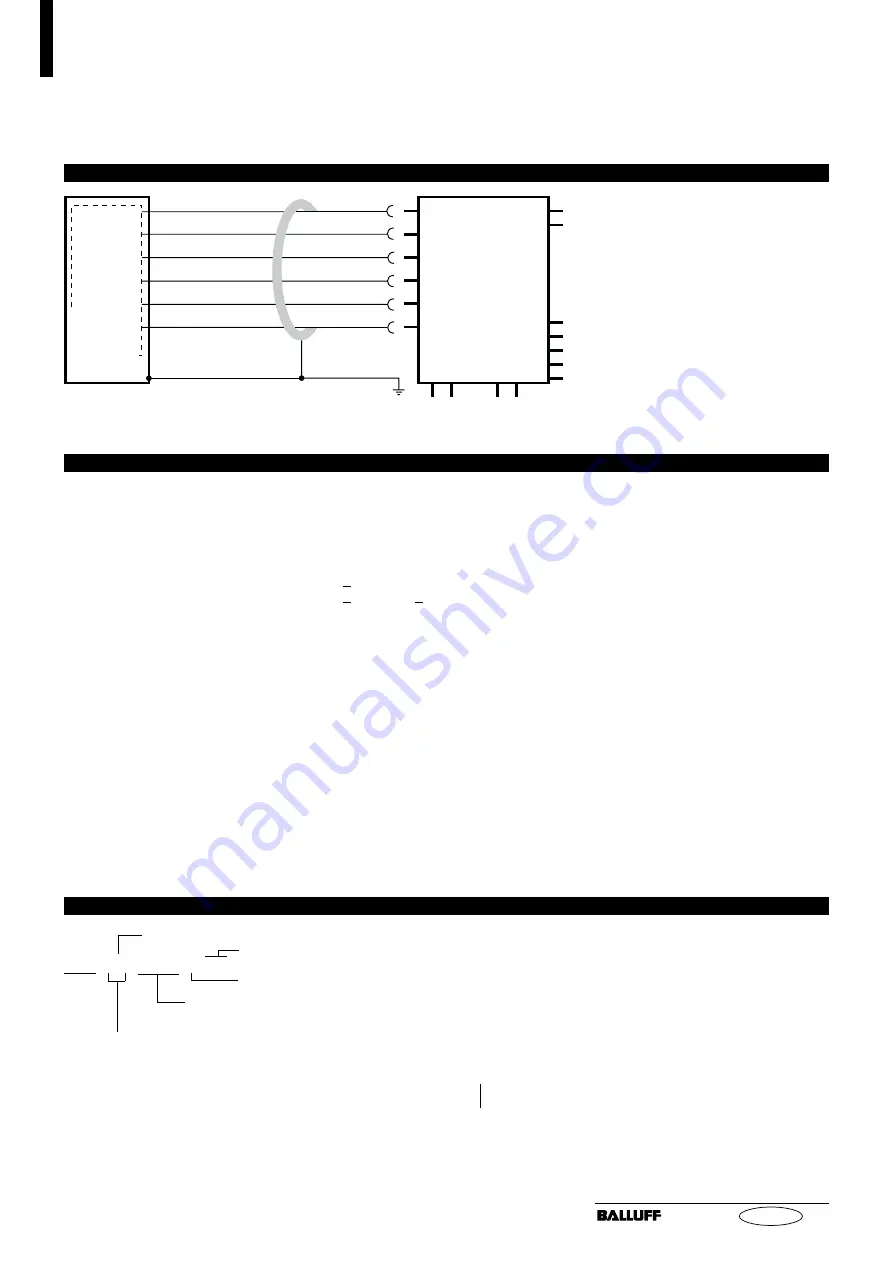
4

Wiring (cont.)

YE

GY

PK

GN

BU

BN

4...20 mA

0 V

10...0 V

0...10 V

GND

+24 V

Fig. 4-3: BTL5-E10...KA _ _ with processor card/controller, wiring example

p

rocessor/

contr

oller with

analog input

BTL5-E10...KA_ _

Summary of Contents for Micropulse BTL5-E series

Page 1: ...BTL5 A C E G_ _ M U_ _ _ _ P S 32 KA_ _ http www balluff de http www balluff de Technical Description User s Guide english ...

Page 2: ...er application 2 1 2 Qualified personnel 2 1 3 Use and inspection 2 1 4 Scope 2 2 Function and Characteristics 3 2 1 Characteristics 3 2 2 Function 3 2 3 Available stroke lengths and magnets 3 3 Installation 3 3 1 Transducer installation 3 3 2 Floating magnets 4 3 3 Captive magnets 5 4 Wiring 6 5 Startup 7 5 1 Check connections 7 5 2 Turning on the system 7 5 3 Check output values 7 5 4 Check func...

Page 3: ...power supply is via a cable which depending on the ver sion is either fixed or connected using a female connector Dimensions for installing the Micropulse transducer and for the magnets and control arm are found on pages 4 and 5 2 Function and Characteristics 3 1 Transducer installation Ensure that no strong electrical or magnetic fields are present in the immediate vicinity of the trans ducer Any...

Page 4: ...ng non magnetizable screws brass alumi num To ensure the accuracy of the transducer system the moving member must carry the magnet on a track parallel to the transducer The following table provides figures in mm for the spacing which must be maintained between magnet and transducer and for the permissible center offset Magnet type Distance D Offset C BTL5 P 3800 2 0 1 4 2 BTL5 P 5500 2 5 15 15 BTL...

Page 5: ...ws DIN 912 max tightening torque 2 Nm Nominal stroke Black round marking Magnet NL Fig 3 8 BTL2 GS10 _ _ _ _ A connecting rod Jam nut DIN 934 M5 Swivel eye DIN 648 Ball joint B DIN 71805 rotates hori zontally part of BTL5 F 2814 1S Ball joint B DIN 71805 rotates horizontally Black round marking Fig 3 6 BTL5 F 2814 1S magnet Fig 3 7 BTL5 M N 2814 1S magnet Mechanically joined to M5 stud using 2 nut...

Page 6: ...des only limited protection Cable length max 20 m Ø 6 to 8 mm Longer lengths may be used if construction shielding and routing are such that external noise fields will have no effect on signal integrity Fig 4 2 Pin assignments BKS connector type BTL BKS connector view towards solder side of female BKS S 32M 00 or BKS S 33M 00 Table 4 1 Wiring assignment straignt BKS S 32M 00 No 99 5672 19 08 Binde...

Page 7: ...cropulse Linear Transducer Voltage output 10 V increasing decreasing UA 10 V 0 V Current output 20 mA increasing decreasing IA 20 mA 0 mA for BTL5 C IA 20 mA 4 mA for BTL5 E 5 3 Check output values After replacing or repairing a trans ducer it is advisable to verify the values for the start and end position of the magnet in manual mode If values other than those present before the replacement or r...

Page 8: ... to 28 V Ripple 0 5 Vpp BTL5 _2 DC 14 7 to 15 3 V Current draw 150 mA Inrush 3 A 0 5 ms Polarity reversal protection built in Overvoltage protection Transzorb diodes Electric strength GND to housing 500 V 7 3 Outputs BTL5 A Output voltage 0 10 10 0 V Load current 5 mA Ripple 5 mV BTL5 G Outputvoltage 10 10 10 10 V Load current 5 mA Ripple 5 mV BTL5 C Output current 0 20 20 0 mA Load resistance 500...

Reviews: