background image

www.balluff.com

BIS V-6108 PROFINET

Processor Unit

85

english

7

  Device Functions

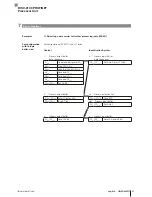
13. Bulk Read (only BIS VU)

Read from all data carriers that are located in front of the antenna. Read 4 bytes starting at data 
carrier address 3.

Control

Identification System

1.

Process output buffer 

(note sequence):

2.

Process Input Buffer 

(note sequence): 

01

hex

Command designator 53

hex

00

hex

/0F

hex

Set AA bit

02

hex

Start address 03

hex

01

hex

Enter the number of tags

03

hex

Start address 00

hex

02

hex

Enter the number of bytes 

per tag

04

hex

No. of bytes 04

hex

05

hex

No. of bytes 00

hex

03

hex

…0E

hex

Enter 12 bytes of data and 

the check byte

06

hex

Subset Type 00

hex

07

hex

Max Tags FF

hex

00

hex

/0F

hex

Invert TO bit

00

hex

/0F

hex

Set AV Bit

00

hex

/0F

hex

Set AE bit

3a. Process input buffer:

01

hex

Copy the number of tags

02

hex

Copy the number of bytes 

per tag

03

hex

…06

hex

Copy the 4th byte of data 

for the 1st tag 

07

hex

Read the check byte

08

hex

…0b

hex

Copy the 4th byte of data 

for the 2nd tag 

0C

hex

Read the check byte

0D

hex

 /0E

hex

Copy the 2nd byte of data 

for the 3rd tag 

3b. Process output buffer:

4.

Process input buffer:

00

hex

/0F

hex

Invert TI bit

01

hex

…08

hex

Enter l8 bytes of data and 

the check byte

00

hex

/0F

hex

Invert TO bit

00

hex

/0F

hex

Set AE bit

5a. Process input buffer:

6a. Process input buffer:

01

hex

…02

hex

Copy the 2nd byte of data 

for the 3rd tag

00

hex

/0F

hex

Reset AA and AE bits

03

hex


Read the check byte

04

hex

…07

hex

Copy the 4th byte of data 

for the 4th tag 

08

hex

Read the check byte

5b. Process output buffer:

00

hex

/0F

hex

Reset AV bit

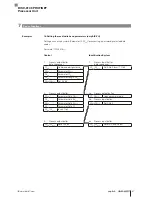
Examples

Summary of Contents for BIS V-6108-048-C002

Page 1: ...BIS V 6108 PROFINET Technical Reference Operating Manual english...

Page 2: ...www balluff com...

Page 3: ...n 8 3 4 Data Integrity 8 3 5 Read Write Heads H1 H4 9 3 6 PROFINET 9 3 7 IO Link 10 3 8 Communication Mode 10 3 9 USB Port 10 4 Installation 11 4 1 Processor Unit Scope of Delivery 11 4 2 Processor Un...

Page 4: ...are set in apostrophes e g L Note tip This symbol indicates general notes Warning notes are especially safety relevant and are used for accident avoidance This information must be read thoroughly and...

Page 5: ...patibility ERP Effective Radiated Power EPC Electronic Product Code FCC Federal Communications Commission FE Functional ground GSD General Station Description GSDML GSD Markup Language IP Internet Pro...

Page 6: ...ssor unit to an external controller observe proper selection and polarity for the connection as well as the power supply see Installation on page 11 The processor unit may only be used with an approve...

Page 7: ...as of use are In manufacturing for controlling material flow e g for model specific processes for workpiece transport using conveying systems for acquiring safety related data In warehouse areas for m...

Page 8: ...red for each R W head If both bit headers are the same then the data has been fully updated and can be transmitted This means that the data for each R W head is only valid if both bit headers are the...

Page 9: ...ions Compatible Read Write Heads H1 H4 VM 3_ _ VL 3_ _ VU 3_ _ C 3_ _ BIS V 6108 048 C002 H1 H4 YES YES YES NO BIS V 6108 048 C102 H1 H4 YES YES YES YES Note Only shielded cables are to be used for co...

Page 10: ...tandard UART protocol Process data cyclical The GSDML file provides combined input output modules 8 bytes 254 bytes for mapping the sensors Combined input output modules 8 bytes 254 bytes Service data...

Page 11: ...echanical connection dimensions in mm Figure 3 A B Installation examples A attachment to DIN rails B attachment to T slotted framing 1 2 DIN rail Fastening 3 4 T slotted framing Holder for screw mount...

Page 12: ...n A coded Power 7 8 male 5 pin 2 5 1 5 3 4 2 3 4 1 A 0V B H1 H4 VP N C PIN Function 1 24 V DC 2 A 3 0 V 4 B 5 n c 3 4 2 3 1 4 5 5 2 1 VP Aktor VP Sensor BUS FE 0V 0V POWER PIN Function 1 0 V 2 0 V 3 F...

Page 13: ...OFINET IO port 1 M12 female 4 pin D coded PROFINET IO port 2 M12 female 4 pin D coded Protection Class IP65 with connectors Weight 800 g Operating Voltage VS 24 V DC 20 LPS Class 2 Ripple 10 Power Con...

Page 14: ...erity level 3A 1400 MHz 2000 MHz Severity level 3A 2000 MHz 2700 MHz Severity level 2A Emission as per EN 55016 2 3 EN 61000 6 3 EMC BIS V 6108 048 C102 EN 61000 6 2 EN 61000 4 2 4 5 6 Severity level...

Page 15: ...ith the host control system in the input and output buffers buffer The size of these buffers must be configured by the master Note The possible buffer sizes for each read write head are stored in the...

Page 16: ...es are assigned to a specific slot for configuring the V 6108 The BIS V 6108 header module always has to be plugged in at slot 0 The data modules for the 4 read write heads can be plugged in at slots...

Page 17: ..._1byte 1 byte IOL_I_2byte 2 bytes IOL_I_4byte 4 Byte IOL_I_6byte 6 Byte IOL_I_8byte 8 Byte IOL_I_10byte 10 Byte IOL_I_16byte 16 Byte IOL_I_24byte 24 Byte IOL_I_32byte 32 Byte Data modules for IO Link_...

Page 18: ...IOL_I O_8 _8byte 8 Byte 8 Byte IOL_I O_10 _10byte 10 Byte 10 Byte IOL_I O_4 _32byte 4 Byte 32 Byte IOL_I O_32 _4byte 32 Byte 4 Byte IOL_I O_16 _16byte 16 Byte 16 Byte IOL_I O_24 _24byte 24 Byte 24 By...

Page 19: ...1 Bit CRC 0 1 0 0 1 1 Bit Dynamic mode 0 1 0 0 2 1 Bit Type serial number 0 1 0 0 3 1 Bit Slow tag detection 0 1 0 0 4 1 Bit Low antenna power 0 1 0 0 5 1 Bit Head LEDs off 0 1 0 1 0 1 byte UID Compar...

Page 20: ...yte 2 0 255 0 4 0 1 byte Device ID Byte 0 0 255 0 5 0 1 byte Device ID Byte 1 0 255 0 6 0 16 bits Serial Number String Empty string 4 0 0 1 Bit Parameter server upload 0 1 0 0 1 1 Bit Parameter server...

Page 21: ...ormally open contact N C Contact Input as normally closed contact IO Link IO Link function N O Contact after Parameter Configuration SIO mode an IO Link device can be configured via IO Link and afterw...

Page 22: ...24 Byte EEPROM BIS M 1_ _ 06 EM EM4135 288 Byte EEPROM BIS M 1_ _ 07 Infineon SRF55V10P 992 Byte EEPROM BIS M 1_ _ 08 NXP SL2ICS530 160 Byte EEPROM BIS M 1_ _ 09 NXP SL2ICS500 32 Byte EEPROM BIS M 1_...

Page 23: ...is a procedure for determining a check value for data in order to be able to recognize transmission errors If the CRC check is enabled a status message will be sent when a CRC error is detected Note...

Page 24: ...1_ _ 15 131072 Byte 114688 Byte BIS M 1_ _ 20 8192 Byte 7168 Byte BIS L 1_ _ 01 192 bytes 168 bytes BIS L 2_ _ 03 5 bytes read only BIS L 1_ _ 05 192 bytes 168 bytes BIS C 1_ _ 04 511 Byte 450 Byte BI...

Page 25: ...ata carriers transfer EPC or TID into the Serial Number field depending on the most recently executed command For BIS VU 00hex is transferred by default into the data carrier type field Data Format 1...

Page 26: ...the end byte of the process data This setting is only for the input data has no influence on the actual process data length and is for visual purposes only Whether a connected IO Link device receives...

Page 27: ...r set read Configuration options 8Xhex Switch on X1hex Switch on upload X2hex Switch on download The connection of a BIS V 6108 to a Siemens S7 controller using SIMATIC Manager is shown as an example...

Page 28: ...RFID The module is added as PROFINET IO Select the PROFINET rail Double clicking adds the device as a PROFINET IO The slots are assigned the default settings Figure 7 Adding the BIS V 6108 as a slave...

Page 29: ...cess data buffer size for a read write head can be selected by deleting and plugging in a corresponding head module min 8 bytes max 254 bytes When a module is not plugged in no process data is configu...

Page 30: ...has to be deleted first Select the corresponding IO Link module after the deletion Figure 11 Selecting the IO Link module Drag the selected module to slot 5 slots 6 13 are reserved for optional addit...

Page 31: ...11 1Ehex 21 2Ehex 31 3Ehex 40 4Fhex 01 0Ehex 00hex 0Fhex 10hex 1Fhex 20hex 2Fhex 30hex 3Fhex The total buffer size is derived from the sum of all buffers ranges 1 5 X and is not allowed to exceed 244...

Page 32: ...high byte or Data 06hex Data Data Last Byte Bit Header TI KA GR AV Assignment and explanation Subaddress Bit name Meaning Description of Function 00hex last byte TI Toggle Bit In Controller is ready t...

Page 33: ...fication system Write operation Identification system can accept additional data MT Multiple Tag More than 1 data carrier is in the R W head s field AF Job Error A job was processed incorrectly or was...

Page 34: ...er are not the same The 2nd bit header must be used 20hex Address assignment of the read write job is outside the memory range of the data carrier 21hex This function is not possible for this data car...

Page 35: ...01hex Command Identifier 01hex Read from data carrier 02hex Start address low byte Start address for reading 03hex Start address high byte Start address for reading 04hex Number of bytes low byte Numb...

Page 36: ...01hex Command Identifier 01hex Read from data carrier 02hex Start address low byte Start address for reading 03hex Start address middle byte Start address for reading 04hex Start address high byte Sta...

Page 37: ...be written from 03hex Start address high byte Start address to be written from 04hex Number of bytes low byte Number of bytes to be written starting from the start address 05hex Number of bytes high b...

Page 38: ...he start address 06hex Number of bytes middle byte Number of bytes to be written starting from the start address 07hex Number of bytes high byte Number of bytes to be written starting from the start a...

Page 39: ...match the data is valid Command Identifier 87hex Save the Start Address for the Auto Read Function with 24 bit addresses When assigning addresses to data carriers with expanded memory the start addres...

Page 40: ...entifier 09hex Read out type and serial number None No meaning Last byte 2nd Bit Header If the 1st and 2nd bit headers match the data is valid If execution is successful the response is passed to the...

Page 41: ...s to start 04hex Target start address low byte Copy the start address of the target data carrier for the function from which copying is to start 05hex Target start address high byte Copy the start add...

Page 42: ...ddress of the source data carrier for the function from which copying is to start 05hex Target start address low byte Copy the start address of the target data carrier for the function from which copy...

Page 43: ...eck is to be carried out 04hex Number of bytes low byte Start address from which the CRC_16 data check is to be carried out 05hex Number of bytes high byte Start address from which the CRC_16 data che...

Page 44: ...t address low byte Start address from which the CRC_16 data check is to be carried out 03hex Start address middle byte Start address from which the CRC_16 data check is to be carried out 04hex Start a...

Page 45: ...e Number of bytes to be written starting from the start address None No meaning Last byte 2nd Bit Header If the 1st and 2nd bit headers match the data is valid Data is accepted from the processor unit...

Page 46: ...nd Identifier 32hex Write a constant value to the data carrier 02hex Start address low byte Start address to be written from 03hex Start address middle byte Start address to be written from 04hex Star...

Page 47: ...s Number of bytes for the data carrier identifier EPC or TID that is transmitted in subsequent cycles 04hex Reserved Set to 0 05hex Reserved Set to 0 06hex Reserved Set to 0 None No meaning Last byte...

Page 48: ...tion 00hex 1st Bit Header 01hex Command Identifier 41hex Unselect Undo the data carrier selection None No meaning Last byte 2nd Bit Header If the 1st and 2nd bit headers match the data is valid Input...

Page 49: ...r 01hex Command Identifier 42hex Read from EPC None No meaning Last byte 2nd Bit Header Valid data is present if the 1st and 2nd bit strings match If execution is successful the response is passed to...

Page 50: ...it Header 01hex Command Identifier 43hex Write to EPC 02hex No of bytes Number of bytes for the EPC to be written None No meaning Last byte 2nd Bit Header If the 1st and 2nd bit headers match the data...

Page 51: ...g Subaddress Meaning Description of Function 00hex 1st Bit Header 01hex Command Identifier 44hex Read from TID None No meaning Last byte 2nd Bit Header If the 1st and 2nd bit headers match the data is...

Page 52: ...on 00hex 1st Bit Header 01hex Command Identifier 45hex Set antenna power 02hex Antenna power Antenna power ERP EIRP in increments of n 0 25 dBm A value of 0 turns off the antenna Example An antenna po...

Page 53: ...ch the data is valid If execution is successful the response is passed to the input buffer in the following format Subaddress Meaning Description of Function 00hex 1st Bit Header 01hex Antenna power A...

Page 54: ...t byte 2nd Bit Header If the 1st and 2nd bit headers match the data is valid If the EPCs transfer with the length of 12 bytes the response in the input buffer is as follows Subaddress Meaning Descript...

Page 55: ...right justified and filled with zeros on the left In the following the number of data carriers read number of bytes per EPC are transmitted For 64 bytes per EPC the actual EPC length in ASCII is spec...

Page 56: ...t headers EPC 1 Length 48 bytes 34hex 38hex EPC E2 FF 00 00 E2 11 90 22 E2 03 01 27 33 44 55 66 77 88 99 AC 01 02 03 04 05 06 07 08 09 0A 0B 0C 00 00 00 00 00 00 00 00 00 00 00 00 00 00 AA BB EPC 2 Le...

Page 57: ...t only after the command has been accepted by the processor unit and acknowledged Subaddress Meaning Description of Function 00hex 1st Bit Header 01hex Data Parameter data Data Parameter data None No...

Page 58: ...nction 00hex 1st Bit Header 01hex No of bytes Number of bytes of the parameter that is transmitted in the subsequent cycles 02hex Data Parameter data Data Parameter data Data Parameter data Data Param...

Page 59: ...cols Class 1 Generation 2 UHF RFID and ISO IEC 18000 63 The EPCglobal standard is available online at www gs1 org standards Subaddress Meaning Description of Function 00hex 1st Bit Header 01hex Comman...

Page 60: ...occur In which case the data will be marked as invalid via a check byte at the end of the data block and transmitted to the controller Data blocks marked as valid in their check bytes can be used with...

Page 61: ...lid Data 2 0 Transmission of the 1st byte that was read from the 2nd data carrier Data 2 1 Transmission of the 2nd byte that was read from the 2nd data carrier Data 2 Additional data from the 2nd data...

Page 62: ...ax Tags Maximum number of tags None No meaning Last byte 2nd Bit Header If the 1st and 2nd bit headers match the data is valid Data is accepted from the processor unit only after the command has been...

Page 63: ...No of tags Number of detected tags 02hex Number of Successfully Written Data Carriers 0 255 None No meaning Last byte 2nd Bit Header If the 1st and 2nd bit headers match the data is valid or Input Bu...

Page 64: ...er If the 1st and 2nd bit headers match the data is valid If execution is successful the response is passed to the input buffer in the following format Subaddress Meaning Description of Function 00hex...

Page 65: ...RSSI 2 Data RSSI None No meaning Last byte 2nd Bit Header If the 1st and 2nd bit headers match the data is valid The RSSI value is returned in the form of an I component and a Q component as a power l...

Page 66: ...ata carrier should be processed with respect to its Lock Status 0 Memory area is not affected by the Action field 1 Memory area is affected by the Action field Action Bit Mask 16 Bit used to determine...

Page 67: ...1 Read and Write Not Possible State can no longer be changed Subaddress Meaning Description of Function 00hex 1st Bit Header 01hex Command Identifier 57hex Lock 02hex Mask 0 03hex Mask 1 04hex Action...

Page 68: ...controller sends a command identifier to the processor unit in the output buffer with the AV bit set The AV bit tells the processor unit that a job is starting and that the transmitted data is valid...

Page 69: ...arted 10 ms Write times Data carrier with 16 bytes per block FRAM BIS M 1_ _ 02 20 EEPROM BIS M 1_ _ 03 07 08 Data carrier detection 20 ms 20 ms Write bytes 0 to 15 60 ms 80 ms For each additional 16...

Page 70: ...Data carrier BIS L 2_ _ Writing not possible Read times in static mode Data carrier with 32 bytes per block No of bytes Read time ms 0 to 31 110 For each additional 32 byte block started 120 Data car...

Page 71: ...0 to 31 112 Data carrier with 64 bytes per block No of bytes Read time ms 0 to 3 14 For each additional byte 3 5 0 to 63 224 m Highest address to read Formula t m 1 3 5 ms Example Read 11 bytes start...

Page 72: ...Failure SF red Bus Failure BF Red Off Device is not ready for operation No voltage or PROFINET IO ready for operation No voltage or PROFINET IO connection established LED lights up Device is ready for...

Page 73: ...LED for displaying the operational status Indicator Function IO Link Input Off PROFINET IO not yet started Signal 0 Yellow Signal 1 Red Error SC Green IO Link communication active Flashing green IO Li...

Page 74: ...note sequence 2 Process Input Buffer note sequence 01hex Command designator 01hex 00hex 0Fhex Set AA bit 02hex Start address 0Ahex 01 0Ehex Enter first 14 bytes 03hex Start address 00hex 00hex 0Fhex I...

Page 75: ...ontrol Identification System 1 Process output buffer note sequence 2 Process Input Buffer note sequence If problem occurs immediately 01hex Command designator 01hex 00hex 0Fhex Set AA bit 02hex Start...

Page 76: ...Process output buffer note sequence 2 Process Input Buffer note sequence 01hex Command designator 01hex 00hex 0Fhex Set AA bit 02hex Start address 0Ahex 01 0Ehex Enter first 14 bytes 03hex Start addr...

Page 77: ...utput buffer 4 Process output buffer 01 0Ehex Enter first 14 bytes 01 0Ehex Copy first 14 bytes 00hex 0Fhex Invert TI bit Process input buffer 00hex 0Fhex Invert TO bit 5 Process output buffer 6 Proce...

Page 78: ...7 bytes starting from address 10 of the data carrier are to be copied to the data carrier in front of read write head 3 starting from address 35 Control Identification System 1 Process output buffer n...

Page 79: ...Input Buffer note sequence 01hex Command designator 32hex 00hex 0Fhex Set AA bit invert TO bit 02hex Start address 50hex 03hex Start address 00hex 04hex Number of bytes E8hex 05hex No of bytes 03hex...

Page 80: ...bit invert TO bit 02hex Start address 00hex 03hex Start address 00hex 04hex No of bytes 92hex 05hex No of bytes 02hex 00hex 0Fhex Set AV Bit 3 Process output buffer 4 Process output buffer 01 0Ehex E...

Page 81: ...fer 2 Go to the default state Process input buffer 00hex 0Fhex Set GR bit 00hex 0Fhex Reset BB bit R W head is shut off 3 Process output buffer 4 Process input buffer 00hex 0Fhex Reset GR bit 00hex 0F...

Page 82: ...hex 0Fhex Set AE bit 3a Process input buffer 4 Process input buffer 01hex Note number of data carriers 01 0Chex Enter second EPC 12 bytes 02hex Save number of bytes 0Dhex 0Ehex Enter third EPC 2 bytes...

Page 83: ...tor 40hex 00hex 0Fhex Set AA bit Invert TO bit 02hex Type EPC 00hex 03hex Length of the EPC 0Chex 04hex Reserved 00hex 05hex Reserved 00hex 06hex Reserved 00hex 00hex 0Fhex Set AV Bit 3 Process output...

Page 84: ...ax Tags FFhex 00hex 0Fhex Set AV Bit 3 Process output buffer 4a Process output buffer 01 0Ehex Enter first 14 bytes 01 0Ehex Copy first 14 bytes 00hex 0Fhex Invert TI bit 4b Process input buffer 00hex...

Page 85: ...hex 0Fhex Invert TO bit 00hex 0Fhex Set AV Bit 00hex 0Fhex Set AE bit 3a Process input buffer 01hex Copy the number of tags 02hex Copy the number of bytes per tag 03hex 06hex Copy the 4th byte of data...

Page 86: ...parameter data 00hex 0Fhex Set AV Bit 00hex 0Fhex Set AE bit 3a Process input buffer 4 Process input buffer 01hex Read parameter length 00hex 0Fhex Reset AA and AE bits 02hex Copy parameter data 3b Pr...

Page 87: ...equence 01hex Command designator 48hex 00hex 0Fhex Set AA bit Invert TO bit 02hex Parameter 02hex 03hex Parameter 10hex 04hex Parameter Length 04hex 00hex 0Fhex Set AV Bit 3 Process output buffer 4a P...

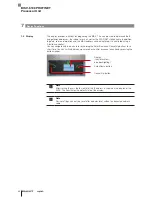
Page 88: ...n controller You can navigate within a menu level by holding the Enter Down and Cancel Up buttons for a short time You can switch between menu levels or confirm or cancel an action by pressing the but...

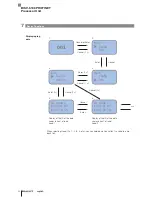
Page 89: ...onfig IP Subnet Config IP Subnet Config Subnet Gatew Config PN Na Fa Re Config Gatew PN Na Device resets now Reset default settings Cancel or Enter Enter 1 s Enter Enter Enter Enter Enter 1 s Cancel C...

Page 90: ...s Cancel 1 s Enter 1 2 3 6 4 5 Main Config Info Info Tag ID Version ID Head 1 E0 08 01 D7 E5 47 5D 55 ID Head 2 E0 08 01 D7 E5 47 5D 56 Display of the ID of the data carrier in front of read head 1 Di...

Page 91: ...Enter 1 s Enter Enter 1 s Enter Cancel Cancel 1 s Cancel Cancel 1 s Cancel 1 s 1 2 3 4 6 5 Main Config Info Info Tag ID Version Info Tag ID Version Vers Info FW IOL 1 10 010A Two versions are display...

Page 92: ...s 001 Main Config Info Cancel or Enter Enter 1 s Enter Enter 1 s Enter Enter Cancel Cancel 1 s Cancel Cancel Cancel Cancel 1 s 1 2 3 4 6 7 5 Main Config Info Info Tag ID Version Info Tag ID Version In...

Page 93: ...IS V 6108 PROFINET Processor Unit 93 english 7 Device Functions 001 Main Config Info Cancel or Enter Enter 1 s Enter 1 s Cancel 1 s Cancel 1 s Cancel 1 s 1 2 3 4 Config IP Subnet IP 192 168 002 001 Vi...

Page 94: ...sor Unit 94 english 7 Device Functions 001 Main Config Info Cancel or Enter Enter 1 s Enter Enter 1 s Cancel 1 s Cancel Cancel 1 s Cancel 1 2 3 4 5 Config IP Subnet Config IP Subnet Subnet 255 255 255...

Page 95: ...glish 7 Device Functions 001 Main Config Info Cancel or Enter Enter 1 s Enter Enter Enter 1 s Cancel 1 s Cancel Cancel Cancel 1 s Cancel 1 s 1 2 3 4 6 5 Config IP Subnet Config IP Subnet Config Subnet...

Page 96: ...ons 001 Main Config Info Config IP Subnet Config IP Subnet Config Subnet Gatew Config Gatew PN Na Cancel or Enter Enter 1 s Enter Enter Enter Enter 1 s Cancel 1 s Cancel Cancel Cancel Cancel 1 s Cance...

Page 97: ...for setting parameters for IO Link For connection setup with the webserver enter the IP address of the module in the address line of the browser Please use Internet Explorer 7 or higher Information on...

Page 98: ...device is visualized by LEDs on this page If an RFID R W head or an IO Link device is connected to the respective ports then additional information on the connected module will be displayed alongside...

Page 99: ...nk are shown on this page Every module can be selected individually right side IO Link modules can also be configured using this page Note The connected IO Link module can be configured in this window...

Page 100: ...BIS V 6108 PROFINET Processor Unit 100 english This page shows the current status of the module and the network as it appears on the module Diagnostic Module 7 Device Functions...

Page 101: ...he module description and module position of the BIS V device can be edited on this page The device settings can also be reset This function can only be used after entering a username and password Use...

Page 102: ...BIS V 6108 PROFINET Processor Unit 102 english This page shows the contact information Contact 7 Device Functions...

Page 103: ...nnector with 7 8 external thread IO Link Master and USB Flanged female connector M12 internal thread 5 pin A coded PROFINET Input Flanged male connector M12 external thread 5 pin D coded PROFINET Outp...

Page 104: ...101 65 e 16 10 Ctrl P DLE 59 3B 102 66 f 17 11 Ctrl Q DC1 60 3C 103 67 g 18 12 Ctrl R DC2 61 3D 104 68 h 19 13 Ctrl S DC3 62 3E 105 69 i 20 14 Ctrl T DC4 63 3F 106 6 A j 21 15 Ctrl U NAK 64 40 107 6B...

Page 105: ...tions 12 Electrical Data 13 I Input buffer 33 34 Bit Header 33 Intended Use 6 IP Address 15 AnyBus IPconfig 15 DHCP 15 M Mechanical Data 13 O Operating conditions 14 Operating Principle 7 11 31 Output...

Page 106: ...luff com www balluff com No 912447 726 EN 04 125050 K17 Subject to modification Replaces D16 Balluff GmbH Schurwaldstra e 9 73765 Neuhausen a d F Germany Tel 49 7158 173 0 Fax 49 7158 5010 balluff bal...

Reviews: