


30
31
BICYCLE
ASSEMBLY
BICYCLE
ASSEMBLY
HAND OPERATED BRAKES
Hand operated brakes have a separate hand lever to operate front and
rear brakes. Front hand brake levers are located on the left side of the
handlebar, and rear hand brake levers are located on the right side of the
handlebar. Hand operated brakes may be used alone or on some models
in conjunction with foot operated brakes. It is OK to operate one brake
at a time, or all together, depending on your style, comfort, and riding
conditions, however, be careful to pay close attention to front brakes
locking up;
CAUTION:
If the front brake is applied too quickly or too hard, the
front wheel can stop turning resulting in a front pitch over or cause
the bicycle to lose steering function leading to a crash.
To best avoid this, apply the front and rear brakes simultaneously, while
shifting your body weight back slightly to compensate for braking force.
As terrain changes, the rider must practice and learn how each bicycle will
respond in a new terrain or weather change. The same bicycle will react
differently if it is wet, or if there is gravel on the road etc. Always test the
brakes and be sure you feel comfortable with the reaction.
If the riding conditions are too steep (off road for example) and you
are unsure, dismount the bicycle and walk past the questionable terrain
before riding again. Remember that as you apply the brakes your weight
will want to shift forward, and the wheels will want to stop. See Assembly
and Maintenance for further information on brake adjustment.
(Fig. D)
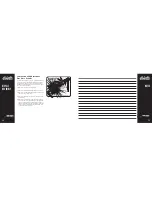
Rear Fender Installation
Note:
Top Fender mount is loose
(Fig. 06)
to allow installation.
1. Line up the Rear Fender Braces (A) with the Frame Mounting Tabs (B)
(Fig. 05)
.
2. Insert each lower mounting Bolt (7) and Washer (6) into the Frame Mounting
Tabs (B) and tighten securely. Make sure fender is centered over tire.
Tighten Top Fender Mount:
3. Tighten Bolt (11) and Nut (10) securely. Make sure fender is centered over tire
(Fig. 06)
.
Note:
Ensure wheel spins freely without contacting frame or fender.
6
7
B
B
A
11
10
FIG. 05
FIG. 06


