background image

NOTE: Assemble the Cabinet in desired location for use.

(E)

Page 3 of 5

Customer Service: 800-367-2810

Online: www.ballarddesigns.com

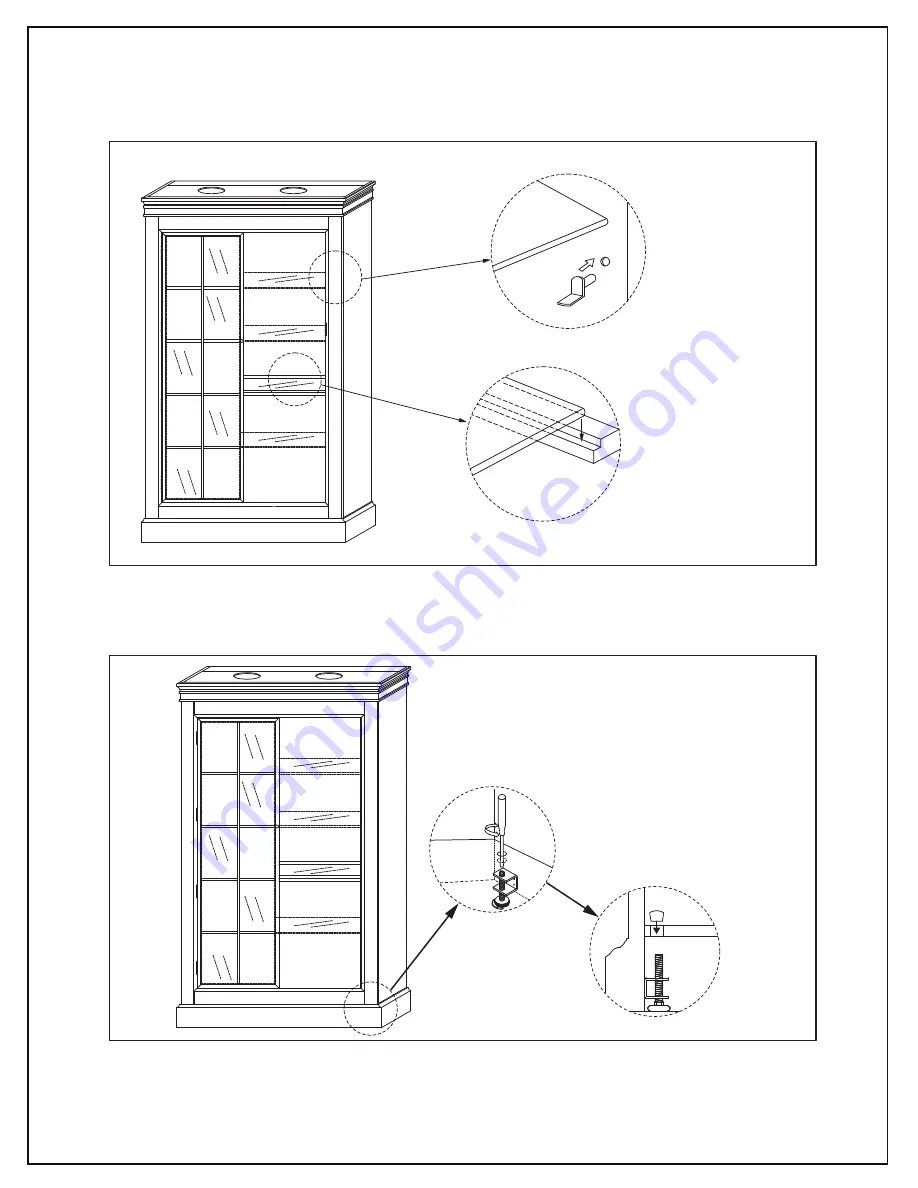
STEP 1: Insert the Shelf Supports (B) into the holes of the Cabinet at the desired shelf heights. Set

the Shelves (G) on the Shelf Supports. Insert the Narrow Shelf (F) into the wooden tracks 

inside the Cabinet.

If the Cabinet is uneven, adjust the levelers located in the bottom corners using a 

Flathead screwdriver. Turn clockwise or counterclockwise until the Cabinet is level.

Insert the Wood Plugs (E) into the leveler holes to cover the holes.

STEP 2:

(G)

(B)

(F)

Summary of Contents for Delano MA236

Page 1: ...OR COMMERCIAL USE UPDATED 5 4 2017 Page 1 of 5 PRODUCT NAME Delano Iron Door Cabinet ITEM NUMBER MA236 DIMENSIONS OF ITEM ASSEMBLED 80 3 4 H x 48 W x 16 D Customer Service 800 367 2810 Online www ballarddesigns com MADE IN CHINA ...

Page 2: ...g lay the parts on a padded surface such as the packaging provided Be sure to locate all hardware before throwing away any packaging NOTE Assemble the Cabinet in desired location for use L Brackets Long Screws Ltr C s t r o p p u S f l e h S B 2 12 Qty Hardware Included Ltr Qty A 16 D 8 Anchors Hardware Included IMPORTANT Installing the L Bracket C to a Wall Stud and the Cabinet is REQUIRED before...

Page 3: ...abinet at the desired shelf heights Set the Shelves G on the Shelf Supports Insert the Narrow Shelf F into the wooden tracks inside the Cabinet If the Cabinet is uneven adjust the levelers located in the bottom corners using a Flathead screwdriver Turn clockwise or counterclockwise until the Cabinet is level Insert the Wood Plugs E into the leveler holes to cover the holes STEP 2 G B F ...

Page 4: ...t C over the top corner of the Cabinet and in front of the previously marked stud Mark the wall at the top of the L Bracket NOTE It is important that the L Bracket is positioned like the picture below in order to hide the Bracket C Installing the L Bracket C to a Wall Stud and the Cabinet is REQUIRED before any use of the product for consumer safety Page 4 of 5 Customer Service 800 367 2810 Online...

Page 5: ...he Cabinet in desired location for use STEP 6 Slide the Cabinet underneath the previously installed L Brackets C and use 2 or more of the Long Screws A to attach the L Brackets to the Cabinet with a screwdriver NOTE The L Brackets may not be completely on the Cabinet s top due to the Wall s base molding Only screw the into the bracket holes that are completely on the Cabinet top D C A Wall Wall Pa...

Reviews: