Masoneilan 77000 Series Control Valves Instruction Manual | 17
Copyright 2021 Baker Hughes Company. All rights reserved.
Offset Actuator Mounting Linkage
1.
Place the bracket body (A035) on bonnet flange (B003) tight
with cap screws (A915b).
2.
Place the valve stem clevis (A033) on plug stem (B122).
3.
Actuator must be mounted.
4.
Place actuator spud adapter (A060) on bracket body (A035)
tight with actuator bolts (A915a).
5.
Install valve link arm (A734) with bracket body (A035) using
bracket link pin (A090).
6.
Place main lever arm (A026) with valve link arm (A734)
using qty 1 of 2 valve link pins (A090a).
7.
Place actuator link arm (A734a) with main lever arm (A026)
using qty 1 of 2 valve link pins (A090a).
8. Connect the valve stem clevis (A033) with main lever arm
(A026) using qty 2 of 2 valve link pins (A090a).
9. Connect actuator connector (A044) to actuator link arms
(A734a) using qty 2 of 2 actuator link pins (A090b).
10.
It would be useful to have extended procedure for adjusting
stroke while ensuring plug is seated with enough overtravel.
A warning to not bottom out the lever against the spud
adapter (A060) would be beneficial as well since this will
cause irreparable damage to the actuator stem.
11. Ensure main lever arm (A026) is horizontal when valve is in
the closed position.
12.
After all adjustments are made, install and tighten clevis cap
screw (A915) on valve stem clevis (A033) to clamp stem
and prevent rotation.
13.
Install appropriately sized link pin snap rings (A900) &
(A900a) to both ends of bracket link pins (A090) and
actuator link pins (A090b).
Seat Lapping
Seating surfaces may need to be lapped in order to restore
the necessary surface integrity to meet valve leakage
requirements. Prior to lapping ensure the plug and seat ring
seating surfaces are free from large scratches or dents.
Remachining of these surfaces may be necessary. If so a
maximum of .015” (0.4mm) metal removal from both the
plug and seat seating surfaces is allowable for any valve
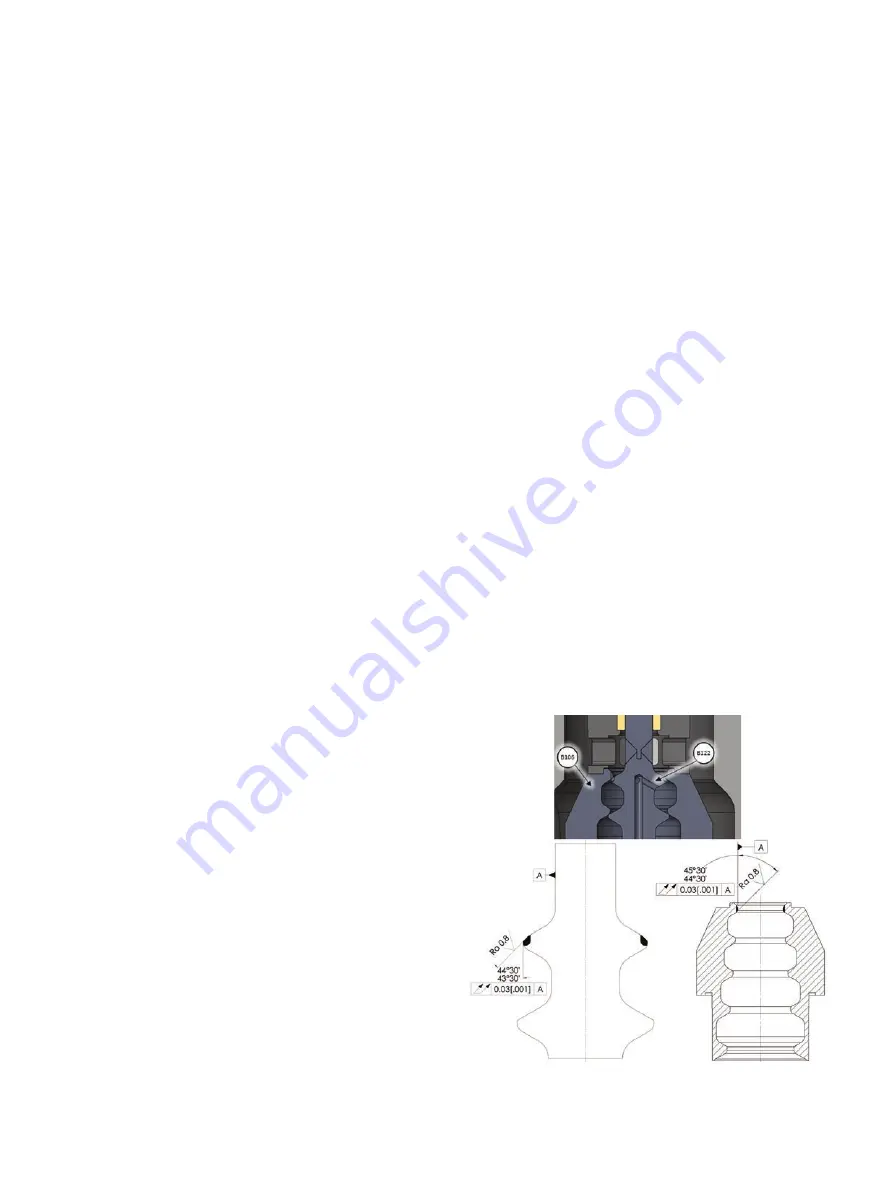
size. Seating Surfaces Make sure the seating angles on the
reworked parts are within the specified tolerances as shown in
Figure 18. Parts requiring more metal removal to restore should
be discarded and replaced.
14.
Clean body gasket surface areas.
15.
If lapping is to be done outside of the body ensure the liner/
seat (B106) is set on a flat and stable surface and proceed
to step 5.
16.
For lapping done with the trim installed inside the body,
install new gaskets into the valve to ensure the ideal
geometric characteristics in order to have the correct
position of the seat ring during lapping.
Note: The gaskets used during lapping must not be
reused for the body reassembly.
17. Loosen the packing packing nuts (B106) to remove friction
and allow the plug/stem (B122) to rest against the liner/seat
(B106) by its own weight.
18.
Spread a fine layer of high quality lapping compound (600
grit) on the seating surface of the seat ring. If lapping with
the trim installed inside the valve, insert the liner/seat
(B106) into the valve body (1).
19. Insert the plug/stem (B122) carefully into the liner/seat
(B106) until it is seated.
Note: It is highly recommended to assemble the valve
completely including using new gaskets before lapping
the valve. Assembly with the top entry bonnet or
bottom spool aligns the trim parts and improves the
integrity of the surface geometric characteristics
20.
Place an appropriate tool on the valve plug/stem (B122)
threads to allow for manual rotation. Options for creating a
manual resurfacing tool include using a T-handle secured
with a locknut, or using a flat piece of steel with a drilled
hole and two locknuts to fasten to the valve plug/stem
(B122).
21.
Lapping of the liner/seat (B106) is accomplished by rotating
the plug/stem (B122) in short oscillating strokes.
22.
After 8 to 10 strokes, lift the plug/stem (B122) and repeat
the operation three or more times in increments of 90°,
180°, and 270°, from the original position.
Note: Performing the operation at various increments is
critical in maintaining concentricity between the parts
during lapping.
23.
Lapping can be repeated, but should be limited as much as
possible so that the seat line remains sufficiently narrow to
guarantee tightness.
24.
After lapping, disassemble the parts to clean them and then
reassemble, making sure the seating angles are within
tolerance as shown in Figure 18.
25.
Gasket seating surfaces must be free of dents, scratches,
corrosion, or other types of damage. Clean mating surfaces
as required and replace any non-conforming parts. Spiral
wound gaskets (items 7, 8 and 34 for top entry designs)
must always be replaced after disassembly.
Figure 18: Seat Lapping


