background image

5

IMPORTANT SAFETY INSTRUCTIONS

Please read these instructions. All the safety and operating instructions should be read before the appliance is 
operated.

Important Information Regarding Use of Video Games, Computers, Captions or Other 
Fixed Image Displays

The extended use of fi xed image program material can cause a permanent “shadow image” on the LCD panel.
This background image is viewable on normal programmes in the form of a stationary fi xed image. This type of 
irreversible LCD/LED panel deterioration can be limited by observing the following steps:

1. Reduce the brightness/contrast setting to a minimum accetable viewing level.
2. Do not display a fi xed image for extended periods of time.
3. Turn the power off  when not in actual use.

Examples of images that you need to watch out for are as follows (this is not an exhaustive list):

• 

TV Channel Logos: e.g. Shopping channel logos and pricing displays-especially if they are bright and stationary. Moving or  


low-contrast graphics are less likely to cause ageing of the screen.

• 

Time Displays

• 

Teletext: Do not view a stationary page for a long period of time

• 

TV/DVD Menus: e.g. Listings of DVD disk content

• 

Pause Mode: Do not leave the TV in pause mode for long periods of time, e.g. When watching DVDs or videos.

Important: Once a ‘shadow image/screen burn’ occurs, it will never disappear and is not repairable under 
warranty.

How do I dispose of this product?

UK

: Waste electrical products should not be disposed of with household waste. Separate 

disposal facilities exist. For your nearest facilities, please contact your local council for 
information on your nearest disposal site.

ROI

: Waste electrical products should not be disposed of with household waste. Separate 

disposal facilities exist. Check with your Local Authority or retailer for recycling advice.

Batteries

• 

Observe the correct polarity when inserting batteries.

• 

Do not use diff erent types of batteries together or mix old and new batteries.

• 

Dispose of batteries in an environmentally friendly way. 

• 

Certain regions may regulate the disposal of batteries. 

• 

If you are not using your TV for an extended period of time then remove the batteries to prevent


possible damage due to leakage.


Please consult your local authority.

Cd

Summary of Contents for TI2402DVDBC

Page 1: ...User Guide Model TI2402DVDBC TI2402DVDWC A3 8 PLEASE READ THIS USER GUIDE CAREFULLY AND RETAIN FOR FUTURE REFERENCE ...

Page 2: ...2 ...

Page 3: ...s and Input Source Menu 9 Remote Control 10 Connections 11 12 TV Menu Operation 13 18 Channel Menu 13 Picture Menu 14 Sound Menu 15 Time Menu 16 Lock Menu 17 Setup Menu 18 PC Operation 19 20 DVD 21 8 Day TV Guide 22 USB Record 23 USB Mode Media Player 24 General Information 25 27 Frequently Asked Questions 25 Technical Specifications 26 Index 27 Digital Switchover 27 ...

Page 4: ...p of the power cable as the weight of the television may damage the cable and cause a safety hazard Never place mobile phones speakers or any other device which may cause magnetic or radio interference with the television If interference is apparent move the device causing the interference away from the television To disconnect the apparatus from the mains disconnect the Mains Adapter from the wal...

Page 5: ...g of the screen Time Displays Teletext Do not view a stationary page for a long period of time TV DVD Menus e g Listings of DVD disk content Pause Mode Do not leave the TV in pause mode for long periods of time e g When watching DVDs or videos Important Once a shadow image screen burn occurs it will never disappear and is not repairable under warranty How do I dispose of this product UK Waste elec...

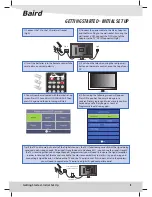
Page 6: ... the stand into the bottom of the LED TV body and tighten the screws Insert two UM 4 AAA batteries into the remote control Take care to observe correct polarity Insert the aerial cable into the RF socket Switch on the TV by pressing the STANDBY button on the top of the TV or on the remote control The LED will change from red to green Connect the power cord to the AC IN connector of the MAINS ADAP ...

Page 7: ...e wall mount can now be easily attached to the spacers using suitable screws The positions of the spacers is indicated in the diagram below Important If wall mounting this TV only use the spacers already provided in the wall mounting holes Using other screws which are longer could cause irreparable damage to internal parts For optimum viewing if wall mounting the TV higher than eye level the TV sh...

Page 8: ...ing the following screen will appear Press OK to confirm Country Code again to confirm Primary region and twice more to confirm Secondary and Tertiary Regions Your first Programme should now appear Tip If the TV finds some but not all of the Digital channels the TV is functioning correctly but the signal being received is not strong enough The signal strength needs to be above 85 you can see the s...

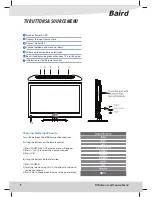
Page 9: ... Using the buttons on the Television 1 Press SOURCE 2 Scroll up down using CH CH buttons to the input source you require 3 Press Vol to change input source to the one selected Standby Power On Off Displays the input source menu Displays Menu OSD Channel up down and menu up down Volume up down and menu left right Red is standby mode green when your TV is switched on Infrared sensor for the remote c...

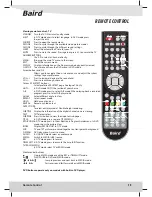
Page 10: ...our choice A B In DVD mode press to select A B mode When playing back a recorded program press to select A B play mode ANGLE Select different angle to View REPEAT Select repeat mode HOLD Hold or continue on REVEAL Reveal any hidden text ASPECT SIZE To select a display mode Double height rendering SUBTITLE Display the information of the digital channel you are viewing TEXT TV Teletext select SUBPAG...

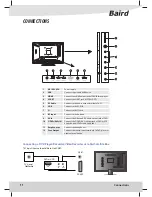
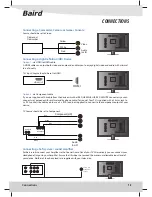
Page 11: ...k of DVD Bluray player 4 SCART Connect the SCART jack of VCR or DVD 5 PC Audio Connect to the Audio output terminal of a PC 6 VGA Connect to the PC RGB 7 CI Connect to the CI card 8 RF Input Connect to the Antenna 9 AV in Connect the Video and R L audio output jack of DVD 10 Y PbPr CbCr IN Connect the Y PbPr CbCr output jack of DVD or VCR using the mini YPbPr cable supplied 11 Earphone out Connect...

Page 12: ...o cable for sound Your TV is supplied with a 3 5mm jack to 3 x RCA sockets to enable you to use a 3 x RCA lead not supplied to connect to the component output of your device TV Source should be set to Component Component HD Component Green Blue Red Audio L R White Red Audio In L R Camera or Camcorder Yellow White Red Audio In L R Video HDMI OUT HDMI Connecting a hi fi system sound amplifier For be...

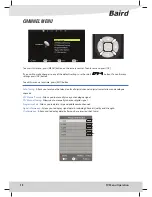
Page 13: ...amme Edit Allows you to delete skip and add favourite channels Signal Information Allows you to display signal details including Channel Quality and Strength CI Information Allows you to display details after you have inserted the CI card To access this menu press MENU button on the remote control To enter a menu press OK If you wish to make changes to any of the default settings use the scroll bu...

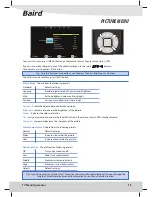
Page 14: ... the picture Colour Increases the colour saturation Tint Lets you increase or decrease the level of tint within the picture only in NTSC playback mode Sharpness Increase or decrease the sharpness of the picture Colour Temperature Choose from the following presets Normal Default settings Warm Increases red within the picture Cool Increases blue within the picture Noise Reduction Choose from the fol...

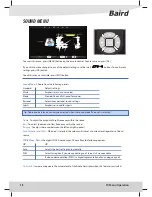
Page 15: ...ive and full sound for movies Personal Selects your personal sound settings Sports Emphasises sound for sports SPDIF Mode This is the digital COAX Audio output Choose from the following options Off Off Auto Selects the best settings automatically PCM Select this option if you are connecting to a Stereo Hi fi via coax cable Pulse code modulation PCM is a digital representation of an analogue signal...

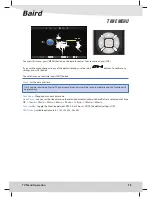
Page 16: ...he date and time Time Zone Change your current time zone Sleep Timer Lets you set the sleep timer so the television automatically switches off after a set amount of time Off 10min 20min 30min 60min 90min 120min 180min 240min Auto standby Toggle the Function between OFF 3 4 or 5 hours NOTE The default setting is OFF OSD Timer Available options are 5S 10S 15S 20S 25S 30S Tip If you are receiving a D...

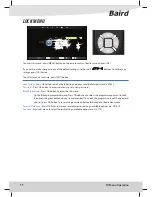
Page 17: ...ontrol To unlock the programme input the password you set press OK button to save setting and menu button to back go to the previous menu Parental Guidance Press OK Enter sub menu to select viewing settings available options are Off 4 18 Key Lock Enter sub menu to select the lock settings available options are On Off To access this menu press MENU button on the remote control To enter a menu press...

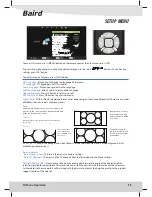
Page 18: ...els from the television and the Menu settings Software Update USB From time to time we may release new firmware to improve the operation of the television available to download This menu lets you install the new software firmware onto the television Further details of how to do this will be issued with the firmware Contact the helpline or refer to the product support section of the website Aspect ...

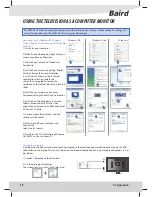
Page 19: ...e television move the slider 5 Left click your mouse on Advance Advanced Settings and left click on Monitor 6 Left click on the drop down for Screen refresh rate and select 60 Hertz if you experience picture noise or flickering select 50 hertz or 70 hertz 7 Click on Apply then click Yes and the settings will be saved 8 Now switch off your computer and connect the television as shown 9 Switch on th...

Page 20: ...r monitor It is recommended that you use this feature first as in most cases it will correctly align the picture H Offset Changes the horizontal position of the picture V Offset Changes the vertical position of the picture Size increase picture size Phase To adjust delay time of phase in order to reduce the noise of picture Position Reset Changes back to the original settings Tip If the computer i...

Page 21: ...up Page Press the D SETUP key and then press the to display the audio setup page when in DVD mode Press the key to move the highlight to select following option Press the OK key into following menu and then press the key to select a menu item Press the OK key to confirm Preference Page Press the D SETUP key and then press the to the preference setup page when in DVD mode Press the key to move the ...

Page 22: ...N View a previous day by pressing YELLOW View the next day by pressing BLUE 3 Press EXIT to exit the 8 day TV Guide Note This TV is designed to operate with USB memory sticks up to 32GB It is possible to use either a USB memory stick or a USB portable Hard Drive of a larger capacity however it must be formatted to the FAT32 file system in order to operate correctly At the time of printing this use...

Page 23: ...ega Byte Per Second If you wish to use a USB portable hard drive larger than 32GB please refer to the FAQ section at the rear of this user guide Tip When you switch the TV to standby or change channel the Time Shift memory is wiped To restart time shift you must press play pause button Tip This television contains one TV tuner therefore it can only record the channel you are watching or record one...

Page 24: ...n your USB Memory Stick On switching to the USB source the above menu screen will appear The content will be divided into Photo Music Movie and Text based on file type You can navigate through the menus using the scroll buttons To confirm the item you wish to play view press the OK button USB Mode Media Player ...

Page 25: ...ndoor type aerial This may change once the analogue signal is switched off in 2011 2012 and the Digital signal strength is increased TV I have re tuned my television but when I switch it off it is not storing the channels Complete a first time installation please refer to the set up menu section of the manual for how to do this VCR DVD Recorder I have connected the TV to my VCR or DVD Recorder via...

Page 26: ...o Inputs 2 x HDMI 1 x SCART 1 x Video 1 x YPbPr Audio Inputs 1 x 3 5mm jack for PC audio input 1 x pair RCA Audio input shared for Video and Component Audio Outputs 1 x 3 5mm jack for headphones 1 x Coax Audio output Sound Power Watts RMS 2 x 3W Voltage and power consumption AC 100V 240V 50Hz 60Hz 35W 0 5W StandBy Dimensions including stand 580mm W x 176mm H x 407mm D Weight Net 4 7 kg Gross 6 9 k...

Page 27: ... We recommend that you retune every few months to ensure you are receiving the very latest TV and radio channels that are broadcast 1 On the remote control press MENU followed by 8 8 8 8 so the number 8 button four times 2 The First Time Installation menu will appear Press OK and tuning will take place For help and support regarding the digital switchover please contact Digital UK Telephone 08456 ...

Page 28: ......

Reviews: