17
1) Give machine an overall inspection. Verify that
all guards, covers, etc. are in place and in
working order, the blade is tensioned properly,
and tooth direction matches arrow on bow.
Check that blade guides and wire brush are set
correctly.
2) Raise bow until it will clear workpiece by a few
inches, and secure in position by closing
cylinder valve.
Always secure bow in
raised position before loading material.
Never start a cut with blade contacting
workpiece.
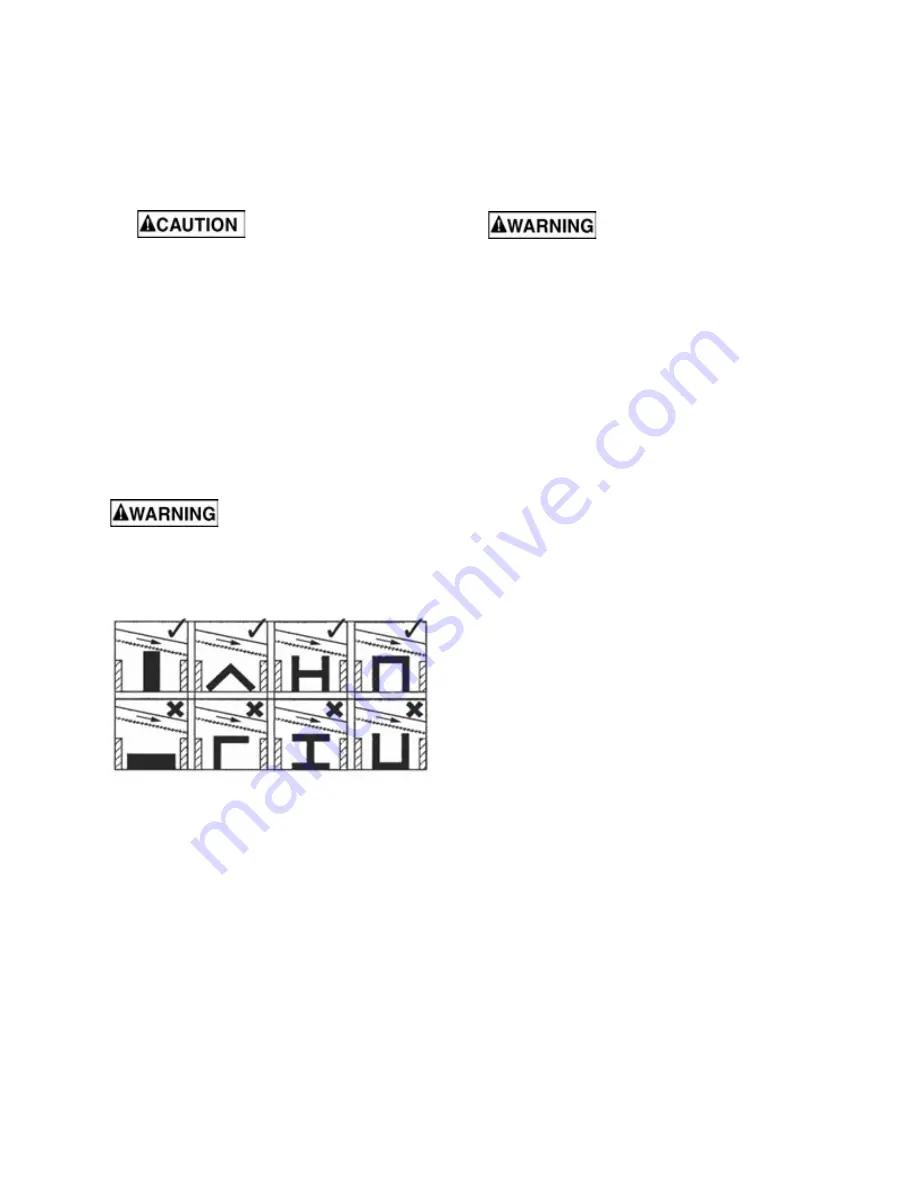
3) Position workpiece in vise and tighten vise.
Workpiece should be fitted directly between the
jaws without adding other objects. When work
piece is profiled section, flat piece or special
shape, refer to examples in Figure 9-1 for
proper clamping positions. The top row shows
acceptable clamping positions, the bottom row
show
un
acceptable positions.
If the thickness of profile section is very thin, a
piece which duplicates the profile should be
fitted inside the workpiece itself, to prevent
workpiece being crushed between the jaws.
Do not load/unload material
from vise while machine is running. Never hold
workpiece by hand when cutting; workpiece
must be firmly secured in vise. Do not reach into
cutting area during cutting operations.
Figure 9-1: Clamping Positions
4) Adjust left blade guide to minimize exposed
blade area.
5) Set suitable feed rate on cylinder dial.
6) Open coolant valve, and open valve on
hydraulic cylinder to allow bow to descend in
gradual and controlled manner.
7) Switch trip tab must turn off saw at completion
of cut.
9.3
Evaluating Cutting Efficiency
Is the blade cutting efficiently? The best way to
determine this is to observe the chips formed by the
cutting blade.
If chip formation is powdery, then the feed rate is
much too light, or the blade is dull.
If chips formed are curled, but colored — that is,
either blue or straw-colored from heat generated
during the cut — then the feed rate is too high.
If chips are slightly curled and are not colored by
heat – the blade is sufficiently sharp and is cutting
at its most efficient rate.
10.0
User-Maintenance
Always disconnect power to
machine before performing maintenance.
Failure to do this may result in serious personal
injury.
Keep all surfaces clean and free of rust, slag, chips,
and coolant build-up.
Clear metal particles with a small paint brush or
parts cleaning brush. Do not use compressed air, as
it may force chips into the guide bearings and other
critical areas of the saw.
Clean drain filter assembly.
Make frequent inspections of motor fan and blow out
(with low pressure air hose) or vacuum any
accumulation of foreign material to maintain normal
motor ventilation.
Wipe saw down with a clean, dry cloth, and oil all
unpainted surfaces with light machine oil.
Keep blade guides clean and free of metal particles.
Check guide bearings frequently to make sure that
they are properly adjusted and turning freely.
Periodically inspect belt for wear or fraying. Replace
if needed.
To prevent corrosion of machined surfaces when a
soluble oil is used as coolant, pay particular
attention to wiping dry the surfaces where fluid
accumulates and does not evaporate quickly, such
as between machine bed and vise.
Place a thin coat of oil on bed surface on which vise
jaw slides.
If the power cord is worn, cut, or damaged in any
way, have it replaced immediately.
10.1
Lubrication
All ball bearings are permanently lubricated and
sealed. They require no further lubrication.
Lubricate the vise lead screw as needed with #2
tube grease.
Drain and refill gear box oil after first 90 days of
operation. Thereafter, change every six months.
Use 90W oil.
To change gear box oil:
1) Disconnect machine from power source.
2) Place bow in horizontal position.
3) Remove four screws from gear box and remove
cover plate and gasket. If more space is needed
to access gearbox, remove belt and adjust
motor away.
Summary of Contents for BHVBS-712B
Page 22: ...22 12 1 2 BHVBS 712B Bow Assembly Exploded View...
Page 27: ...27 13 0 Electrical Connections BHVBS 712B...
Page 29: ...29 NOTES...
Page 30: ...30 NOTES...
Page 31: ...31 NOTES...


