


Aurora243 Outdoor 2x10W TDD gNodeB Installation Guide
31
4.1.1.2 Caution
After the initial network connections, please verify the following steps to avoid damage to the equipment.
1.
The frequency band and parameters must be set first on the gNB GUI to activate the gNB.
2.
Before the gNB transmits the radio signal, add enough attenuation on the RF cable, the recommended
attenuation is 30W, 30dB above.
Caution
: If you cannot achieve the two settings mentioned above, it indicates damage to the
hardware of the gNB caused by a short circuit at full power. Please process an RMA with the
3.
You can configure only one network port of the network card as the default route on the gNB GUI.
Otherwise, this causes route confusion, and the network will be unreachable.
4.
The management port only supports 1GE optical module. Therefore, the switch must also support the
port type.
4.1.2 Computer Requirements
Refer to
for the minimum computer requirements to launch the gNB GUI.
Table 4-1: Computer Requirements
Item
Description
CPU
Higher than Intel Core 1GHz
Memory
Greater than 2G RAM
Hard Disk
No less than 100 MB space available
Ethernet Port
10/100/1000 adaptive Ethernet interface
Operating System Microsoft: Windows XP, Windows Vista, Windows 7, or
higher
Mac: MacOSX 10.5 or higher
Screen Resolution Higher than 1024 x 768 pixels
Browser
Google Chrome 9+, Internet Explorer 7.0+, Mozilla Firefox 3.6+
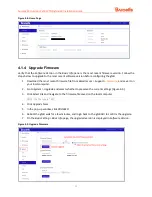
4.1.3 Launching the Aurora243 gNB GUI
Follow the steps below to connect to the Aurora243 gNB GUI.
1.
Connect the Aurora243 to a Personal Computer (PC) directly. Before launching the GUI, you must
set up the computer’s Internet Protocol (IP) address to connect the client to the server.
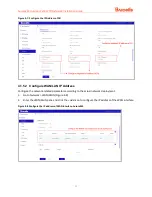
2.
Ensure the PC's IP address and the IP address of the management port of gNB are in the same
network segment (for example, 192.168.150.X), as shown in Figure 4-2.
3.
To launch the GUI, open a Web browser and enter
http://<OAMIP
>
. The OAM IP is the IP address of the
management port, and the default IP is
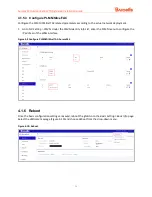
4.
Enter new_user as the
Username
, gNB@2014 as the
Password,
and enter the random case-sensitive
Verification Code
at the
User Login
dialogue window.


