•
10
•
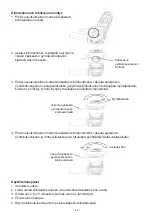
Attaching Polisher Backing Pad
8VHSROLVKHUZKHHOÀDQJHZUHQFKWRKROG
WKHKH[DJRQDOQXW
2. Align the polisher backing pad bolt
thread with the thread hole on
the eccentric wheel ass’y.
8VHÀDQJHZUHQFKWRKROGWKHKH[DJRQDOQXWDQGVWDELOL]HWKHHFFHQWULFZKHHODVV¶\FRXQWHU
weight disc, spin the polisher backing pad in clockwise direction until tightened. If baking
pad came loosely, please use this same method to tighten the backing pad.
8VHÀDQJHZUHQFKWRKROGWKHKH[DJRQDOQXWDQGVWDELOL]HWKHHFFHQWULFZKHHODVV¶\DQG
spin the polisher backing pad in counterclockwise direction to remove.
Operation Procedure
3UHSDUHJOD]HZD[SROLVK
$SSO\WKHZD[RQWKHYHKLFOHWKHQXVHSROLVKHUWRVSUHDGZD[HYHQO\
:DLWIRUaPLQXWHVZKHQZD[EHFRPHVFRQJHDOHG
4.
Cover the lapin cloth on the sponge bonnet.
5.
Use polisher to polish thoroughly.
OG
Threads of
eccentric wheel ass’y
Clockwise
8VHÀDQJHZUHQFKWR
VWDELOL]HWKHHFFHQWULF
wheel ass’y
Counterclockwise
8VHÀDQJHZUHQFKWR
VWDELOL]HWKHHFFHQWULF
wheel ass’y
Summary of Contents for BCL33AP1
Page 111: ...111 BCL33AP1 1 2...
Page 112: ...112 3...
Page 113: ...113 4...
Page 114: ...114 5 6...
Page 115: ...115 1 2 3 4 5 1 2 3 4 5 6 7...
Page 116: ...116 8 9 10 1 2 3 4 5 6 7 8 9 10 11 12 13...
Page 117: ...117 14 15 16 ft lb...
Page 118: ...118 CARACTER STICAS 2 4 3 1 1 2 3 4 1 2 3 4 1 2 3 4 5 6 7 8...
Page 119: ...119 9 10 1 2 3 1 0 33 1 2 34 66 1 2 3 67 100 1 2 3 4 5 6 7 8 9...
Page 120: ...120 1100 1450 2300 3050 3500 1 2 3...
Page 121: ...121 1 2 3 4 1 2 3 4 5...
Page 133: ......


