


•
12
•
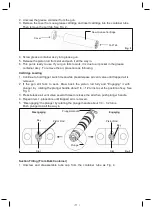
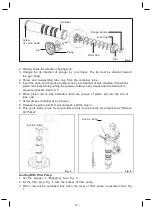
2. Visually check the direction of plunger lip.
3. Change the lip direction of plunger by your finger. The lip must be directed toward
the gun head.
4. Screw and re-assemble tube cap from the container tube.
5. Insert the
open end of grease container ass’y into lubricant of bulk container. Draw back
piston rod slowly while pushing the grease container ass’y deeper into the lubricant to
prevent air pocket. See Fig. 5.
6. When piston rod is fully extended, latch the groove of piston rod into the slot of
tube cap.
7.
Screw grease container ass’y into gun.
8. Release the piston rod from slot and push it all the way in.
9.
This gun is ready to use. If your gun fails to work, to remove the air, procedure as “Remove
Air Pocket”.
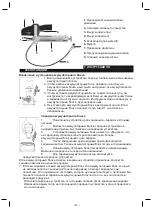
Suction filling
Suction filling
Fig. 5
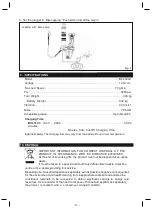
Fig. 6
Loading With Filler Pump
1. Set the plunger in
“Engaging”. See Fig. 3
2. Fit the filler plug Fig. 6 with the socket of filler pump.
3. Piston rod will be extended fully when the level of filler pump is operated. See Fig.
7
Fig. 4
Slot
Pistor Rod
Screw
(
for Gun Head
)
Lip
Plung
Tube Cap
Plunger Handle
Container
Summary of Contents for BCL32G1
Page 1: ...1 14 4 V Cordless Grease Gun BCL32G1 BCL32G1K1...
Page 14: ...14 BCL32G1 1 1...
Page 15: ...15 2...
Page 16: ...16 3...
Page 17: ...17 4...
Page 18: ...18 5 6...
Page 19: ...19 2 1 2 3 4 5 3 1 2...
Page 20: ...20 3 4 5 6 7 8 9 10 4 1 0 C 32 F 40 C 104 F 2 3 4...
Page 21: ...21 5 6 7 8 9 50 C 122 F 10 11 12 13 3 6 40 80 14 25 C 77 F 15...
Page 22: ...22 16 5 II ft lb NLGI 2 6...
Page 23: ...23 1 2 3 4 5 6 6 7 8 9 7 1 2 3 4 1 2 3 4 5 6 7 8 9 1 2 3 7 8 5 4 9...
Page 25: ...25 8 1 1 2 3 2 4 5 6 1 2 1 4 1 2 3 3 4 1 1 2...
Page 26: ...26 5 1 4 1 2 1 4 2 3 4 5 5 6 7 8 9 3 4...
Page 27: ...27 1 3 2 6 3 7 4 9 BCL32G1 14 4 70 41 37 3 08 0 32 0 39 78 6 6 5 7...
Page 41: ......


