background image

Page 18

For technical questions, please call 1-800-444-3353.

ATV Winch

Double Line Rigging

a.  A double line system should be used whenever 

possible.  It reduces the load on the winch, 

allowing it to work longer with less heat buildup.  

It reduces load on the winch in two ways:

•  It utilizes the lower layers of wire rope 

that have higher capacity, and

•  It halves the load on the winch through pulley action.

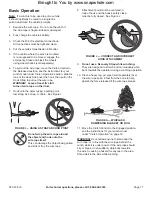
b.  Connect the wire rope for a double line 

system as shown in Figure K below.  

Use a pulley block (sold separately) properly 

rated for the load to be pulled and designed 

to be operated with this winch’s wire rope.

FIGURE K — DOUBLE LINE SETUP

Stationary 

Winching Vehicle  

(Chock tires, 

set parking brake, 

and leave in neutral)

Load

Carpet

c.  Loop the wire rope around the pulley and connect 

to another part of the vehicle’s chassis or to a 

separate anchor point.  

Do not anchor the Wire 

Rope back to the winch or winch mount.

Note:

 If anchoring the winching vehicle, only attach the 

anchor line to the front of the vehicle.  If the anchor line 

is attached to the rear of the vehicle, the vehicle′s frame 

may be damaged by the forces exerted by winching.

12. Operate the controls briefly to 

ensure they work properly.
•  The IN position should retract the winch cable.
•  The OUT position should power out the cable.
If operation is reversed, the power cables 

may be connected backwards.  

Correct any such issue before use.

13. When it is safe to do so, use the power switch on 

the Controller to retract the wire rope, and winch 

the item as desired.  

Do not power the hook all 

the way into the fairlead to prevent damage.

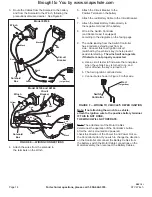
14. Do not operate the winch at extreme angles.  

Do not exceed the angles shown in Figure B for 

a roller fairlead.  For a hawse fairlead, the angle 

should be as close to straight as possible.

FIGURE B — ROLLER FAIRLEAD 

AXIU WINCHING ANGLES

15°

15°

45°

45°

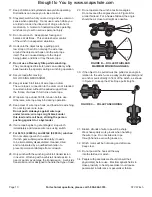
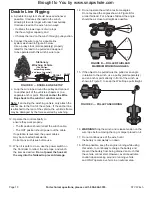
15. If the object to be pulled must be pulled at an angle 

in relation to the winch, use a pulley (sold separately) 

and an anchor point directly in front of the winch, as 

shown in Figure C, to keep the Wire Rope pull straight.

FIGURE C — PULLEY ANCHORING

16. 

WARNING! 

Stop the winch and release tension on the 

wire rope before moving the rag or carpet placed on it.

17. Do not continue use of the winch until 

the battery is completely run down.

18. When possible, keep the engine running while using 

this winch, to continually recharge the battery and 

prevent the battery from being drained so much that 

the vehicle cannot start. However, exercise extreme 

caution when working around a running vehicle 

and ONLY operate a vehicle in an outdoor area.

Brought to You by www.snapwhole.com

Summary of Contents for 68146

Page 1: ...please call Harbor Freight Tools at 1 800 444 3353 as soon as possible Visit our website at http www harborfreight com Copyright 2010 by Harbor Freight Tools All rights reserved No portion of this man...

Page 2: ...This page intentionally left blank Brought to You by www snapwhole com...

Page 3: ...ircraft Wire Rope Battery 12VDC Minimum 12 Ah Battery Cables 10 gauge 5 8 1 78m long Mounting Pattern 3 15 80mm Mounting Hardware Winch 2x G8 M8 1 25 X 35mm Fairlead 2x G8 M8 1 25 X 19mm Overload Prot...

Page 4: ...tery 12VDC Minimum 12 Ah Battery Cables 6 gauge 6 1 83m long Solenoid Cables 6 gauge 3 0 92m long Mounting Pattern 3 x 4 88 76 2mm x 124mm Mounting Hardware Winch 4x G8 M8 1 25 X 25mm Adaptor Plate 2x...

Page 5: ...imum 12 Ah Battery Cables 6 gauge 6 1 83m long Solenoid Cables 6 gauge 3 0 92m long Mounting Pattern 3 x 6 6 76 2mm x 167 6mm Mounting Hardware Winch 4x G8 M8 1 25 X 25mm Adaptor Plate 2x G8 M8 1 25 X...

Page 6: ...ded with this product This is the safety alert symbol It is used to alert you to potential personal injury hazards Obey all safety messages that follow this symbol to avoid possible injury or death DA...

Page 7: ...xits at the bottom Symbol Property or Statement VDC Volts Direct Current A Amperes CCA Cold Cranking Amperes HP Horsepower fpm Feet Per Minute mpm Meters Per Minute RPM Revolutions Per Minute IP Inter...

Page 8: ...Do not use thinner longer cables or link multiple cables together 6 Do not route electrical cables near sharp edges or parts that will move or become hot 7 Ventilate area well before and while workin...

Page 9: ...ntended only Do not lift items vertically or use for aircraft purposes 13 Prevent entanglement Do not wear loose clothing or jewelry as they can be caught in moving parts Non skid footwear is recommen...

Page 10: ...load and recoil back striking the person pushing against it or a bystander 26 If wire rope begins to get entangled stop winch immediately and release wire rope using switch 27 For 68146 2 000 lb and...

Page 11: ...serviced by a qualified repair person using only identical replacement parts This will ensure that the safety of the winch is maintained 5 Maintain labels and nameplates on the winch These carry impo...

Page 12: ...ed location and mark the locations of the winch base holes Compare the dimensions of the marked holes to the section of Figure D that matches your winch 2 0 33 in 8 5mm 3 15 in 80mm 3 94 in 100mm 2 in...

Page 13: ...ation surface has no hidden components or structural pieces that will be damaged before drilling 4 Drill pilot holes for the mounting screws 5 Secure in place with mounting screws Wiring TO PREVENT SE...

Page 14: ...red wire extending out from its side Connect this to an ignition circuit switched by the vehicle s key to help prevent accidental starting The winch will not operate if that wire is not properly conne...

Page 15: ...the Wire Rope 1 The wire rope must be properly coiled under tension to be able to support a load without damage 2 Uncoil the wire rope except for 5 full wraps 3 Recoil the wire rope back into the winc...

Page 16: ...aft Pin Drum End If the pin rests in the groove in the drum the clutch is engaged Shaft Pin Drum End If the pin rests on top of the end of the drum the clutch is released 2 To change clutch positions...

Page 17: ...nt tow strap tree strap or chain See Figure I Figure I USING A STRAP ANCHOR POINT Do not wrap the wire rope around the object and hook onto the wire rope itself This can damage the object being pulled...

Page 18: ...IN position should retract the winch cable The OUT position should power out the cable If operation is reversed the power cables may be connected backwards Correct any such issue before use 13 When it...

Page 19: ...just enough to release tension on the Wire Rope so that you can unfasten the Hook from the load and reel in the Wire Rope 20 Disconnect the Pendant Controller if equipped after use Duty Cycle Duration...

Page 20: ...Do not use the winch if the wire rope is frayed kinked or damaged 2 AFTER USE wipe external surfaces of the winch with clean cloth 3 Lubricate the wire rope occasionally with a light oil 4 The winch s...

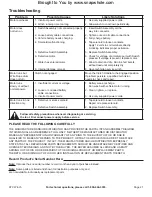
Page 21: ...s 3 Incorrect power cords 1 Battery weak recharge Run winch with vehicle motor running 2 Clean tighten or replace 3 Use only supplied power cords Motor runs in one direction only 1 Defective or stuck...

Page 22: ...hing 1 8 Clutch Assembly 1 9 Spline 1 10 Spring 1 11 Drum Assembly 1 12 Screw M5 5 1 13 Bushing 1 14 Washer 1 15 Hex Flange Nut M5 2 16 Tension Plate 1 17 Baseplate Assembly 1 18 Clutch Knob 1 19 Scre...

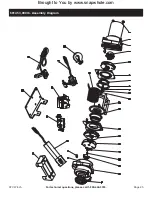
Page 23: ...Page 23 For technical questions please call 1 800 444 3353 ATV Winch 68146 2 000 lb Assembly Diagram Brought to You by www snapwhole com...

Page 24: ...Seal 1 9 Spline Spring 1 10 Clip 1 11 Drive Shaft 1 12 Tie Bar 2 13 Drum 1 14 Screw M6x 10 1 15 Planetary Gear 2 1 16 Planetary Gear 3 1 17 Fork Pin 1 18 Screw 1 19 Clutch Knob Base 1 20 Gearbox 1 21...

Page 25: ...Page 25 For technical questions please call 1 800 444 3353 ATV Winch 68145 3 000 lb Assembly Diagram Brought to You by www snapwhole com...

Page 26: ...Spring 1 14 Joint Gear 1 15 Screw M6 X 10 3 16 Clip 2 17 Gearbox Base 1 18 Seals 2 19 Planetary Gear 1 1 20 Washer 2 21 Planetary Gear 2 1 22 Planetary Gear 3 1 23 Washer 1 24 Sliding Bearing 1 25 For...

Page 27: ...Page 27 For technical questions please call 1 800 444 3353 ATV Winch 68144 5 000 lb Assembly Diagram Brought to You by www snapwhole com...

Page 28: ...lusion or limitation of incidental or consequential damages so the above limitation of exclusion may not apply to you THIS WARRANTY IS EXPRESSLY IN LIEU OF ALL OTHER WARRANTIES EXPRESS OR IMPLIED INCL...

Reviews: