


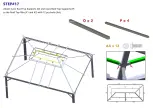


STEP#25
(!) Place Roof Plates (1 pc RF9, 1 pc RF10 and 1 pc RF11) onto short side of assembled Roof Ribs
with edges tucked and clipped into Roof Top Supports. Attach Roof Plates (RF9 and RF10) on roof ribs with
2pcs bolts
(AA).
Then place 1 pc Mould Layer (HD7) on and attach Roof Plates onto the Roof Border
with 4pcs bolts
(AA).
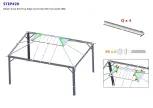
2. On the left, Place Roof Plates (1 pc RFS, 1 pc RF7) onto assembled Roof Ribs, attached RF5 and RF7 on
roof ribs with 2pcs bolts (AA), then place 1 pc Mould Layer (HD8) then attach with 4 pcs bolts (AA). Then
assemble Roof Plates (1 pc RF6, 1 pc RF8) on the right with 1 pc Mould Layer (HD8) then attach with 4 pcs
bolts (AA).
Repeat these two steps to complete the other short side of the roof.
Note: Some Plates (RF9, RF10 and RF11) should be tucked and clipped into Roof Top Supports.
*Do not stand below roof, falling roof plates may cause injury.
RF9 x 2
RF10 x 2
AAx36
�
HOB
HD9 HDlO
HD9
HD8
RF11 x 2
-1
I /
111 I I I I 11 I
l
_
1
1
I I 11 I
1
1
1
1
I I I
I
I I
I I
RFS RF7 RF9 RF11
RF11 RFlO RFS RF&
ltf6
Rf-8
RF10
RF11
RF9
RF7
RFS
Summary of Contents for 212-1911
Page 3: ......
Page 4: ......
Page 5: ......
Page 6: ......
Page 7: ......
Page 8: ......
Page 9: ......
Page 10: ......
Page 11: ......
Page 12: ......
Page 13: ......
Page 14: ......
Page 15: ......
Page 16: ......
Page 17: ......
Page 18: ......
Page 20: ......
Page 24: ......
Page 27: ......
Page 28: ......
Page 29: ......
Page 33: ......
Page 34: ......
Page 35: ......


