background image

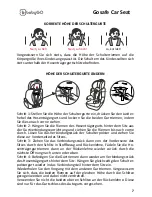
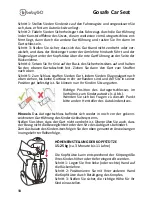
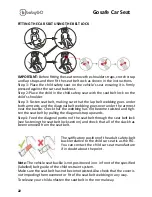
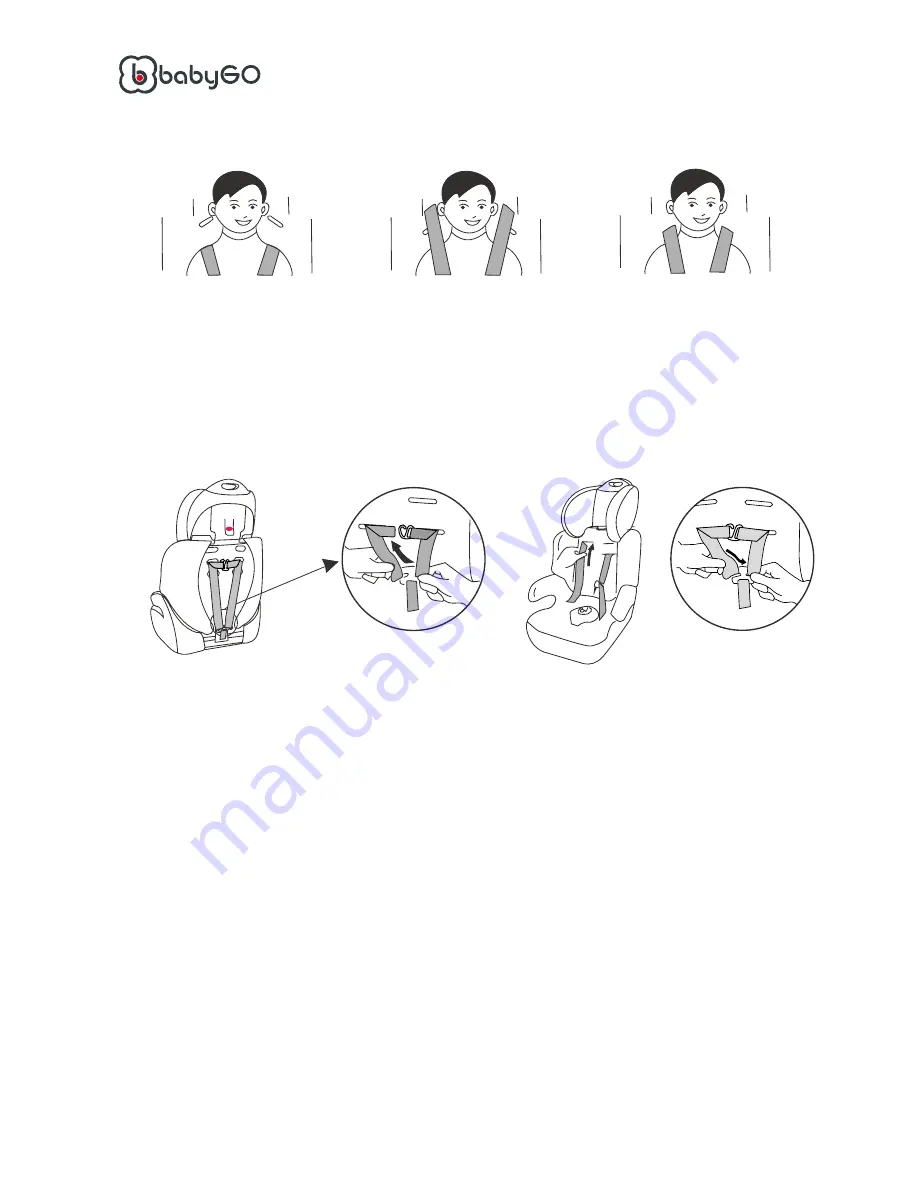
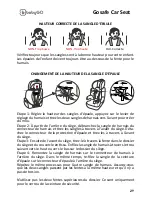
CORRECT SHOULDER STRAP HEIGHT

No, to low

No, to high

Yes, correct

Step 1: Adjust the height of the shoulder straps, press the harness adjuster 

lever and pull both harness straps forward to creat slack.

Step 2: From the back of the seat, unhitch the harness strap from the har

-

ness connector and pull the straps through to the front of the seat. Untie 

the shoulder pad connector and pull these through to the front of the seat.

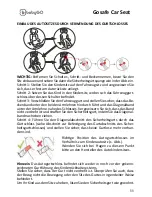
Step 3: Then from the front of the seat, pull it through the slot in the seat’s 

backrest and fabric cover. Thread the harness strap back through the next 

hole up or down on the seat’s backrest.

Step 4: Re-thread the harness strap back onto the harness connector at the 

back of the seat. At the same time, re-thread the shoulder pad belt beck 

onto the shoulder pad connector at the back of the seat.

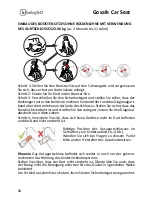
Repeat the same process for the other harness strap. Make sure both of 

the 

straps go through slots at the same height and do not become twisted.

Do not use the top two slots in the backrest. These are for the seat belt lock

only.

Always  check  that  the  shoulder  straps  are  at  the  correct  height  for  your 

child. The child’s shoulders should always be below the slot for the harness.

CHANGING THE SHOULDER STRAP HEIGHT

18

Gosafe Car Seat 


Summary of Contents for GO SAFE

Page 1: ...ants Instructions de Montage WICHTIG FÜR SPÄTEREN GEBRAUCH AUFBEWAHREN SORGFÄLTIG LESEN IMPORTANT RETAIN FOR FUTURE REFERENCE READ CAREFULLY IMPORTANT GARDER POUR UTILISATION ULTÉRIEURE LIRE ATTENTIVEMENT BabyGO Baby Products GmbH Am Bahndamm 1 3 33378 Rheda Wiedenbrück Germany Gosafe Car Seat ...
Page 2: ...Autokindersitz Bedienungsanleitung D Child Car Seat Assembly Instructions EN Siège d auto pour enfants Instructions de Montage FR 2 Gosafe Car Seat ...
Page 3: ...Autokindersitz Bedienungsanleitung Autokindersitz Bedienungsanleitung D 3 Gosafe Car Seat ...

Page 4: ...versal Kinderrückhaltesystems der genannten Gruppen geeignet ist 3 Dieses Kinderrückhaltesystem ist unter strengeren Bedingungen als vor angegangene Modelle welche nicht mit diesem Zusatz versehen sind in die Kategorie universal eingestuft worden 4 Wenden Sie sich bei Fragen bitte an den Hersteller des Kinderrückhal tesystems oder an Ihren Einzelhändler Nur geeignet wenn das Fahrzeug mit 3 Punkt S...

Page 5: ...Wagenrücksitz Verwenden Sie den Kindersitz niemals ohne Ihr Kind darin sicher anzuschnallen und verwenden Sie ihn niemals wenn er nicht am Autositz befestigt ist Nehmen Sie keinerlei Veränderungen am Sitz vor und fügen Sie nichts hinzu Lassen Sie Ihr Kind zu keiner Zeit im Sitz unbeaufsichtigt zurück Das Fahrzeuginnere kann sich bei direkter Sonneneinstrahlung sehr stark aufhei zen Es wird daher e...

Page 6: ...urts Schultergurtschlitz Justierhebel der Gurte Justierband der Gurte Gurtschloss Kopfstütze Rückenlehne Hosenträgergurt Brustpolster Schrittpolster Sitzpolster ACHTUNG DEN KINDERSITZ NICHT AUF BEIFAHRERSITZEN MIT AIRBAG BENUTZEN SRS Der Kindersitz kann nur in Fahrtrichtung montiert werden und muss mit einem Dreipunktgurt mit Becken und Diagonal gurten auf dem Beifahrer oder Rücksitz Ihres Fahrzeu...

Page 7: ...riemen dann an der Rückenlehne wieder zurück durch die nächste Öffnung nach unten oder oben Schritt 4 Befestigen Sie die Gurtriemen dann wieder am Verbindungsstück des Hosenträgergurts hinter dem Sitz Hängen Sie gleichzeitig den Schulter polstergurt wieder in das Verbindungsteil hinter dem Sitz ein Wiederholen Sie den Vorgang mit dem anderen Gurtriemen Vergewissern Sie sich dass die beiden Riemen ...

Page 8: ...diebeidenGurtbandhalterundführenSiediesemitdemschmalen Ende durch die Schlitze unten an der Sitzbasis und durch die Schlitze im Stoffbezug hindurch Schritt 1 Stecken Sie die zwei Metallteile des Schlosses ineinander Schritt 2 Stecken Sie die zwei Verschlussteile in den Schlitz oben auf dem Schloss und achten Sie beim Einrasten auf das Klick Geräusch Schritt 3 Vergewissern Sie sich jedes Mal dass d...

Page 9: ...eckenabschnitt des Gurtes möglichst weit unten sitzt und nicht über den Bauch führt Ein loser Gurt kann gefährlich sein Prüfen Sie die Gurteinstellung und straffen Sie den Hosen trägergurt jedes Mal wenn Sie Ihr Kind in den Sitz gesetzt haben Der Hosenträgergurt wird durch Drücken des Hebels vorne am Sitz unter dem Sitzbezug gelockert Drücken Sie auf die Markierung Press und halten Sie dabei die b...

Page 10: ...se mehr vorhanden sind und der Sitz in seiner Position gut befestigt ist Sie können nun Ihr Kind im Sitz angurten Hinweis Das Autogurtschloss befindet sich weder in noch vor der gekenn zeichneten Gurtführung des Kinderrückhaltesystems Stellen Sie sicher dass der Gurt nicht verdreht ist Überprüfen Sie auch dass der Bezug nicht die Beweglichkeit oder den Sitz des Autogurts behindert Zum Ausbauen des...

Page 11: ... wobei sich das Fahrzeuggurt schloss über dessen Schulter befindet Schritt 3 Verschließen Sie den Fahrzeuggurt und stellen Sie sicher dass das Be ckenband unter den beiden Armlehnen hindurch führt und das Diagonalband unter der Armlehne nahe des Schlosses Vergewissern Sie sich dass das Band nicht verdreht ist und straffen Sie den Sicherheitsgurt indem Sie das Diagonal band nach oben ziehen Schritt...

Page 12: ...st und straffen Sie den Autogurt indem Sie den Diagonal abschnitt nach oben ziehen Schritt 4 Versichern Sie sich dass sich keine Gurtlose mehr im Gurt befinden und das Band nicht verdreht ist Hinweis Das Autogurtschloss befindet sich weder in noch vor der gekenn zeichneten Gurtführung des Kinderrückhaltesystems Stellen Sie sicher dass der Gurt nicht verdreht ist Überprüfen Sie auch dass der Bezug ...

Page 13: ...hen oder färben Sie niemals die Gurte Lassen Sie den Bezug an der Luft trocknen WICHTIGER HINWEIS Das Kinderrückhaltesystem darf nicht ohne den Bezug verwendet werden Sollten Sie den Sitzbezug wechseln wollen sollten Sie eine Empfehlung des Herstellers einholen da der Bezug ein fester Bestandteil zur Rückhalteleis tung darstellt Nach einem Unfall oder Aufprall dürfen Sie den Kindersitz nicht mehr ...

Page 14: ...Child Car Seat Assembly Instructions Child Car Seat Assembly Instructions EN 14 Gosafe Car Seat ...
Page 15: ...le is capable of accepting a Universal child restraint for this group 3 This child restraint has been declared Universal under more stringent conditions than those applied to earlier designs which do not carry this notice 4 If in doubt consult either the child restraint manufacturer or the retailer Only suitable if the vehicle is fitted with 3 point static 3 point retractor safety belts approved t...

Page 16: ...his safest seating position for this child car seat is on the rear seat of a vehicle Never use the child seat without fastening the child s harness correctly and never attempt to use it without fastening it into the car Do not add to or modify the seat in any way Do not leave your child unattended in the seat at any time Car interiors can become very hot when in direct sunlight it is therefore rec...

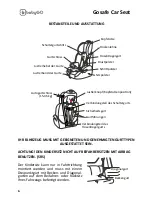
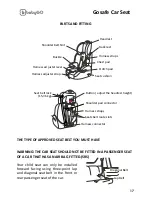
Page 17: ...Slot Harness ad juster lever Harness adjuster strap Buckle Headrest Back rest Harness straps Chest pad Crotch pad Seat cushion WARNING THE CAR SEAT SHOULD NOT BE FITTED IN A PASSENGER SEAT OF A CAR THAT HAS AN AIR BAG FITTED SRS Your child seat can only be installed forward facing using three point lap and diagonal seat belt in the front or rear passenger seat of the car 17 Gosafe Car Seat Diagona...
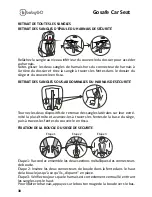
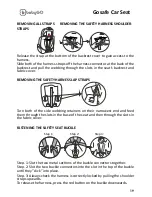
Page 18: ...ver Thread the harness strap back through the next hole up or down on the seat s backrest Step 4 Re thread the harness strap back onto the harness connector at the back of the seat At the same time re thread the shoulder pad belt beck onto the shoulder pad connector at the back of the seat Repeat the same process for the other harness strap Make sure both of the straps go through slots at the same...

Page 19: ...ackrest and fabric cover Turn both of the side webbing retainers on their narrowest end and feed them through the slots in the base of the seat and then through the slots in the fabric cover Step 1 Slot the two metal sections of the buckle connectors together Step 2 Slot the two buckle connectors into the slot in the top of the buckle until they click into place Step 3 Always check the harness is ...

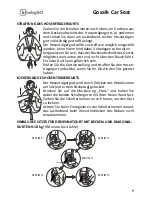
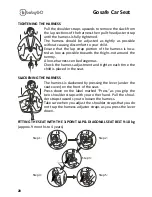
Page 20: ...of the harness is loca ted as low as possible towards the thighs not around the tummy A loose harness can be dangerous Check the harness adjustment and tighten each time the child is placed in the seat The harness is slackened by pressing the lever under the seat cover on the front of the seat Press down on the label marked Press as you grip the two shoulder straps with your other hand Pull the sh...

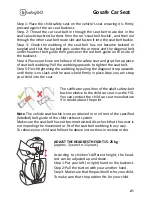
Page 21: ...rds until there is no slack and the seat is held firmly in place Now you can strap your child into the seat Note The vehicle seat buckle is not positioned in or in front of the specified labelled belt guide of the child restraint system Make sure the seat belt has not become twisted Also check that the cover is not impeding the movement or fit of the seat belt webbing in any way To release your ch...

Page 22: ...ckrest Step 2 Place the child in the child safety seat with the seat belt lock on the child s shoulder Step 3 Fasten seat belt making sure that the lap belt webbing goes under both armrests and the diagonal belt webbing goes over under the armrest neat the buckle Check that the webbing has not become twisted and tigh ten the seat belt by pulling the diagonal strap upwards Step 4 Feed the diagonal ...

Page 23: ...he seat belt by pulling the diagonal strap upwards Step 4 Check the seat belt to ensure there is no slack and the belt is not twisted Note The vehicle seat buckle is not positioned in or in front of the specified labelled belt guide of the child restraint system Make sure the seat belt has not become twisted Also check that the cover is not impeding the movement or fit of the seat belt webbing in ...

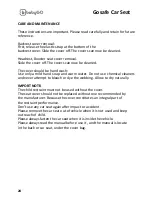
Page 24: ... and never attempt to bleach or dye the webbing Allow to dry naturally IMPORT NOTE The child restraint must not be used without the cover The seat cover should not be replaced without one recommended by the manufacturer Because the cover constitutes an integral part of the restraint performance Don t use any car seat again after impact or accident Please remove the car seat out of vehicle when it ...

Page 25: ...Siège d auto pour enfants Instructions de Montage Siège d auto pour enfants Instructions de Montage FR 25 Gosafe Car Seat ...

Page 26: ...ièges de véhicules mais pas à tous 2 Un réglage correct est requis si le constructeur du véhicule a déclaré dans le manuel du véhicule que le véhicule est capable d accepter un dispositif de retenue universel pour enfant pour ce groupe 3 Ce système de retenue pour enfants a été déclaré universel dans des conditions plus strictes que celles appliquées à des conceptions antérieures qui ne portent pa...

Page 27: ...ment le harnais et n es sayez jamais de l utiliser sans le fixer dans la voiture N ajoutez pas ou ne modifiez pas le siège de quelque façon que ce soit Ne laissez jamais votre enfant sans surveillance dans le siège à aucun moment Les intérieurs de voiture peuvent devenir très chauds en plein soleil il est donc recommandé que le siège enfant soit recouvert quand il n est pas utilisé Cela empêche le...

Page 28: ...du harnais Sangle de réglage du harnais Boucle Appuie tête Dossier Sangles de harnaisharnais Protection de poitrine Entretoise Coussin du siège AVERTISSEMENT LE SIÈGE DE VOITURE NE DOIT PAS ÊTRE FIXÉ DANS UN SIÈGE DE PASSAGER D UNE VOITURE QUI A UN AIRBAG SRS Votre siège enfant ne peut être installé que vers l avant en utilisant une ceinture de sécurité à trois points sous abdominale et diagonale ...

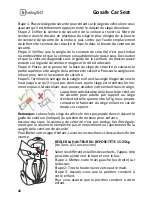
Page 29: ... la sangle de harnais à travers le trou suivant vers le haut ou vers le bas sur le dossier du siège Étape 4 Remontez la sangle de harnais sur le connecteur de harnais à l arrière du siège Dans le même temps re filez la sangle de la ceinture d épaule sur le connecteur d épaule à l arrière du siège Répétez le même processus pour l autre sangle de harnais Assurez vous que les deux sangles passent par...

Page 30: ...rcle en tissu Tournez les deux dispositifs de retenue des sangles latérales sur leur extré mité la plus étroite et avancez les à travers les fentes de la base du siège puis à travers les fentes du couvercle en tissu Étape 1 Raccordez ensemble les deux sections métalliques des connecteurs de boucle Étape 2 Insérez les deux connecteurs de boucle dans la fente dans le haut de la boucle jusqu à ce qu ...

Page 31: ...st située le plus bas possible vers les cuisses pas autour du ventre Un harnais en vrac peut être dangereux Vérifiez le réglage du harnais et serrez chaque fois que l en fant est placé dans le siège Le harnais est relâché en appuyant sur le levier sous le couvercle du siège à l avant du siège Appuyez sur l étiquette marquée Appuyez pendant que vous serrez les deux sangles d épaule avec votre autre...

Page 32: ... la sangle diagonale vers le haut jusqu à ce qu il n y ait pas de mou et que le siège est maintenu ferme ment en place Maintenant vous pouvez attacher votre enfant dans le siège Remarque La boucle du siège du véhicule n est pas placée dans ni devant le guide de ceinture indiqué du système de retenue pour enfants Assurez vous que la ceinture de sécurité n est pas tordue Vérifiez égale ment que le c...

Page 33: ...de sécurité avec le verrou de la cein ture de sécurité sur l épaule de l enfant Étape 3 Attachez la ceinture de sécurité en veillant à ce que la sangle de la ceinture sous abdominale passe sous les deux accoudoirs et que la sang le de la ceinture diagonale passe sous l accoudoir en place dans la boucle Vérifiez que la sangle ne s est pas tordue et serrez la ceinture de sécurité en tirant la sangle...

Page 34: ...sangle diagonale vers le haut Étape 4 Vérifiez la ceinture de sécurité pour s assurer qu il n y a pas de mou et que la sangle n est pas tordue Remarque La boucle du siège du véhicule n est pas placée dans ni devant le guide de ceinture indiqué du système de retenue pour enfants Assurez vous que la ceinture de sécurité n est pas tordue Vérifiez égale ment que le couvercle n empêche pas le mouvement...

Page 35: ...t n essayez jamais de blanchir ou de teindre la sangle Laisser sécher naturellement IMPORTANTE REMARQUE Le dispositif de retenue pour enfants ne doit pas être utilisé sans le couvercle Le couvercle du siège ne doit pas être remplacé sans être recommandé par le fabricant parce que le couvercle fait partie intégrante de la performance de retenue N utilisez pas de siège de voiture à nouveau après un ...

Page 36: ...Impressum BabyGO Baby Products GmbH Am Bahndamm 1 3 D 33378 Rheda Wiedenbrück Germany Tel 0049 5242 418 86 81 Fax 0049 5242 418 86 80 e mail info babygo eu web www babygo eu ...

Reviews: