background image

x1

uA

x1

1

3

2

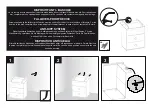
DiSPOSiTiF AnTi - BASCuLe

La vis fournie avec le dispositif anti-bascule est destinée à fixer le dispositif dans le meuble. Pour la fixation au 

mur, compléter par une vis adaptée au support mural. En cas de doute, contacter un magasin de bricolage.

FALLOVeR-PROOF DeViCe

Screw supplied with the fallover-proof device must be used to fix the device in to the piece of furniture. For the 

fixation to the wall, complete it by a screw adapted to the wall bracket. In case of doubt, contact a DIY store.

AnTi-KiPP SYSTeM

Das mitgelieferte Schrauben zu der Antikippvorrichtung  soll das System im Möbel fixieren. Für eine 

Wandfixierung, verstärken Sie die Montage mit einem dafür geeigneten Schrauben. Falls Sie Zweifel haben, 

wenden Sie Sich an einen Fachberater im Baumarkt.

DiSPOSiTiVO AnTiVueLCA

El tornillo surtido con dispositivo antivuelca está destinado a fijar el dispositivo en el mueble. Para la fijación a 

la pared, completar por un tornillo adaptado al soporte mural. En caso de duda, ponerse en contacto con una 

tienda de bricolaje.

Summary of Contents for SMILE SM161A

Page 1: ...montar su mismo Entregue desmontado 1 embrulho Para montar voc mesmo Ongemonteerd geleverd 1 pakket Zelf te monteren Consegnato non montato 1 collo Assemblaggio fai da te PL PL Dostarczane zdemontowan...

Page 2: ...le Reklamationen wenden Sie sich bitte direkt an Ihren H ndler Alle Produkte die seit ber zwei Jahre gekauft wurden geben kein Anspruch mehr auf KOSTENLOSE ERSATZTEILE Aber Sie k nnen Kontakt mit Ihre...

Page 3: ...donnent plus droit une demande de SAV GRATUITE Vous pouvez n anmoins adresser votre demande votre revendeur afin d obtenir un devis All after sales service claims must be informed directly to the sto...

Page 4: ...TANTE DA CONSERVARE PER EVENTUALI RIFERIMENTI FUTURI Rispettare le istruzioni del montaggio e i consigli di utilizazzione seguenti I mobili da montare devono essere assemblati da un adulto e mai da un...

Page 5: ...6x11 5 C00 MG x2 x4 AC 6x11 5 C00 Attention au sens de la coulisse bien respecter le sch ma de d tail Take care of the slideways direction conform exactly to the instructions below Beachten Sie die R...

Page 6: ...xation des pieds en fin de notice For binding feet see the model at the end of the instructions Um die F sse zu befestigen siehe die Modellgr e am Ende der Montageanleitung Para fijar los pies ver el...

Page 7: ...8 6 5 7 C00 C00 D00 D20 D20 x4 AC 6x11 5 CI x4 XN x4 T00 T00 AC XN CI...

Page 8: ...from 20 12 1999 age limit as well as standards label stuck on the product must not be taken off Gem den Anforderungen des franz sischen Kinderdekrets Nr 91 1292 vom 20 12 1991 d rfen die auf dem Produ...

Page 9: ...franz sischen Kinderdekrets Nr 91 1292 vom 20 12 1991 d rfen die auf dem Produkt geklebten Altersgrenze und Normen Aufkleber nicht entfernt werden Para quedar en conformidad con las exigencias del dec...

Page 10: ...ar las exc ntricas LU c mo indicado Avant de passer l tape suivante v rifiez que le tiroir comporte bien 4 angles droits Before the next stage check that the drawer has 4 right angles Bevor Sie weiter...

Page 11: ...oulisses puis les assembler suivant le sch ma de d tail Drive the drawer into the grooves Remove the drawer maintaining grooves and then assemble them according to the detailed drawing Schublade auf d...

Page 12: ...plete it by a screw adapted to the wall bracket In case of doubt contact a DIY store ANTI KIPP SYSTEM Das mitgelieferte Schrauben zu der Antikippvorrichtung soll das System im M bel fixieren F r eine...

Page 13: ...ral adapted wedges thickness in order to lay out fronts of drawers straight down Screw up regularly assembling parts please F r ein gutes Funktionieren der Kommode ist es unerl sslich diese richtig zu...

Page 14: ...ommode lors de l utilisation du plan langer Caution To comply with safety requirements the caps BA shall be used without the changing device Achtung Bei der Benutzung des Wickelansatzes m ssen aus Sic...

Page 15: ......

Page 16: ...CKF E Benutzen Sie das beiliegende Schema und legen Sie es auf das Teil D20 und bohren Sie an jeder Ecke ein Loch zur Befestigung der F e MODELO PARA FIJAR LOS 4 PIES RINCONEROS Utilizar el dibujo al...

Reviews: