B-TEK Scales TL-280 Operation & Setup Manual Download Page 7


  Page | 7 
 

The user menu has the following options: 

1)  i (info) - This option allows you to display the software version and returns the information about 

the set communication protocol. Exiting the info option is done automatically after displaying 
the information. 

2)  P (proto) - This option allows you to select a signalling device communication protocol to work 

with the given control modules uploaded to the device memory. You can change a protocol by 
pressing the microbutton.  Accepting the selected protocol is accomplished by long holding 
down the microbutton (until the inscription "Ok" appears). Exiting the "proto" option comes 
after 30 seconds of the user inactivity. 

3)  C  (custom)  -  The  "custom"  option  allows  you  to  select  a  dedicated  signalling  device 

communication protocol to work with the control modules of selected clients. The protocols have 
special, custom settings needed for a given customer. Setting a protocol is done in the same way 
as in the case of the "proto" option - accepting the selected protocol is accomplished by long 
holding  down  the  microbutton    (until  the  inscription  "Ok"  appears),  while  exiting  the  "custom" 
option comes automatically after 30 seconds of the user inactivity. 

4)  R  (reset)  -  This  option  allows  you  to  reset  the  default  light  signalling  device  protocol.  In 

addition, in the devices with the Ethernet interface, you can restore the default network layer 
settings (IP address: 192.168.0.11, network mask: 255.255.255.0, and the communication port 
for  the  control  module).  To  restore  the  default  settings  you  should,  during  the  normal 
operation  of  the  device,  press  the  microbutton  and  hold  it  down  until  the  inscription  "R" 
appears. Hold the button down until the inscription "R" starts flashing and do not release it 
until  the  information  "default"  is  displayed.  Releasing  the  button  before  the  inscription 
"default" appears will result in interrupting the process of restoring the default settings and 
the display will continue working according to the previously accepted parameters.  


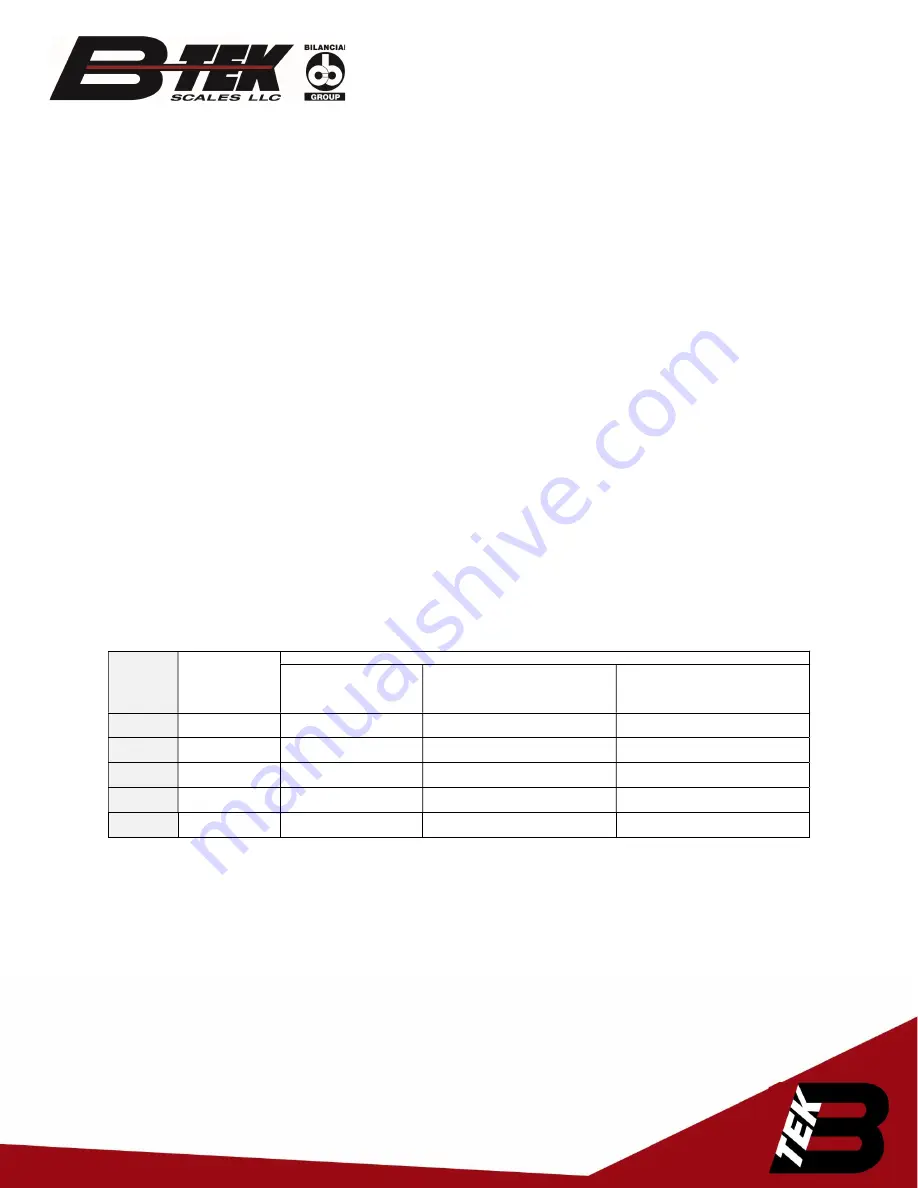
The list of the supported protocols.


Protocol 

no. in the 

menu 

Protocol 

Notes 

The response to the 

pressing button on the 

operator panel 

The response to not pressing the 

button on the operator panel or the 

lack of communication with the 

control device 

The response to the long, 

simultaneous holding of the red and 

green button on the operator panel 

Standard 

Turning on the red, green 

light 

By default, the red light comes on  

Turning off the signalling device  

Standard 

Turning on the red, green 

light 

The last status is saved 

Turning on the red and green light 

Standard 

Turning on the red, green 

light 

The operator panel cable connection 

failure is signalled: „XX” 

Turning off the signalling device  

Standard 

Turning on the red, green 

arrow 

The cable connection failure is 

signalled „XX” 

Turning on the red light 

Pfister DWT800 

Turning on the red, green 

light 

The cable connection failure is 

signalled „XX” 

Turning off the signalling device 


Summary of Contents for TL-280

Page 1: ...Page 1 TL 280 STOP GO LIGHT OPERATION SETUP GUIDE V1 1 ...

Page 2: ...Module Connectors 9 Communication Connections 10 1 RS 232 connector 11 2 RS 485 RS 422 connector 11 3 0 20mA digital current loop 11 4 Operator panel dry contact 11 5 Ethernet 11 Automatic brightness control of the light signalling device 12 Initial start up 12 Changing Ethernet Settings 12 Additional options 13 Disposal and recycling 13 Packaging material recycling 13 Device disposal 13 Most comm...

Page 3: ...ector Power Cable 2 Meter 120 VAC US Plug Weight 1 5kg 3 3lbs Transport and Storage The device is sensitive to mechanical damages Care should be taken to properly protect the device during transport to eliminate any damage It is forbidden to transport the device components separately in a collective package each component must be packed separately and cannot bump during transportation Due to prote...

Page 4: ...e 4 Fig 1 TL 280 Dimensions Fig 2 Mounting The roof functions as a mounting bracket Fig 3 Fig 3 NOTICE It is forbidden to make any additional mounting points or any holes in the device assembly components ...

Page 5: ...he roof construction allows you to mount the signalling device on posts with diameters of 50 70mm 2 2 8in and 100 120mm 3 9 4 7in using a U bolt with a rod diameter of 8mm 0 7in Fig 4 or on the BT 470 scale display visor Fig 5 Fig 4 Fig 5 ...

Page 6: ... the set protocol reset to the default settings The DEF microbutton used to operate the menu is located inside the signalling device However after unscrewing the lock screw it is accessible through the technological hole without opening the device det A lock screw det B technological hole Fig 6 The user menu is called up by pressing and holding down the DEF microbutton and releasing it when the de...

Page 7: ...layer settings IP address 192 168 0 11 network mask 255 255 255 0 and the communication port for the control module To restore the default settings you should during the normal operation of the device press the microbutton and hold it down until the inscription R appears Hold the button down until the inscription R starts flashing and do not release it until the information default is displayed Re...

Page 8: ...e green light will be turned off 0x3A 0x20 0x47 on the signalling device the green light will be turned on the red light will be turned off 0x3A 0x3C 0x3E on the signalling device the red symbol of the left arrow and the green symbol of the right arrow will be turned on 0x3A 0x20 0x5E on the signalling device the red symbol turns off and the green symbol of the up arrow will be turned on Alpha cha...

Page 9: ... device det A det B det C LED module connectors det D RS 485 RS 422 connector det E 0 20mA digital current loop det F RS 232 connector det G Ethernet connector det H DEF microbutton det I housing earthing soldering point det J network power supply connector Fig 7 LED Module Connectors det A operator panel connector dry contact Fig 8 ...

Page 10: ...he light signalling device The connectors are accessible after the disassembly of the back cover and the LED module mounted on this cover det A device front det B controller det C back cover det D LED module Fig 9 NOTICE The housing should be disassembled with the power supply disconnected ...

Page 11: ... Ethernet TX Pin No 1 of RJ 45 TX Pin No 2 of RJ 45 RX Pin No 3 of RJ 45 RX Pin No 6 of RJ 45 Table 2 1 RS 232 connector For the communication purposes the user connects with the controller via the RS 232 connector Fig 7 using the control module 2 RS 485 RS 422 connector For the communication purposes the user connects with the controller via the RS 485 or RS 422 connector Fig 7 using the control ...

Page 12: ...the device to the mains power supply Step 4 The properly connected system will display the symbols in the light fields followed by the hard space symbol _ in the bottom field It means that the device is working according to the default protocol In 7 seconds the signalling device will go into the default display state Changing Ethernet Settings Wagset Software can be used to change the IP address T...

Page 13: ...ecycling The packaging elements must be segregated and then recycled in accordance with the local executive regulations on waste disposal Device disposal The device must not be disposed of as urban waste In accordance with the directive 2002 96 EC WEEE if the repair of the device is not economically justified the user must take the damaged or destroyed equipment to a special waste disposal Most co...

Reviews: