6
INSTALLATION INSTRUCTIONS
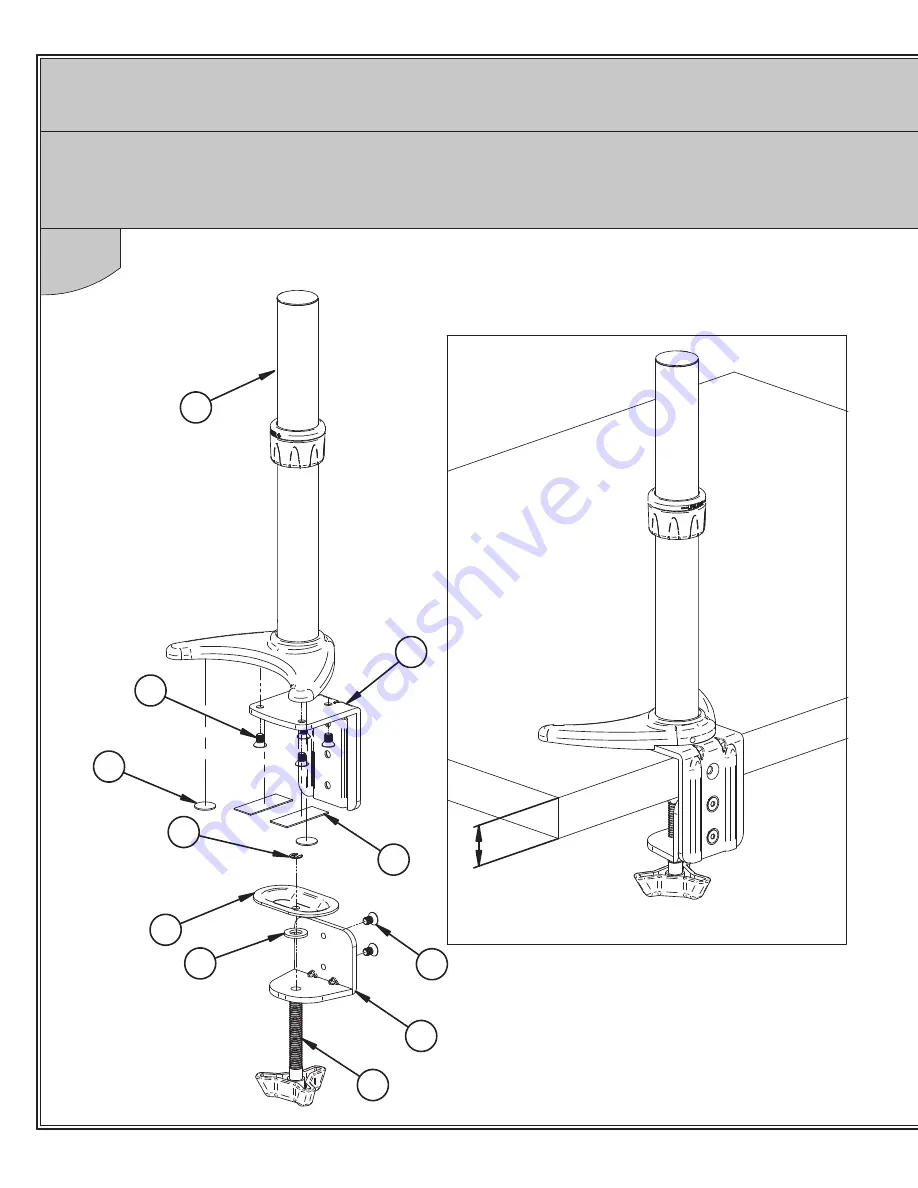
1
Choose a preferred mounting method.
i. Clamp (page 6)
ii. Grommet (page 8)
i. Desk clamp option.
Max 70mm
(2.8")
4
11
19
5
7
8
13
12
20
Page 1: ...Dimensions 15 B Tech Contact Details 16 PLEASE KEEP THIS FOR FUTURE REFERENCE 2 5mm Hex Key Supplied 4mm Hex Key Supplied Designed for screens up to 24 61cm 9kg 20lbs Fits screens with VESA mounting...
Page 2: ......
Page 3: ...dans la limite du poids maximum indiqu IT B Tech International Ltd consiglia di affidare l installazione di questo prodotto a un installatore specializzato o ad altra persona adeguatamente qualificata...
Page 4: ...BT7372 PARTS LIST 4 Suitable for loads up to 9kg 20lbs GROMMET CLAMP 3 4 5 6 7 8 11 11 12 13 14 13 6 16 17 15 9 1 9 10 2 21 22 23 11...
Page 5: ...6 M 1 1 1 G N I R E 0 1 M 2 1 2 R E H S A W L A T E M 0 1 M 3 1 1 T U N 0 1 M 4 1 1 E T A L P T E M M O R G 5 1 1 L E E H W D N A H G N O L 6 1 1 P A C D N E E L O P 7 1 1 P I L C E L B A C 8 1 2 D A...
Page 6: ...6 INSTALLATION INSTRUCTIONS 1 Choose a preferred mounting method i Clamp page 6 ii Grommet page 8 i Desk clamp option Max 70mm 2 8 4 11 19 5 7 11 8 13 6 12 20...
Page 7: ...7 Attach the foam pads to the underside of the clamp base Place the mount over edge of the desk and tighten the short handwheel 19 DESKTOP 6 4 8 20...
Page 8: ...8 ii Grommet Clamp Max 95mm 3 7 4 15 19 6 13 14 16 11 20...
Page 9: ...rommet plate Then attach the foam pads onto the grommet plate Place the mount over the cable management hole and screw the handwheel into the grommet plate then tighten the nut to clamp the desk 26 26...
Page 10: ...lock height of adjustment collar hold the top of the collar and rotate the lower part of the adjustment collar Attach the interface plate to the flat screen FLAT SCREEN TOP BOTTOM LOCK COLLAR E D C B...
Page 11: ...11 4 Slide the flat screen and arms onto the pole adjust height then tighten the grub screw FLAT SCREEN UNLOCK COLLAR LOCK COLLAR i ii iii 2 4 3 3 3 25 10 2...
Page 12: ...slack for movement of the screen and that cables will not be pinched when the mount is closed Insert the cable into the cable management slots on the underside of the arm FLAT SCREEN WARNING Ensure ar...
Page 13: ...ease tilt resistance tighten part 9 40 26 9 If this does not hold the screen at the required tilt remove the flat screen from the interface Then remove plastic nut cover and tighten the M8 nyloc nut M...
Page 14: ...14 7 Tilt and swivel 360 90 360 FLAT SCREEN 25 10 9 26 26 9...
Page 15: ...THE ACCURACY OF THE INFORMATION CONTAINED IN THIS DOCUMENT 100mm 3 9 75mm 3 75mm 3 100mm 3 9 120mm 4 7 120mm 4 7 83 7mm 3 3 95mm 3 7 70mm 2 8 MAX DESK CLAMP GROMMET BASE INTERFACE PLATE 72mm 2 8 400m...
Page 16: ...nett Technologies Limited All other brands and product names are trademarks of their respective owners Photographs are for illustrative purposes only E OE SINGAPORE Ruby Industrial Complex Singapore 3...