background image

4

•  

The minimum distance between the support surfaces of the cooking 

pots on the cooker top and the lowest part of the cooker hood must be 

at least 

65 cm

. If a connection tube composed of two parts is used, the 

upper part must be placed outside the lower part. Do not connect the 

cooker hood exhaust to the same conductor used to circulate hot air or 

for evacuating fumes from other appliances generated by other than 

an electrical source. Before proceeding with the assembly operations, 

remove the anti-grease filter(s) so that the unit is easier to handle.

- In the case of assembly of the appliance in the suction version prepare 

the hole for evacuation of the air.

•  

We recommend the use of an air exhaust tube which has the same 

diameter as the air exhaust outlet hole. If a pipe with a smaller diameter 

is used, the efficiency of the product may be reduced and its operation 

may become noisier.

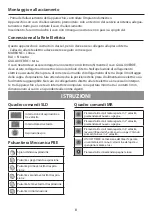
INSTALLATION

Procedure for fixing


• Dimensional Drawings.

• Fix the hood as shown in the scheme. 

Connecting and fitting

• Before connecting the appliance, check the household installation.

Appliance with prefitted power cable: The power cable must only be replaced by a trained after-sa-

les engineer. Installing: Do not trap the power cable and do not route it over sharp edges. If the oven 

is a built-under type, route the cable on the rear corners of the oven to the socket.

Eletrical Connection

This is a class I, appliance and must therefore be connected to an effiecient earthing system.

- The appliance must be connected to the electricity supply as follows:

BROWN = L line

BLUE = N neutral

YELLOW/GREEN = earth.

The neutral wire must be connected to the terminal with the N symbol while the YELLOW/GREEN, 

wire must be connected to the terminal by the earth symbol .

When connecting the appliance to the electricity supply, make sure that the mains socket has an 

earth connection. After fitting the ducted cooker hood, make sure that the electrical plug is in a po-

sition where it can be accessed easily. If the appliance is connected directly to the electricity supply, 

an omnipolar switch with a minimum contact opening of 3 mm must be placed in between the two; 

its size must be suitable for the load required and it must comply with current legislation.

Summary of Contents for CH105E

Page 1: ...EN IT ES FR DE COOKER HOOD User instructions CAPPA ASPIRANTE Istruzioni per l uso CAMPANA EXTRACTORA Manual d utilizaci n HOTTE DE CUISINE Notice d utilisation DUNSTABZUGSHAUBE Gebrauchsanweisung...

Page 2: ...2...

Page 3: ...trical appliances may be a danger hazard A Do not check the status of the filters while the cooker hood is operating B Do not touch bulbs or adjacent areas during or straight after prolonged use of th...

Page 4: ...connecting the appliance check the household installation Appliance with prefitted power cable The power cable must only be replaced by a trained after sa les engineer Installing Do not trap the power...

Page 5: ...5 minutes After this the cooker hood will be switched off automatically motor and lighting Push This button to switch on off the light Commands MR Maintenace Use only a damp doth with neutral liquid d...

Page 6: ...energia diversa da quella elettrica in quanto la cappa aspirando toglie all ambiente l aria di cui il bruciatore o il focolare ne cessita per la combustione La pressione negativa nel locale non deve...

Page 7: ...uatamente ventilato L Se le operazioni di pulizia non vengono eseguite nel rispetto delle istruzioni esiste il rischio che si sviluppi un incendio La distanza minima fra la superficie di supporto dei...

Page 8: ...la posizione della presa di alimentazione elettrica sia facilmente raggiungibile Nel caso di collegamento diretto alla rete elettrica necessario interpor re tra l apparecchio e la rete un interruttore...

Page 9: ...montato non rigenerabile e quindi deve essere sostituito almeno ogni due mesi B FILTRI ANTIGRASSO METALLICI Fig 5 E necessario lavare i filtri almeno una volta al mese in acqua calda e detersivo dome...

Page 10: ...ego directo debajo de la campana D Evite dejar la llama libre porque puede da ar los filtros y cons tituye un riesgo de incendio E Controle constantemente los alimentos fritos para evitar que el aceit...

Page 11: ...ntaje de la campana de aspiraci n controle que la posici n del enchufe de alimentaci n el ctrica sea f cilmente accesible Si se co necta directamente a la red el ctrica es necesario interponer entre e...

Page 12: ...velocidad de marcha actualmente en uso despu s de lo cual la campana se apaga Presionar este bot n para encendido apagado de la luz Controles Electr nicos MR Mantenimiento Utilice solamente y un pa o...

Page 13: ...lisez simultan ment la hotte vacuation avec un br leur ou une chemin e aliment s par une nergie autre que l lectricit vous pouvez cr er un probl me d inversion de flux Dans ce cas la hotte aspire l ai...

Page 14: ...surveill s H Veillez ce que les enfants ne jouent pas avec l appareil I Lorsque la hotte est utilis e en pr sence d appareils utilisant du gaz ou d autres combustibles la pi ce doit tre correctement v...

Page 15: ...e courant comporte bien une borne de mise la terre Une fois l installation termin e cette prise doit tre facilement accessible Un interrupteur omnipolaire ayant une distance d ouverture des contacts d...

Page 16: ...nes Fig 1 D branchez la hotte du r seau lectrique et attendre quelques minutes pour refroidir la lampe Suivez les instructions de la conception connexes en utilisant des gants Rempalcement de la Lamp...

Page 17: ...gew hrleisten ist daher immer auf eine ausreichende Bel ftungdesRaumeszuachten BeiderAbleitungderLuftnachaussen m ssen die nationalen Vorschriften eingehalten werden Vor Anschluss des Modells an das S...

Page 18: ...lter auf der Kochvorrichtung und dem unterenTeil der Abzugshaube muss mindestens65cmbetragen FallseinVerbindungsrohrverwendetwird dasauszweiodermehrTeilenzusammengesetztist mussderobereTeil ber den u...

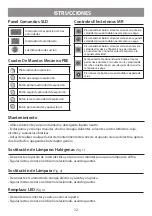
Page 19: ...estens 3 mm der der Belastung und den geltenden Richtlinien entspricht installiert werden ANLEITUNG Beleuchtungstaste Ausschalttaste Absaugvorrichtung Taste f r erste Geschwindigkeit der Absaugvorrich...

Page 20: ...weisungen in der zugeh rigen Design mit Handschuhen Filter Wechseln AKTIVKOHLENFILTER nur bei Filterversion Abb 4 Die beiden montierten Filter sind nicht regenerierbar und m ssen deshalb mindestens al...

Page 21: ...21 min 650 240 260 350 360 140 145 120 150 18 20 23...

Page 22: ...22 Fig 1 Fig 2 Fig 3...

Page 23: ...23 Fig 4 Fig 5...

Page 24: ...3011000137700 00...

Reviews: