background image

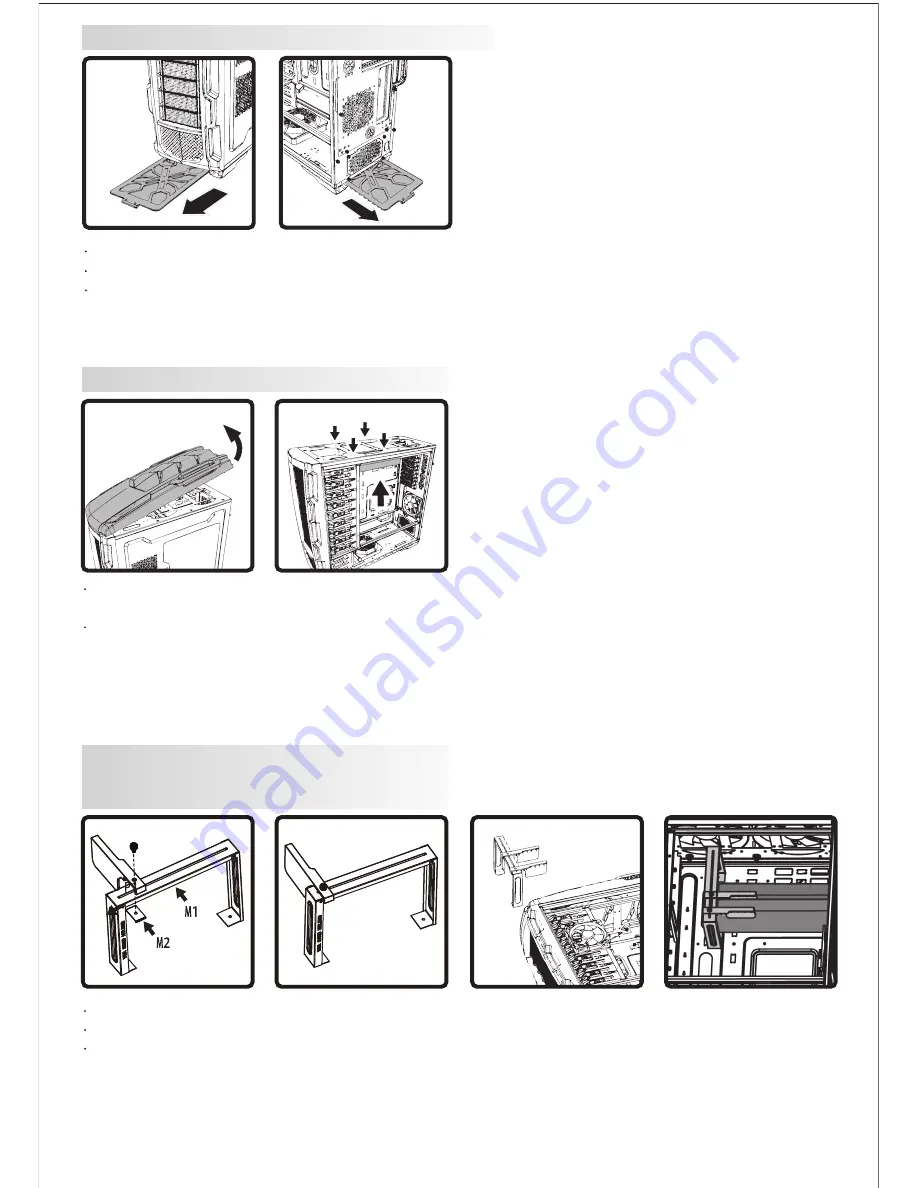
12.Fan Dust Filter Removal

13.Water Cooling Radiator Installation

14.Graphics Card Support Bracket Installation (Present-day graphics cards are increasingly heavier in weight, 
     placing greater strain on the PCI-E slots. To help reduce such strain, we are providing a graphics card
     support bracket.)

12.1 Unscrew the thumb screws from the bottom front of the chassis and remove the dust filter
12.2 Remove the fan dust filter by pressing down on the tab then pull out
12.3 Clean the dust filter using a clean cloth

13.1 To install an external water cooling system, use the pre-drilled holes located on the back to connect the 
        tubes
13.2 Up to size 480mm radiator may be installed on the top of the unit using the pre-drilled holes

14.1 Assemble M1, M2 & P1 with the thumb screw, do not tighten the thumb screw yet
14.2 Secure M1 to the motherboard tray with screws
14.3 Adjust P1 position to provide additional support to the graphics card, then tighten the screw to M2

Summary of Contents for CSAZ-GT1

Page 1: ...CSAZ GT1 www azzatek com EASY SWAP RADIATOR READY INSTALLTION GUIDE...

Page 2: ...Motherboard Tray Removal and Installation 7 Power Supply Installation 8 Motherboard CPU and Graphics Card Installation 9 5 25 Device Installation 10 3 5 HDD and 2 5 HDD SSD Installation 11 How to Remo...

Page 3: ...t Ports Cooling System 230mm Fan 140mm Fan 120mm Fan Physical Spec Dimensions HxWxD Weight GT 1 CSAZ GT 1 ATX Full Tower Black Black inside chassis 0 8mm SECC Yes Not Included up to 200mm XL ATX E ATX...

Page 4: ...5 25 Device Cover x9 3 5 HDD 2 5 SSD HDD Holder x5 Bottom Dust Filter Bottom Stand Right Side Panel 5 25 Tool less Retaining Clips Motherboard Tray Handle 2x140mm Silent Bottom Fans 2x120mm Side Fans...

Page 5: ...651 42 605 21 241 26 Side 1 x 120mm Silent Fan 24 dBA Bottom 1 x 140mm Silent Fan 19 dBA Top 1 x 230mm LED Silent Fan 24 dBA Back 1 x 120mm Silent Fan 24 dBA Air Cooling System Diagram...

Page 6: ...y Screw for2 5 SSD Screw for 3 5 HDD Power Supply Screw Screw for HDD Bracket Speaker Cable Tie Pad for Power Supply Graphics Card Support Bracket M1 metal Graphics Card Support Bracket M2 metal Graph...

Page 7: ...therboard tray 2 1 Unscrew the thumb screws on the back of the chassis 2 2 Pull the side panels toward the back of the chassis When the motherboard is rotated 180 degree the two side panels will need...

Page 8: ...op of the case The motherboard tray can be rotated 180 degrees to revert to the standard AXT form factor 7 1 Rear power supply installation 7 2 Place the power supply into its proper location and tigh...

Page 9: ...nnectors from the motherboard to the Easy Swap SATA connectors 10 3 Pinch the 5 25 drive bay metal mesh to remove it from the front panel 10 4 While pressing on the lever pull the HDD tray out and pla...

Page 10: ...filter 12 2 Remove the fan dust filter by pressing down on the tab then pull out 12 3 Clean the dust filter using a clean cloth 13 1 To install an external water cooling system use the pre drilled ho...

Page 11: ...the sections of USB connector And audio connector Please verify the pin definition before connecting the connectors to the motherboard 1 USB and Audio connectors have foolproof design can only be ins...

Reviews: