

MODEL
WIPC409HD-E
This Easy Start Guide will help you set up your Aztech WIPC409HD-E in connecting to your network for the first
time. Before you continue with the installation, ensure that your modem’s Internet connection is UP. This Easy
Start Guide, along with the User Manual which provides a more advanced guide to this product, is included in the
Resource CD and is also downloadable from our Aztech Support Website
(www.aztech.com/support)
.
PAGE 6
3B
For APPle Users
Download and install the
Aztech IP Cam App
on
AppStore or you may also scan the QR Code found on
the Packaging Box to search for the application.
Launch the
Aztech IP Cam App
then tap the
icon and tap the
Add Manually
icon on the next
page to begin adding a camera.
You may use the
QR Code
button to scan the
UID found on the bottom label of the camera,
LAN Search
to scan for connected camera(s), or
manually enter
the information needed.
NOTE: The 20-digit UID is unique for every device.
Enter your camera’s
Security Code
(password).
NOTE: The default
Security Code
for all IP cameras
is
admin
.
You may also edit the camera
Name
(E.g. Cherry’s
Camera) in this page.
Press
Add
. You may now start viewing your camera’s
monitored area.
1
2
3
If you are connecting via Wireless, disconnect the Ethernet cable ONLY after you have completed
the setup. Your IP Camera will automatically connect to your Access Point within 2 minutes.
Disconnect and reconnect the power adapter to perform a device reboot. After reconnecting, it
will take about 10 seconds before the camera will auto-pan and tilt. After the boot up process,
use the WIPC409HD-E Utility to launch the IP Camera’s WEB User Interface.
In using a Third Party DDNS, it is required to have an active DDNS Account. You may refer to the
Third Party DDNS Server on how to register and create an account.
Ensure that you have set the Port Forwarding feature of your router to access the IP Camera via
PC remotely. Refer to the User Manual of your router on how to enable this function.
After setting the Port Forwarding on your router, launch the IP Camera’s Web User Interface
again and uncheck the DHCP / Static box then click Submit to save the current IP Address of
the IP Camera.
It is important to ensure that the Default Device Password is changed during the Initial set up
for User Security Purposes.
On Proper SD Card Placement, its metal contacts must be faced down. Insert the SD Card first
before turning ON the device.
Ensure to insert the SD Card first before enabling the alarm notification through the FTP
server.
•
•
•
•
•
•
•
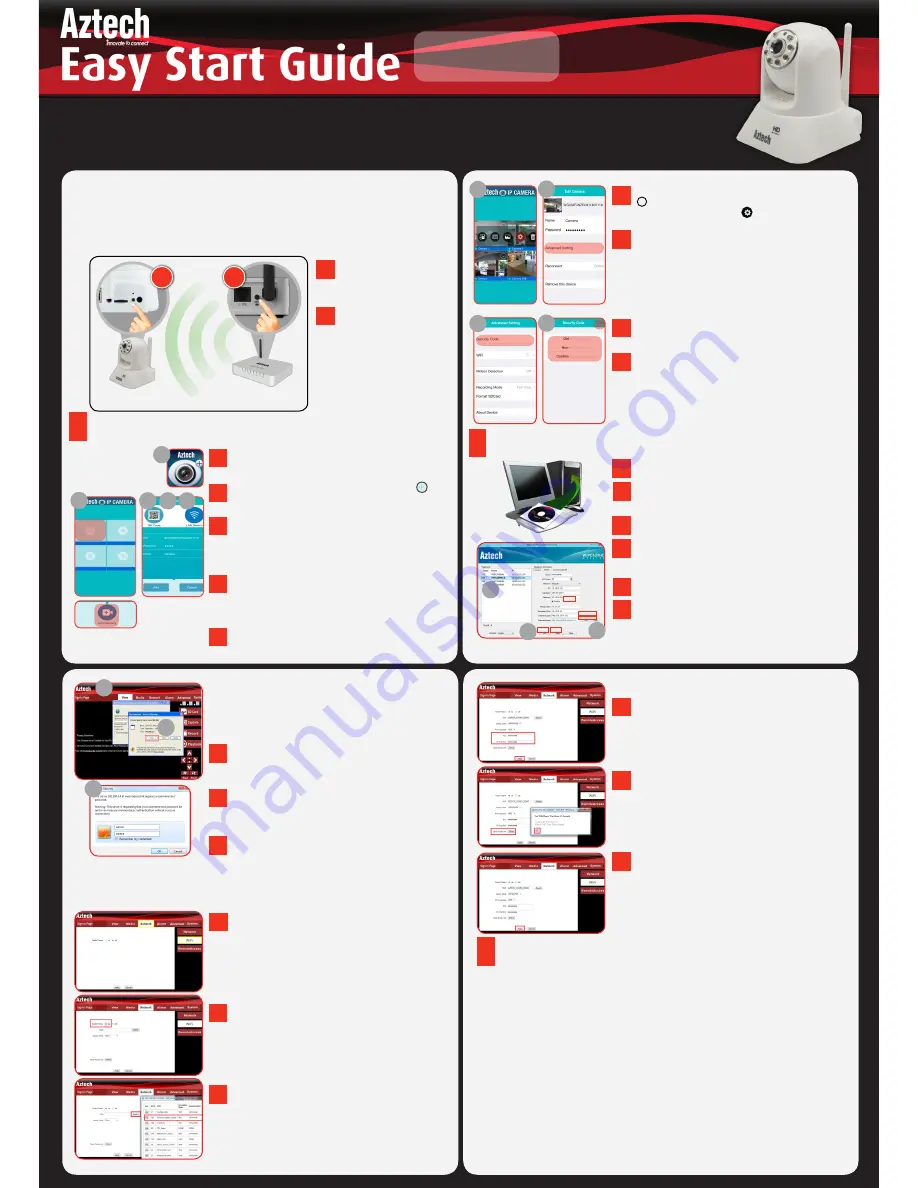
If you want to edit your camera’s settings, tap the
icon of the camera that you want to edit then
tap the
Edit Camera
icon .
On the
Edit Camera
section, tap the
Advanced
Setting
button.
On the Advanced Setting page, tap on the
Security
Code
button.
Enter the
Old
password of your IP camera,
then enter the
New
password that you prefer
and reconfirm entry. Tap
OK
to save and apply
settings.
6
7
8
9
PAGE 8
PAGE 5
PAGE 7
3c
For DesktoP/Pc Users
Insert the
WIPC409HD-E Resource
CD into the
CD-ROM drive.
On your desktop, click the
My Computer
icon.
Right click on the
D drive (where D: is your CD-
ROM drive)
then select
Explore
.
Copy and save the
WIPC409HD-E Utility.exe
on
your computer’s desktop for easier access.
Launch the
WIPC409HD-E Utility
then click the
Find
button to search for all available Aztech IP
Cameras on your network.
Select your WIPC409HD-E device.
If you want to have the
External Access
address
for remote access, click the
GET
button, and enter
admin
as its username and password on the
Validate Authentication
window.
You may then copy the url link and use it to access
the camera remotely.
NOTE: The DDNS feature will only work after a
successful Port Forwarding setup.
On the WIPC409HD-E Utility, ensure that
Auto
is ticked
then click the
Open
button (beside the Internal Access
field) to launch the Web User Interface.
The
SEClientOCX_setup.exe
Message will pop up.
Click
Run
to install the application. This will launch
the IP camera’s web user interface.
Input
admin
for both Username and Password.
For First time Use
, the
OCX Plug-in
is needed.
Click
Download
and
Install Player
to view camera
videos smoothly.
Click the
Network Tab
, and select
WiFi
on the
submenu.
On the
Enable Wireless
settings, select
ON
.
Search for the SSID or the Wireless Network
you
want to connect your WIPC409HD-E Camera to.
1
2
3
4
Input the
password
and click the
Apply
button to
save changes.
On the
Check Wireless Set
settings, click the
Check
button to verify if the Wireless Setting is
successful.
Click the
Apply
button.
Disconnect the Ethernet cable from the Camera
and perform device reboot.
7
8
D
NOTES
connecting your camera to wi-Fi
1
4
1
2
3
6
7
8
9
7
9
5
2
6
5
4
5
3
B. Using the WPS Button of the Camera
If your router has a Wi-Fi Protected Setup (WPS) feature, you may use the WPS button
of the WIPC409HD-E to easily connect it to your router. To do this process, you must first
check your router’s User Manual for the NUMBER OF SECONDS required in activating
its WPS feature.
1
2
1
2
Press the WPS button of
your WIPC409HD-E for
two (2) seconds.
Press the WPS button on
your router as seen on its
user manual (number of
seconds may vary).
NOTE: Ensure to do STEP
2 within TWO MINUTES
after pressing the WPS
button of your IP camera.
WIPC409HD-E
Router
6
9
6
8
4
4
5
5
...


