background image

7

Easy Start

Easy Start

Easy Start

Easy Start

Easy Start

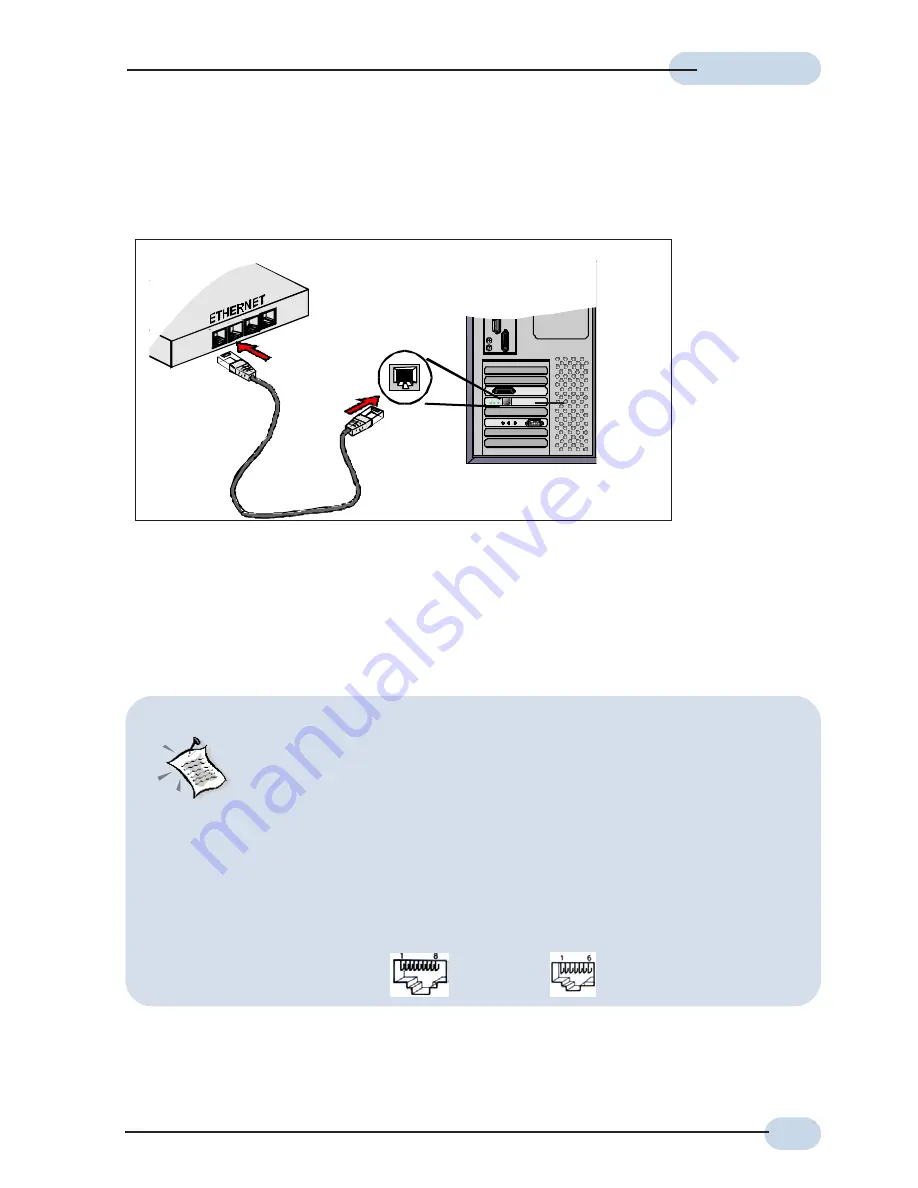
Step 1.3 Connecting  to the Ethernet

Connect your computer(s)/notebook(s) to the ADSL Router as illustrated. The following

illustration shows the connection of a single computer.

Back view of a computer

Ethernet Network cable

Ethernet Port

Back view of

the ADSL

Router

Ethernet

Network Card

(All the Ethernet

Ports on the ADSL
Router are Auto

MDIX.  Both Straight

and Cross Ethernet

Network cables can

be used).

To connect the ADSL Router to your Computer/Notebook, you need to have an 

Ethernet Port 

present

on your Computer/Notebook.

(See the following note if you are not sure of how an Ethernet Port looks like).

Locating the Ethernet Port on your Computer/Notebook

The following are some tips to help you locate your Ethernet Port on your
Computer/Notebook.  Alternatively, you may refer to the documentation that
comes with your Computer/Notebook.
Most Computers/Notebooks have labels describing the Ports.  For Ethernet Port,
you will see either 

ETHERNET

,

 ETH 

or 

RJ45 

labelled near the Port.

If your Computer/Notebook does not have such descriptions, try the following.
-

Picture A 

gives the illustration of an Ethernet Port.  All Ethernet Ports have 

8

conductors on it.  Do not mistaken with the LINE Port (Picture B) that has only
6 conductors.

-

An Ethernet Port is slightly bigger than a LINE Port.

A.  ETHERNET: 

 B.  LINE: 

Summary of Contents for 4-Port Wireless N Router

Page 1: ...rs Contents Introduction 2 Minimum System Requirements 2 ADSL Router Package 2 ADSL Router Overview 3 Typical ADSL Router Connections 4 Step 1 Connecting the ADSL Router to Your Computer Notebook 5 St...

Page 2: ...ndows configurations discussed Windows 98 Windows 98 Second Edition Windows Me Windows XP Windows 2000 Web Browser support Microsoft Internet Explorer 4 0 or later versions Netscape Navigator 4 7 or l...

Page 3: ...activate the reset function p ADSL Telephone jack RJ 11 to connect to the ADSL Line 4 To activate the reset function Ensure that the ADSL Router is powered on Use a pencil tip or a paper clip to depr...

Page 4: ...of the Ethernet Ports via an Ethernet Hub Switch For details on how to connect to the Ethernet Switch Hub please refer to the documentation that comes with the unit to Computers Notebooks with Ethern...

Page 5: ...ep 1 1 Connecting to the Power Outlet Connect the other end of the Power Adapter to the Power Outlet Back view of the ADSL Router Step 1 2 Connecting to the ADSL Line To connect the ADSL Router to the...

Page 6: ...performance When purchasing POTS Splitter from your dealer ensure that it has a built in Micro Filter Telephone Set POTS Splitter Connect the Telephone set to the jack labelled TEL or PHONE and the t...

Page 7: ...tebook See the following note if you are not sure of how an Ethernet Port looks like Locating the Ethernet Port on your Computer Notebook The following are some tips to help you locate your Ethernet P...

Page 8: ...your connections before proceeding Step 1 5 Powering Up Power on the Power Outlet that the ADSL Router is connected to Power on your Computer s Notebook s Proceed to Step 2 LINE ETHERNET DC 5V To your...

Page 9: ...Neighborhood icon Select Properties ii From the Configuration tab select TCP IP xxx where xxx refers to the model of your Ethernet Network Card that is connected to the ADSL Router Click Properties St...

Page 10: ...d click OK Click OK again to close Proceed to Step 3 2 2 For Windows 2000 Windows XP i Windows 2000 a From your Windows desktop right click on the icon My Network Places and select Properties b At the...

Page 11: ...og modem on your computer notebook before Proceed with 3 1 v v Disable the Proxies At the Connection tab click on LAN Settings button Disable all proxies settings if it has been enabled Click OK vi Cl...

Page 12: ...k will appear indicating that the selection is enabled and click Connect You will see Dial On Demand enabled waiting for traffic on the Quick Start page Internet connection will automatically be initi...

Page 13: ...ve 3 profiles have the DHCP Server and NAT Network Address Translation options enabled The DHCP Server range is 192 168 1 2 to 192 168 1 21 and default LAN IP Address is 192 168 1 1 For more details p...

Page 14: ...5 0 Remote Gateway ___________________ default is 192 168 1 1 To enable or disable NAT __________________ default is enabled i Power on your computer notebook ii Launch your Web Browser On the Address...

Reviews: