7
IRR-30 Receiver Set up
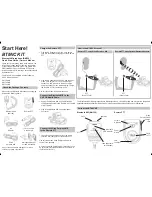
1. Power Switch - turns the receiver On and Off.
2. Power LED - indicates the power state of the receiver.
3. Receiving Sensors - internal receiving infrared sensors.
4. Channel 1 Volume - adjusts the output volume for Channel 1.
5. Channel 1 Indicator - glows green when connecting Channel 1.
6. Channel 2 Volume - adjusts the output volume for Channel 2.
7. Channel 2 Indicator - glows green when connecting Channel 2.
⑩
⑫
⑧
⑨
⑪
②
①
③
⑥
④
⑦
⑤
8. Switched External Sensor Input (F connector) - Plugging an external sensor
in here turns the front panel sensor (3) off.
9. 2-External Sensor Inputs (F connector) - Plugging external sensors in here
extends the receiver s potential working distance.
10. Input Selector - selects either Mic (-20dB max @ 1.5K ohms) or Line (+4dB max
@ 1k ohms) level for the output jack (10).
11. Output Jack - connects the receiver to a mixer or audio amplifier/speaker combination
(1/4 inch connector). In general, choose MIC when attaching to a mixer
input and LINE when attaching to an amplifier input.
12. Power Input - plug in AC-DC adapter (BC-27) to power receiver (12VAC-1.6A)
Don t use other one beside of our recommending.
III. Mounting the Receiver:
As infrared operates "line-of-sight" and can be interrupted by any solid object, it is strongly
suggested that the receiver (or external sensors) be mounted or placed in a location that puts the
receiving sensors above the audience's heads or any other obstacles.
IV. Powering the Receiver:
The IRR-30 is powered by a AC-DC power supply(BC-27) . Before turning the receiver
ON be sure to plug it into an active 110-220VAC wall socket and into the rear of the IRR-30 (12).
DO NOT USE any power supply except the our standard.
I. Receiver Front Panel:
II. Receiver Rear Panel:
10
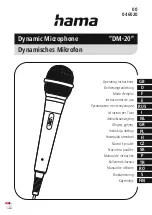
IRN-10 Transmitter
5. Using the IRB-10c:
After inserting fresh batteries, the IRB-10c can be powered by sliding the ON/OFF Switch (4) to the
ON position. The Power LED will glow when the IRB-10c is powered ON as will the red LED on
the front panel of the IRR-30 which corresponds to the chosen channel. Be sure to slide the Power
Switch to OFF when not in use to preserve battery life. The Power LED on the mic will turn from
green to red to indicate "Low Battery".
The emitter (1) must be plugged into the IRB-10c (3) and either attached to the clothing with the clip
(2) or worn around the neck with the lanyard as described in section V. The emitter acts as the
transmitter and, for best results, should be worn in such a way as to have a clear path to the
receiving sensor(s).
The IRB-10c can be attached to the belt or other clothing by way of the metal belt clip. It is suggested
that the body-pack be worn in the front portion of the body to avoid the possibility of damaging it.
6. Attaching and Using the Lanyard with the IRE-10 Emitter:
As described above, the emitter(1) can be attached to clothing using the built-in clip. To attach,
insert the metal clip through the holes (2) on the lanyard's clear plastic slide.
1. Power switch - turn ON/OFF the transmitter by sliding the switch.
2. Power LED - Glow GREEN when the transmitter is ON.Glow RED when the battery is low.
3. Battery door - When replacing the battery slide it down to open.
4. Extarnal Mic input jack - Plug the ext. mic into the jack, then internal mic will be disabled.
5. Power input - Plug the charger jack into the port.
6. Charge LED - Glow RED when when charging.
7. Channel switch - Slide the switch to select the frequency.
8. Mic gain adjusment point - Use very tiny Philip type screw driver for turning the inside screw.
By turning the screw to the counterclockwise, the gain go up and down.
Find the optimum gain by turning the screw while lessening the speech through a speaker.
If howling appear, this phenomenon can be minimized by adjusting the internal microphone
level through this feature. The best solution to avoid the howling is to use uni-directional
microphone like our HS-11(headset mic),EX-505U (lavalier type) etc.
1
2
3
4
5
6
7
8