background image


Instruction of Caster Wheel 

1.  Nip the groove at both sides of bucket and pull the bucket out by the arrow shown 

direction. (As shown in fig.a) 

2.  Take out accessory box (there are 4 castors). 

3.  Refit the bucket by the arrow shown direction, then the unit is ready to be electrified and 

turned on. (As shown in fig.c) 


4.  Take out 4 castors from accessory box. 

5. 

Tilt the dehumidifier no more than 45°. Aim the shaft of castor at the installation hole on 
chassis, and then forcibly push the castor upward to let the locating ring on the shaft of 
castor stick together with the side face of installation hole. (refer to Fig.d) 


6.  Install the 4 caster wheels on the dehumidifier. 


NOTE: 

1.  Keep the dehumidifier balance during installation incase the dehumidifier falls. 
2.  Four caster wheels must be installed well before operating the unit. 

Bucket 

Accessory box 

Fig. a 

Fig. b 

Fig. c 

Locating ring  
  on the shaft  
        of castor 

Fig. d 

Summary of Contents for AYD-20

Page 1: ...AYD 20 Dehumidifier User manual...

Page 2: ...1 Original...

Page 3: ...rature will not below 5 C or above 32 C Allow at least 30 45cm of air space on all sides of the unit Close all doors windows and other outside openings of the room to improve the working effect Please...

Page 4: ...fier under dripping objects Memory function is included in this dehumidifier When nobody is taking care of the unit please turn it off and remove the power plug or disconnect power Do not repair or di...

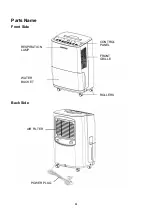
Page 5: ...4 Parts Name Front Side Back Side CONTROL PANEL FRONT GRILLE ROLLERS RESPIRATION LAMP WATER BUCKET AIR FILTER POWER PLUG...

Page 6: ...5 Tilt the dehumidifier no more than 45 Aim the shaft of castor at the installation hole on chassis and then forcibly push the castor upward to let the locating ring on the shaft of castor stick toget...

Page 7: ...sides of the water bucket and pul lit out following the arrow direction 2 Check whether float in the water bucket is properly placed It might have been moved a little after long time transportation I...

Page 8: ...ltaneously Basic Functions of the Buttons POWER Button Press this button to turn on off dehumidifier Button Under free drying mode press these buttons to adjust set humidity Invalid under other modes...

Page 9: ...Pressing or button each time will increase or decrease the time by 0 5h or 1h When figure varies within 10h pressing button will increase decrease the time by 0 5h when figure varies from 10h to 24h p...

Page 10: ...ry Function If power is lost all of the control settings are remembered So when power is restored the unit will start back up in the settings it was in when power was lost 4 Bucket full light This ind...

Page 11: ...be drained out through it instead of into the bucket 1 Hold the handles on both sides of the water bucket and pull it out following the arrow direction Attention Pull out the bucket carefully in case...

Page 12: ...reinstall the gasket on the drainage joint if it dropped Otherwise there will be water leakage phenomenon 2 Open the drainage cover and then install the drainage joint on the drainage outlet tightly a...

Page 13: ...n and then cover the hole with a lid Note that drain hose should not be pressed otherwise water can not be drained out Note When you don t use the drainage pipe the drainage joint must be removed Othe...

Page 14: ...off When the case is very dirty greasy use mild detergent to clean it To clean the grille Use a dust catcher or brush 2 Water Brucket Every few weeks clean the bucket to prevent growth of mold mildew...

Page 15: ...ith fire or electric hair dryer Otherwise the air filter may be unshaped or caught on fire Don t use dust catcher or brush to clean the air filter Otherwise the air filter may be destroyed Check Befor...

Page 16: ...e is from 5 to 15 C it will start to defrost automatically Compressor will stop for a brief period of time fan will operate in high fan speed When unit finishes defrosting it will be back to normal op...

Page 17: ...t can function normally but it can not start up Humidity is set too high If you want the air drier press button to lower the figure or press CO button for unit to dehumidify continuously Dehumidifier...

Page 18: ...re level Sound power level 54 56 58 dB A Weight 15 0 kg Tank capacity 3 6 liters Dehumidification is the value measured during continuous operation of the dehumidifier in the room at 30 C and 80 relat...

Page 19: ...CONCERNING USED REFRIGERANT MEDIUM This unit is containing fluorinated gases included in the Kyoto protocol The maintanance and the liquidation must be carried out by qualified personel Type of refrig...

Reviews: