7.1.
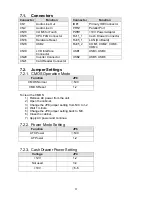
Connectors
Connector
Function
Connector
Function
CN1
Audio Line Out
IDE1
Primary IDE Connector
CN2
Audio Line In
PRN1
Parallel Port
CN13
COM5 for Touch
PWR1
+19V Power Adapter
CN15
CPU FAN Connector
RJ11_1
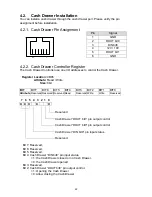
Cash Drawer Connector
CN16
Hardware Reset
RJ45_1
LAN (On Board)
CN18
USB2
RJ45_2
COM1, COM2, COM3,
COM4
CN19 LCD
Interface
Connector
USB1
USB3,
USB4
CN20
Inverter Connector
USB2
USB5, USB6
CN21
Card Reader Connector
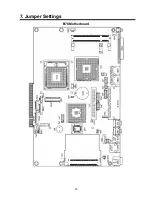
7.2.
Jumper Settings
7.2.1. CMOS Operation Mode
Function
JP8
CMOS Normal
◎
N/C
CMOS Reset
1-2
To clear the CMOS:
1) Remove AC power from the unit.
2) Open the cabinet.
3) Change the JP8 jumper setting from N/C to 1-2.
4) Wait 1 minute.
5) Change the JP8 jumper setting back to N/C.
6) Close the cabinet.
7) Apply AC power and continue.
7.2.2. Power Mode Setting
Function
JP6
ATX Power
◎
N/C
AT Power
1-2
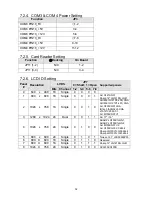
7.2.3. Cash Drawer Power Setting
Voltage
JP4
+12V 1-2
Not used
3-4
+19V
◎
5-6
31
Summary of Contents for POS3600 Series
Page 1: ...User Manual June 2008 Revision 1 2b Point of Sale Hardware System ...
Page 9: ...2 3 Rear View Rear I O 2 4 Bottom View Rubber Foot VESA mounting holes 9 ...
Page 12: ...e Click the Finish button and restart your system 12 ...
Page 20: ...c Click the OK button and restart your system 20 ...

