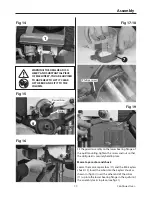


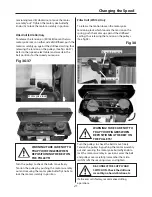


Changing the Speed
21
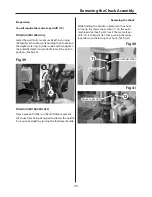
Pillar Drill (ED16SB) Only
Pillar Drill (WD13L) Only
tensioning lever (B) clockwise, to move the motor
assembly “out”. Tighten the motor yoke butterfly
knobs (A) to lock the motor assembly in position.
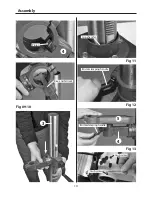
Fig 36-37
To release the tension on (ED16SB) loosen the two
motor yoke locks on either side of drilllhead, push the
motor assembly up against the drillhead casting, thus
releasing the tension on the pulleys, (See figs 36-37).
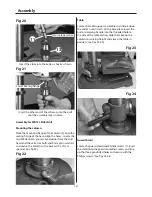
Refer to the (speed select table) and ascertain the
belt positions for the speed you require.
WARNING! TAKE CARE NOT TO
TRAP YOUR FINGERS WHEN
REPOSITIONING THE BELT ON
THE PULLEYS!
WARNING! TAKE CARE NOT TO
TRAP YOUR FINGERS WHEN
REPOSITIONING THE BELT ON
THE PULLEYS!
Turn the pulleys to check the belts move freely.
Tension the pulleys by pushing the motor assembly
out and securing the motor yoke butterfly knobs to
lock the motor assembly in position.
Turn the pulleys to check the belts move freely.
Tension the pulleys by pushing the motor assembly
out and securing the motor yoke butterfly knob to
lock the motor assembly in position. Lower the belt
and pulley cover carefully, (remember the micro
switch) refit the securing screw and tighten.
To release the tention loosen the motor yoke
tensioning lock which loosens the tension on the
spring, push the motor up against the drillhead
casting, thus releasing the tension on the pulleys,
(See fig 38).
Fig 38
Motor yoke lock
Motor yoke lock
Tensioning spring
RE-CONNECT THE SUPPLY AND
SWITCH ON. Check the drill runs
smoothly, no hard vibration etc.
If all seems satisfactory, recommence drilling
operations.
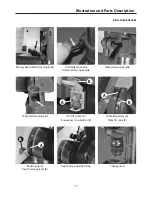
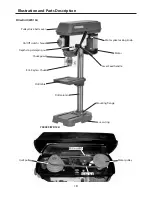
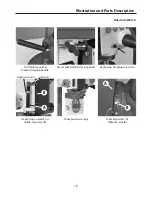
Summary of Contents for ED16B2
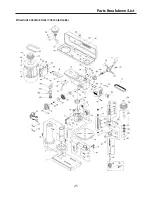
Page 25: ...Parts Breakdown List 25 Pillar Drills 505024 ED16F 700100 ED16B2 ...
Page 27: ...Parts Breakdown List 27 Pillar Drill 700101 ED16SB ...
Page 28: ...Parts Breakdown List 28 Pillar Drill 700101 ED16SB ...
Page 29: ...Parts Breakdown List 29 Pillar Drill 700099 WD13L ...
Page 30: ...Parts Breakdown List 30 Pillar Drill 700099 WD13L ...
Page 31: ...Notes 31 ...