SETTING UP THE SAW
24
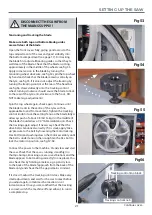
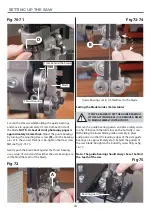
Fig 70-71
D
Thrust bearing
Blade
1mm behind the blade
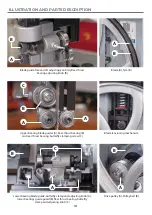
Loosen the Hex screw (A) holding the guide bearings
and move to approximately 0.5mm from each side of
the blade. NOTE: A sheet of A4 of photocopy paper is
approximately 0.5mm thick. Adjust the guide bearings
by turning the adjusting Hex screw (B), until the bearings
are set to the correct thickness. Re-tighten the Hex screw
(A), see fig 72-73-74.
Gently push the blade back against the thrust bearing,
use a scrap of wood and check that the side bearings are
still behind the teeth of the blade.
Fig 72
A
Fig 73-74
B
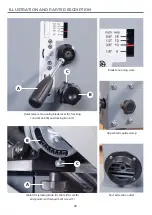
Guide bearings set to 0.5 thickness to the blade
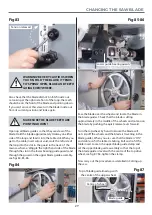
Setting the Blade Guides (below table)
Remove the guide bearing guards and place safely aside,
see fig 75. Beneath the table loosen the butterfly screw
(C) holding the lower blade guide assembly in place
and position so that the leading edges of the side guide
bearings are approximately 2mm behind the gullets of
the saw blade. Re-tighten the butterfly screw (C), see fig
76-77.
Note: The guide bearing should always be set behind
the teeth of the saw.
IT MAY BE EASIER TO SET THE GUIDE BEARINGS
IF THE CAST IRON TABLE (1) IS REMOVED, REFER
TO MAIN ASSEMBLY INSTRUCTIONS.
Fig 75
Bearing guard
Summary of Contents for 107659
Page 1: ...AP2552B Bandsaw Code 107659 AT 12 05 2022 BOOK VERSION 07 ...
Page 4: ...4 5 6 7 WHAT S INCLUDED 4 2 2 3 ...
Page 5: ...WHAT S INCLUDED 5 10 9 8 15 14 13 12 11 16 17 18 19 20 21 22 23 24 25 26 ...
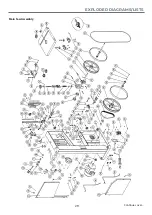
Page 29: ...EXPLODED DIAGRAMS LISTS 29 Continues over Main Saw Assembly ...
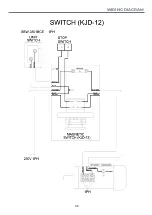
Page 35: ...WIRING DIAGRAM 35 ...

