background image

AXIS T8412 User’s Guide

Page 13

ENGL

IS

H

Power over Ethernet

AXIS T8412 delivers PoE to Axis network video products with PoE support, either from the unit's 
own battery, or from an extenal PoE source, via the bypass function. Tap this icon to turn on and off 
the unit’s own Power over Ethernet. 

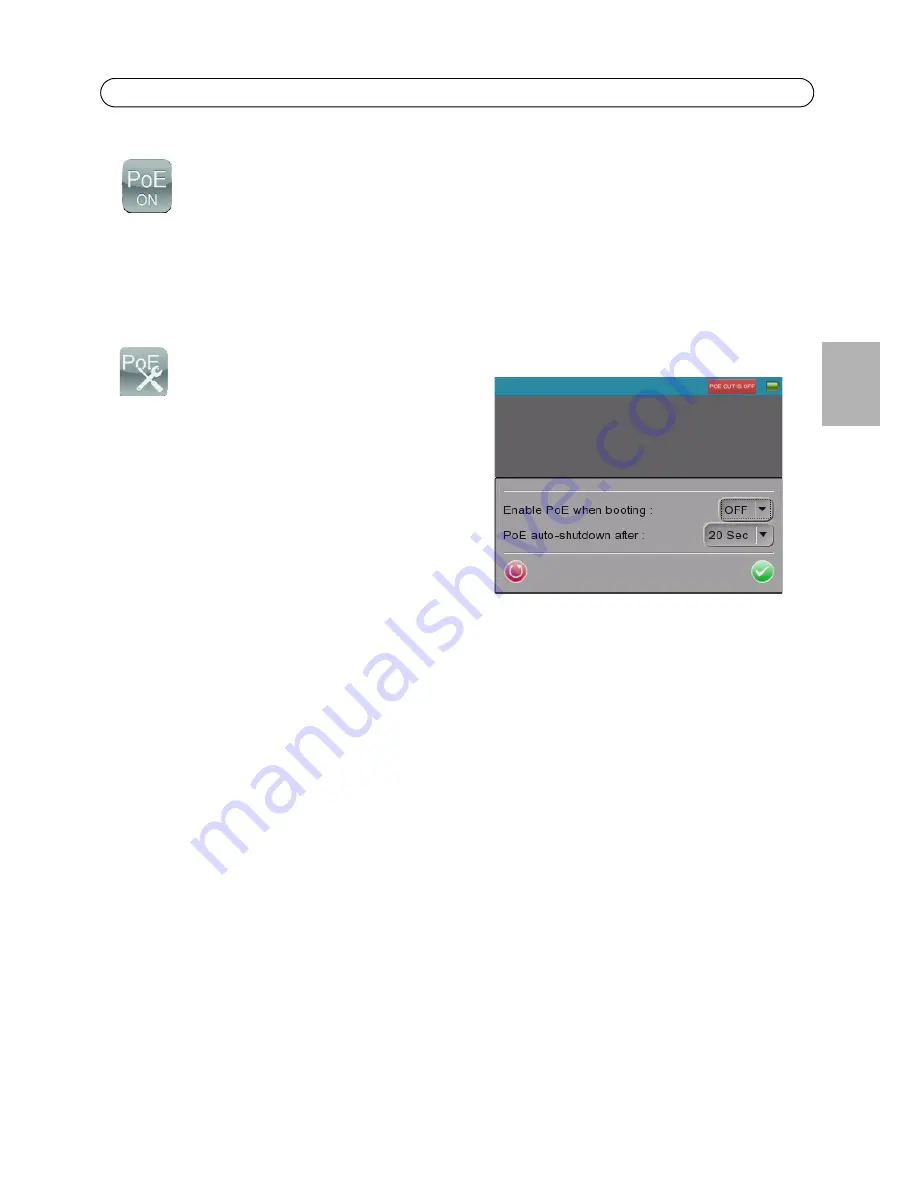
PoE Setup

To allow PoE out to start as soon the AXIS T8412 
itself is powered up, select 

ON

 from the drop-down 

list. To limit the amount of time that PoE will be 
enabled when there is no camera connected, select 
the number of seconds from the

 PoE auto-

shutdown after

 drop-down list.

Summary of Contents for T8412

Page 1: ...ENGLISH DEUTSCH ITALIANO ESPAÑOL User s Guide FRANÇAIS AXIS T8412 Installation Display ...

Page 2: ...ict accordance with the instructions given in the user documentation This equipment contains no user serviceable components Unauthorized equipment changes or modifications will invalidate all applicable regulatory certifications and approvals Liability Every care has been taken in the preparation of this document Please inform your local Axis office of any inaccuracies or omissions Axis Communicat...

Page 3: ...test page 12 AV in page 12 System setup page 17 Alternative connection methods page 18 Technical Specifications page 19 Package contents Item Models variants notes Installation Display AXIS T8412 Power supply with power cable 12 V DC Adapter Battery 7 4V Li ion Battery Pack 2200mAh Cables BNC Cable Network Cable Printed materials AXIS T8412 User s Guide this document Included accessories Soft carr...

Page 4: ...PoE to Axis network video products with PoE support either from the unit s battery or from PoE by pass This allows network cameras with PoE to be powered up and tested without extra tools or the need for electricity and network infrastructures at the installation site User friendly AXIS T8412 Installation Display has user friendly functions that simplify camera setup For example the touchscreen mo...

Page 5: ...on off LAN PoE OUT USB slot Stylus slot AV in Light sensor Data indicator LED LCD screen Navigation keys ESC key Start Enter Snapshot key Power indicator LED Charging LED DC12V POWER on off LAN PSE IN External power bank Micro SD slot CAT5 Cable tester port not included ...

Page 6: ...able test on page 12 for instructions on testing wiring type Power Adapter 12 V DC connector LED indicators Battery The AXIS T8412 is powered by a rechargeable Li ion battery pack that takes approximately 4 hours to charge and provides the AXIS T8412 with up to 3 hours run time To open the battery compartment cover press it while sliding it outward as shown in the figure below When installing the ...

Page 7: ...et the Power switch to the ON position 2 Press the Start key and hold for 3 seconds 3 The Power indicator lights and a progress bar is displayed on the screen 4 The Data Indicator blinks 5 The main menu will appear within 45 seconds Power switch Start key Data indicator Power indicator ...

Page 8: ...sed to move around in the image The letters PT Pan Tilt indicate that this is enabled The arrows and digits at the bottom of the screen indicate the current position Flip view Press and hold the Up and Down navigation keys to flip the view 180 degrees Press again to flip back again DC Iris cameras If the camera has a DC Iris this can be disabled for focusing by holding down the L and R navigation ...

Page 9: ...ator switch to switch to PT Pan Tilt mode PTZ cameras When connected to a mechanical PTZ camera the PTZ functions can be controlled by the following Tap the direction arrows on the screen to pan and tilt the view Press and hold the Up or Down navigation key for continuous optical zoom in or out Press and release the Up or Down navigation key for optical zoom in single steps in or out Tap ZOOM on t...

Page 10: ...n Function Main Menu Return go to previous page Enter opens a submenu or saves settings PoE indicator Battery status Connect to an Axis network camera View analog camera connected to AV IN connector CAT5 Network cable test PoE On Off PoE Setup Setup menu ...

Page 11: ... cameras in a local network or a single camera directly To connect to and find cameras on a local network connect a network cable to one of the LAN ports on AXIS T8412 Tap the Device Search icon to show the list of cameras found Tap the IP address of the target camera and enter its Username and Password if different from the default Tap the Enter icon the CONNECT button or the hardware Enter key T...

Page 12: ... the BNC cable from the camera s video output to the AXIS T8412 video input port Tap the AV In icon in the Main Menu and the video signal will be displayed on the LCD screen Press the ESC key to return to the menu To adjust the contrast in the image go to Setup Setup AV Network cable test Follow these steps to test a network cable for its type straight or cross and for errors open short or miswire...

Page 13: ...nal PoE source via the bypass function Tap this icon to turn on and off the unit s own Power over Ethernet PoE Setup To allow PoE out to start as soon the AXIS T8412 itself is powered up select ON from the drop down list To limit the amount of time that PoE will be enabled when there is no camera connected select the number of seconds from the PoE auto shutdown after drop down list ...

Page 14: ...CP is the default set ting and should be used in most situations even when there is no actual DHCP server available via a network The IP address is grayed out when set to DHCP To set a fixed address tap Set change the IP address and then tap the Enter icon Camera Profile this allows you to select different camera profiles for use in different situa tions Select the profile from the list Camera IP ...

Page 15: ...eady loaded but these can be replaced or added to as required It is also possible to create edit a script on a PC and then click the Import button to load it via a USB stick name the file script txt An example of script txt is shown below AXIS Color level axis cgi admin param cgi action update ImageSource I0 Sensor ColorLevel d INTEGER 50 Brightness axis cgi admin param cgi action update ImageSour...

Page 16: ...rightness sharpness and contrast Use the up or down keys on the AXIS T8412 front panel to move among the items or tap the icon on the right side of the value indicator To adjust the value press the left right keys on the front panel or tap the slider in the page Tap the Enter icon to save the settings Snapshot Function In the IP Camera viewing mode press the Snapshot key on the AXIS T8412 front pa...

Page 17: ...ap Save Delete Select the file to remove and tap the Delete icon Tap OK to complete the removal Select all To select all files for copying or deleting tap the Select all icon System Setup Tap the Setup System icon to enter the AXIS T8412 System setup page In this page you can adjust the brightness of the screen implement firmware upgrades and restore all settings of the AXIS T8412 to factory defau...

Page 18: ... complete installation of every component in the firmware If this option is not checked only the changes in the firmware will be upgraded Restore to Factory Defaults Restore the AXIS T8412 system to factory default by tapping the Default button Auto Shutdown To save power tap the drop down list to choose the amount of idle time before AXIS T8412 shuts down Alternative connection methods External p...

Page 19: ...er 300 charge cycles Charge time 3 5 Hrs Operation time 3 Hrs with PoE off 2 Hrs with PoE on Connectors BNC Video in RJ 45 10BASE T 100BASE TX PoE IEEE 802 3af CAT 5 USB 2 0 PoE Operating conditions 0 50 C 32 122 F Humidity 20 80 RH non condensing Local Storage SD SDHC memory card slot card not included Approvals USA FCC Class A Europe CE Class A Dimensions HxWxD 170 x 99 x 38 mm 6 7 x 3 9 x 1 5 W...

Page 20: ...Page 20 AXIS T8412 User s Guide ...

Page 21: ......

Page 22: ...User s Guide Ver 1 1 AXIS T8412 June 2011 Axis Communications AB 2009 2011 Part No new number ...

Reviews: