Axion 16-3350 User Manual Download Page 9

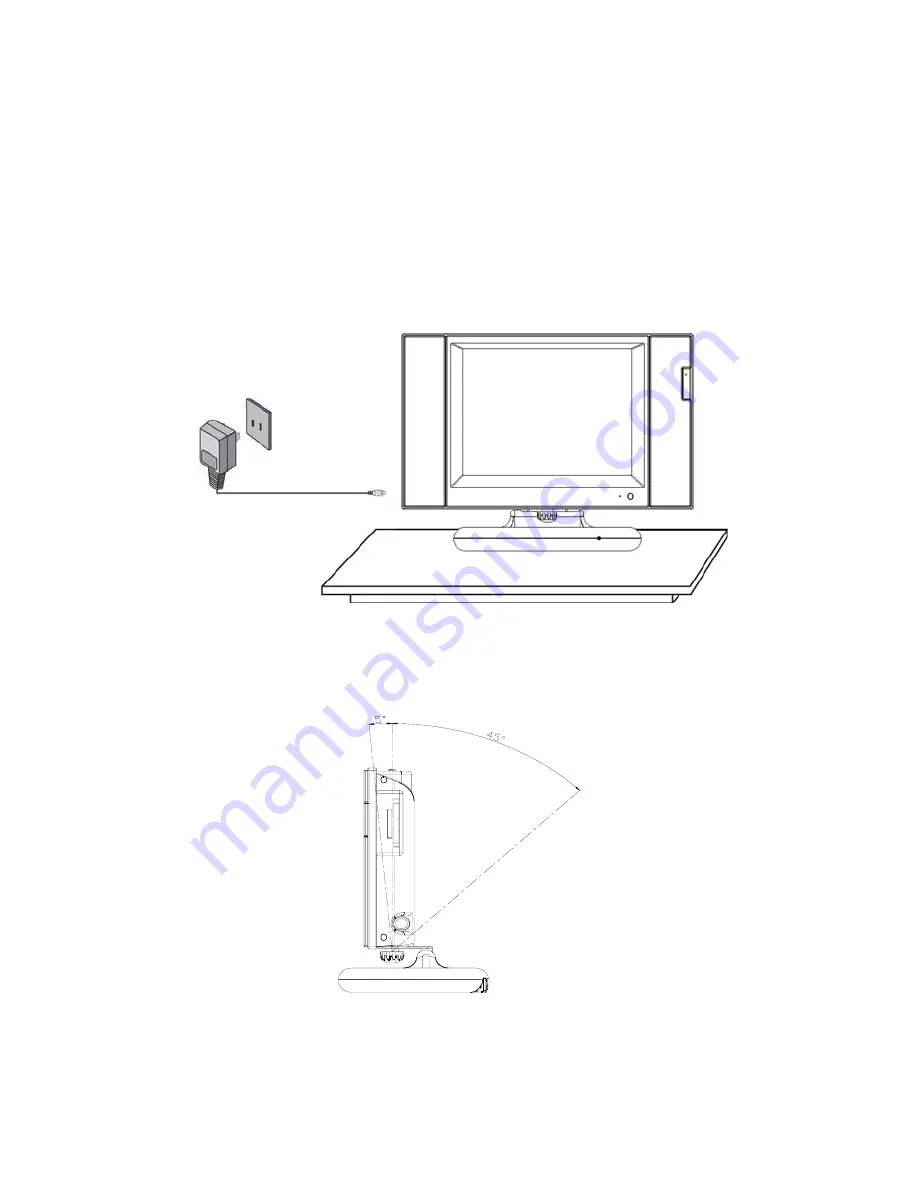
D. Indoor Installation 


Swing up the rear metal stand and place the unit on a 
table or other level surface. Plug one end of the AC/DC 
adapter into the 

12V DC IN

 on the right side of the main 

unit. Then, plug the other end into a standard AC wall 
outlet.. 


CAUTION

: Adjust the battery stand within –5

°


 +45

°


Summary of Contents for 16-3350

Page 1: ...8 TFT LCD TV with Card Reader Cat No 16 3350 User s Guide...

Page 2: ...kage Contents 8 D Indoor Installation 9 E Rechargeable Battery 10 F Controls Indicators Connectors 13 G Remote Controls 15 H Card Reader 19 I System Operation 22 J Watching TV 24 K Playing a Video Gam...

Page 3: ...e 3 Heed Warnings Adhere to all warnings on the product and in the operating instructions 4 Follow Instructions Follow all operating and user instructions 5 Cleaning Unplug this product from the wall...

Page 4: ...ng These openings must NOT be blocked or covered There should be at least 4 10cm of space from these openings The openings should never be blocked by placing the unit on a bed rug or other similar sur...

Page 5: ...ntenna system extreme care should be taken to keep from touching such power lines or circuits as contact with them could be fatal 17 Overload DO NOT overload wall outlets extension cords or integral c...

Page 6: ...ecks to determine that the product is in proper operating condition 21 CAUTION There is a danger of explosion if the battery is incorrectly replaced Replace only with the same or equivalent type 22 Im...

Page 7: ...FCC This Equipment has been tested and found to comply with the limits for a TV Broadcast Receiver pursuant to Part15 of the FCC Rules These limits are designed to provide reasonable protection agains...

Page 8: ...areas of excessive heat To ensure optimum picture quality do not position magnetic equipment nearby b Cable Equipment The audio video connection between components can be made with shielded video and...

Page 9: ...stand and place the unit on a table or other level surface Plug one end of the AC DC adapter into the 12V DC IN on the right side of the main unit Then plug the other end into a standard AC wall outle...

Page 10: ...use the battery for an extended period of time one week or longer we recommend that you first fully charge the battery and store it away properly For longer periods of storage please recharge the bat...

Page 11: ...ischarged immediately recharge regardless of whether you plan to use battery or not in order to maximize battery life 2 To charge the battery remove the adapter cable from the DC12V input jack on the...

Page 12: ...and store it properly if you are not planning to use the unit for a month or more During this period please recharge the battery at least once every two months to avoid irreparable damage to the batt...

Page 13: ...e 6 VOLUME Up Press to increase volume 7 PICture Select Press to adjust Contrast Brightness Color Tint Sharpness Language and Factory Reset 8 TV AV CARD Reader Switch Press to select TV AV or card rea...

Page 14: ...DC adapter 22 Left Speaker 23 Right Speaker 24 TV Stand 25 CF Card Slot Insert CF card here 26 SD Card Slot Insert SD card here 27 TV Antenna Jack Connects external antenna or CATV cable 28 Battery C...

Page 15: ...y sliding the cover back up until it snaps into place Remote Control Buttons 1 CARD TV AUX Switch 2 POWER On Off Switch TV 15 3 0 9 Buttons 4 TV CATV Switch 5 MUTE 6 PICTURE Button 7 VOLume Up Down 8...

Page 16: ...ch time you press this button the on screen picture adjustment will display the adjustment bars for Contrast Brightness Color Tint Sharpness Language and Factory Reset Once the desired adjustment bar...

Page 17: ...ove cursor Left Right Up Down during setting card reader Press ENTER to confirm settings and choose directory or pictures 16 ROTATE Press to rotate image 0 90 180 270 degrees 17 INFO Displays folder i...

Page 18: ...are in thumbnail preview mode use this button to quickly switch to previous pages 26 MODE Changes between the 3 different modes as follows 1st Preview Mode Thumbnail preview showing 9 images Use arrow...

Page 19: ...3 Press MODE to enter preview mode 4 Press SLIDE to enter slide show mode C Setup 1 Press SETUP to enter setup mode 2 Press cUp dDown to change selection 3 Press ENTER to choose the desired function o...

Page 20: ...andard enlargement is 1x e Zoom does not support AVI format 4 Rotate a Image Rotation 0 90 180 270 degrees b Press ROTATE to rotate a single image clockwise by 90 degrees at the time c Rotate does not...

Page 21: ...c arrow to go one level up Use the ef arrows to choose different folders e When in folder view select folder view again to return to the main screen 2 Select File Type Change between displaying eithe...

Page 22: ...een picture adjustment display cycles through adjustment bars for CONTRAST BRIGHTNESS COLOR TINT SHARPNESS LANGUAGE and FACTORY PRESET Then use VOLUME to raise or lower the level This display will aut...

Page 23: ...ow 3 9 3 x 3 thumbnails appear on the monitor Use the e f keys to switch picture as illustrated below 4 Press ENTER to zoom out 5 Press MODE to change picture mode 6 In card mode press TV AV CARD to s...

Page 24: ...cable access 3 Press AUTO MEMORY to search and tune all channels in TV or CATV mode The channels with signals detected are automatically stored 4 Use SKIP SEARCH to select between SKIP and SEARCH mod...

Page 25: ...yellow white AUDIO L to white and red AUDIO R to red Select the AV mode and adjust the volume and picture controls L Using Headphones Optional wired Hi Fi headphones may be used with the system Simply...

Page 26: ...ze 8 inches Remote Control Infrared rays Antenna Ext antenna Channels VHF Low 2 6 VHF High 7 13 UHF 14 69 CATV 1 125 Audio output 2 Watts Power Input DC 12 V 2 5A AC Power Source AC 110V 240V 50 60Hz...

Reviews: